1. Introduzzjoni
Thank you for choosing the Aigostar Retro Desk LampDan il-manwal jipprovdi informazzjoni essenzjali għall-użu sikur u effiċjenti tal-magna l-ġdida tiegħek.ampJekk jogħġbok aqra dawn l-istruzzjonijiet bir-reqqa qabel l-assemblaġġ u t-tħaddim, u żommhom għal referenza futura.

Figure 1: Aigostar Retro Desk Lamp fl-użu.
2. Kontenut tal-Pakkett
Ensure all components are present and undamaged before proceeding with assembly. If any parts are missing or damaged, please contact customer support.
- Lamp Bażi
- Adjustable Wooden Arm Assembly
- Lamp Shade with E27 Socket
- Power Cord with On/Off Switch
- Manwal għall-Utent
Nota: Il-bozza tad-dawl mhijiex inkluża u trid tinxtara separatament.
3. Istruzzjonijiet ta' Setup
The Aigostar Retro Desk Lamp is designed for tool-free setup. Follow these steps to assemble your lamp:
- Ħoll il-Komponenti: Neħħi b'attenzjoni l-partijiet kollha mill-imballaġġ.
- Poġġi l-Bażi: Poġġi l-lamp bażi fuq wiċċ stabbli u ċatt.
- Attach Arm Assembly: The wooden arm assembly is pre-attached to the base and lamp head. Ensure all joints are securely tightened.
- Installa Bozza: Screw an E27 base bulb (maximum 40W) into the lamp sokit. Tissikkax iżżejjed.
- Qabbad l-Enerġija: Ipplaggja l-korda tad-dawl fi żbokk elettriku adattat.

Figure 2: Tool-free setup for quick assembly.
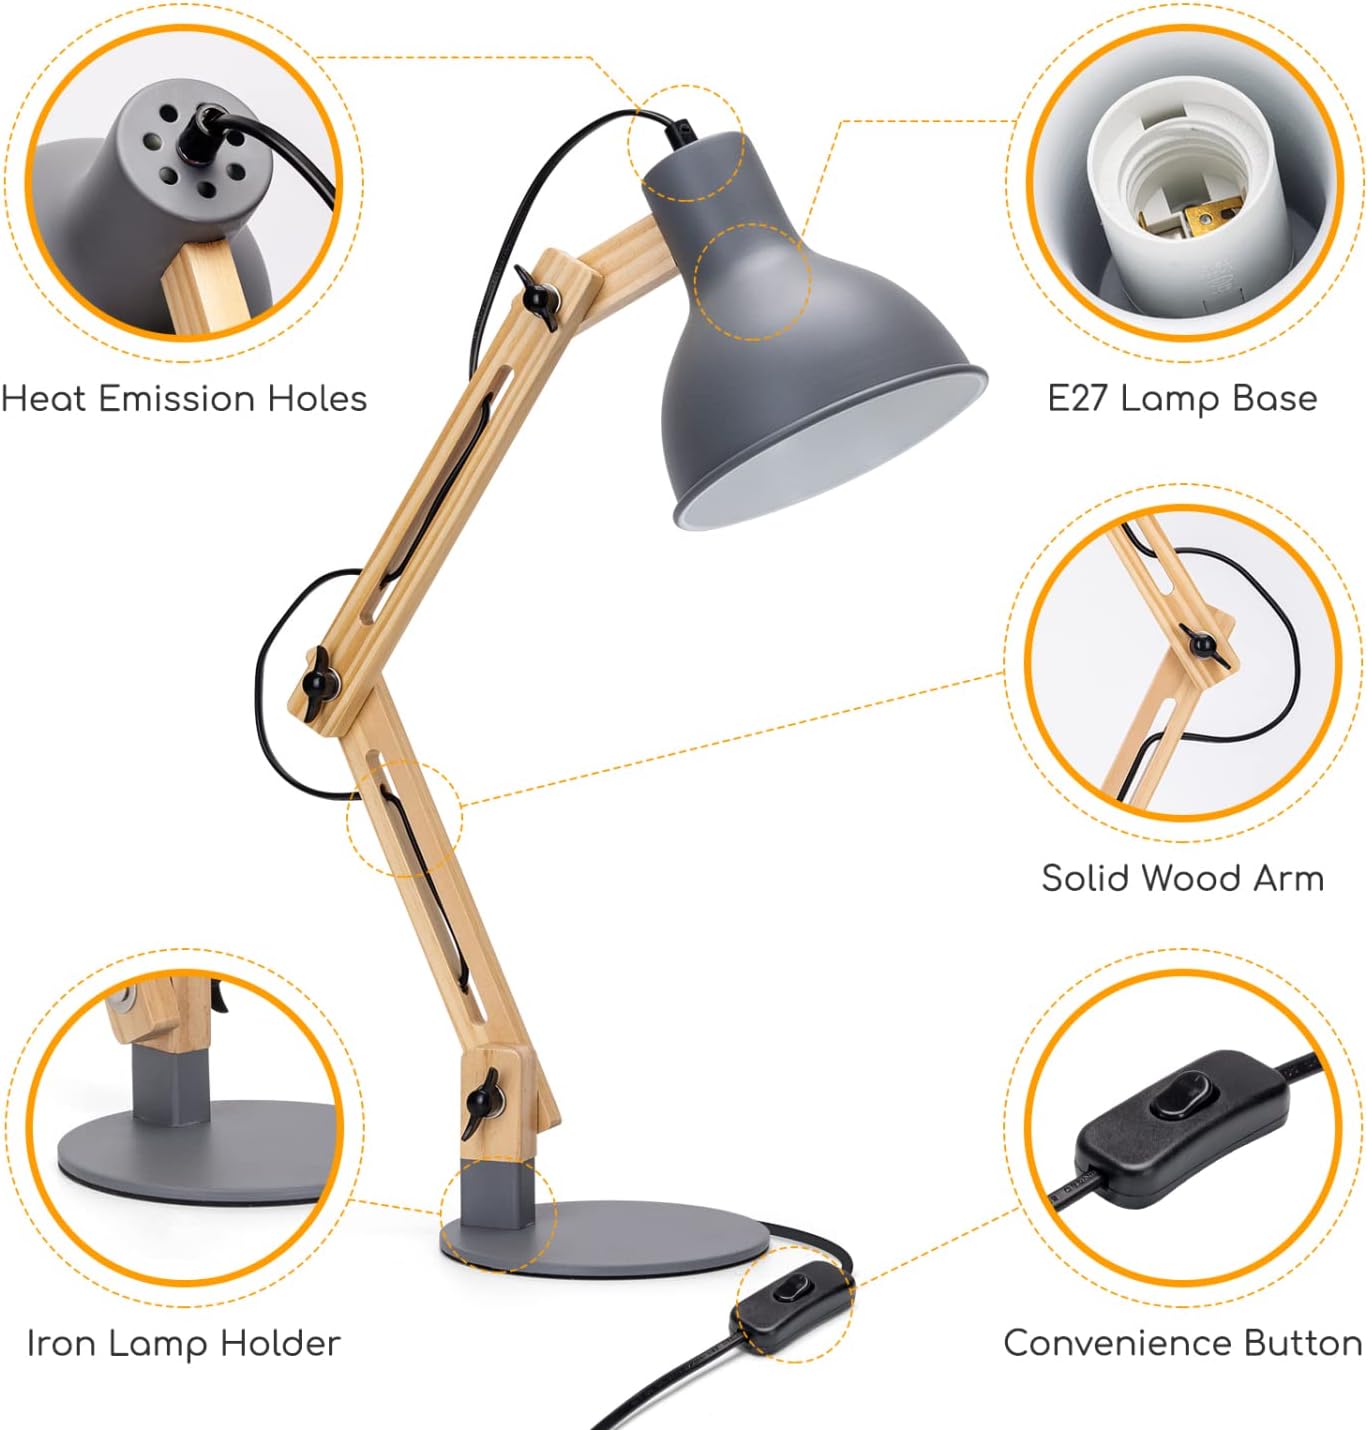
Figura 3: Aktarview ta' lamp komponenti.

Figura 4: Lamp dimensions and bulb specifications.
4. Istruzzjonijiet Operattivi
Your Aigostar Retro Desk Lamp is designed for ease of use and flexibility.
4.1 Tixgħel/Jitfi
Locate the convenience button (switch) on the power cord. Press the switch to turn the lamp mixgħul jew mitfi.
4.2 Aġġustament tal-Lamp Driegħ
Il-lamp features a swivel hinge arm and multiple adjustable joints, allowing you to direct light precisely where needed. Gently loosen the wing nuts at the joints, adjust the arm to your desired position, and then tighten the wing nuts to secure it.
- Il-lamp head can rotate up to 210 degrees.
- The upper arm can adjust by 60 degrees.
- The lower arm can adjust by 15 degrees.

Figure 5: Demonstrating the adjustable design of the lamp.

Figure 6: Specific adjustment angles for optimal light positioning.
5. Manutenzjoni
5.1 Tindif
Biex tnaddaf il-lamp, ensure it is unplugged from the power outlet. Use a soft, dry cloth to wipe down the surfaces. Do not use abrasive cleaners or solvents, as these may damage the finish.
5.2 Sostituzzjoni tal-Bozza
Before replacing the bulb, always unplug the lamp and allow the old bulb to cool completely. Unscrew the old E27 bulb and screw in a new E27 bulb, ensuring it does not exceed 40W. Refer to Figure 4 for bulb specifications.
6 Issolvi l-problemi
- Lamp ma jixgħelx:
- Check if the power cord is securely plugged into the wall outlet.
- Ensure the bulb is correctly screwed into the socket and is not burnt out.
- Verify that the on/off switch on the power cord is in the 'on' position.
- Teptip tad-dawl:
- Issikka l-bozza fis-sokit.
- Ipprova bozza differenti biex teskludi jekk hix bozza difettuża.
- Lamp arm is loose:
- Tighten the wing nuts at the adjustable joints to secure the arm in place.
7. Speċifikazzjonijiet
| Karatteristika | Speċifikazzjoni |
|---|---|
| Numru tal-Mudell | 218188 |
| Dimensjonijiet tal-Prodott (P x W x H) | 16D x 16W x 45.5H ċm |
| Piż tal-oġġett | 1.38 Kilogrammi |
| Kulur | Griż |
| Materjal Bażi | Injam |
| Lampdell Materjal | Ħadid |
| Lamp Sokit | E27 |
| Max Wattage | 40.00 W |
| Tip ta' Swiċċ | Touch (Inline Switch) |
| Karatteristiċi Speċjali | Driegħ aġġustabbli |
| Sors tal-Enerġija | Corded Elettriku |
| Użu fuq ġewwa/barra | Ġewwa |
| Pajjiż ta' Oriġini | Iċ-Ċina |
8. Garanzija u Appoġġ
For warranty information or technical support, please refer to the documentation provided with your purchase or contact Aigostar customer service directly. Keep your purchase receipt as proof of purchase.


