1. Prekawzjonijiet tas-Sigurtà
To ensure safe operation and prevent damage to the device or injury, please read and adhere to the following safety guidelines:
- Always ensure the power switch is in the 'OFF' position before plugging in or unplugging the sharpener.
- Do not immerse the electric knife sharpener in water or any other liquid. Clean only with a damp drapp.
- Żomm l-apparat fejn ma jintlaħaqx mit-tfal u l-annimali domestiċi.
- Place the sharpener on a stable, non-slip surface during use to prevent accidental movement.
- Avoid applying excessive pressure when sharpening, as this may cause the diamond wheels to jam or damage the blade.
- Never interrupt or stop the motion of the blade while it is in contact with the abrasive wheel.
- This sharpener is designed for metal knives. It is not recommended for ceramic knives, serrated knives, or scissors.
- Unplug the sharpener from the power outlet when not in use or before cleaning and maintenance.
- Jekk il-korda tal-enerġija tkun bil-ħsara, għandha tiġi sostitwita mill-manifattur, mill-aġent tas-servizz tiegħu, jew minn persuni kwalifikati bl-istess mod biex jiġi evitat periklu.
2. Prodott Aktarview
The BEPER P102ACP010 Electric Knife Sharpener is designed to restore and maintain the sharpness of your metal knives with ease and efficiency. It features two distinct sharpening stages and durable diamond discs.

Immaġni: Quddiem view of the BEPER P102ACP010 Electric Knife Sharpener.
Karatteristiċi ewlenin:
- 40W Qawwa: Provides efficient and consistent sharpening.
- Diamond Discs: Ensures durability and precise sharpening for various metal blades.
- Two Sharpening Stages: Includes a coarse stage for dull blades and a fine stage for polishing and daily maintenance.
- Bażi li ma jiżloqx: Enhances stability during operation for safer use.
- Magnetic Debris Compartment: Collects metal shavings, keeping your workspace clean and simplifying maintenance.

Immaġni: Fuq view of the sharpener, highlighting the two sharpening stages.
3. Setup
- Ippakkja: Carefully remove the sharpener from its packaging. Retain the packaging for future storage or transport.
- Pjazzament: Place the sharpener on a clean, dry, and stable surface. The non-slip base ensures the device remains secure during use.
- Konnessjoni tal-Enerġija: Ensure the power switch is in the 'OFF' position. Plug the power cord into a suitable electrical outlet.
4. Istruzzjonijiet Operattivi
Follow these steps to effectively sharpen your knives:
- Prepare the Knife: Kun żgur li x-xafra tas-sikkina tkun nadifa u niexfa qabel ma ssannha.
- Activate the Sharpener: Turn the power switch to the 'ON' position. The sharpening wheels will begin to rotate.
- Select Sharpening Stage:
- Stage 1 (Oħxon): Use this slot for very dull or damaged blades to restore the initial edge.
- Stage 2 (Fine): Use this slot for daily sharpening, refining the edge after coarse sharpening, or for polishing already sharp blades.
- Sharpening Technique:
- Hold the knife with one hand, ensuring your fingers are away from the sharpening slots.
- Insert the knife blade into the chosen slot, holding it perpendicular to the sharpener.
- Pull the knife slowly and steadily towards you, from the heel to the tip of the blade, applying light, even downward pressure. Do not push the knife back and forth.
- Repeat this motion 3-5 times for each side of the blade, or until the desired sharpness is achieved.
- Temm: After sharpening, turn off the power switch and carefully remove the knife. Wipe the blade with a clean cloth to remove any metal residue.
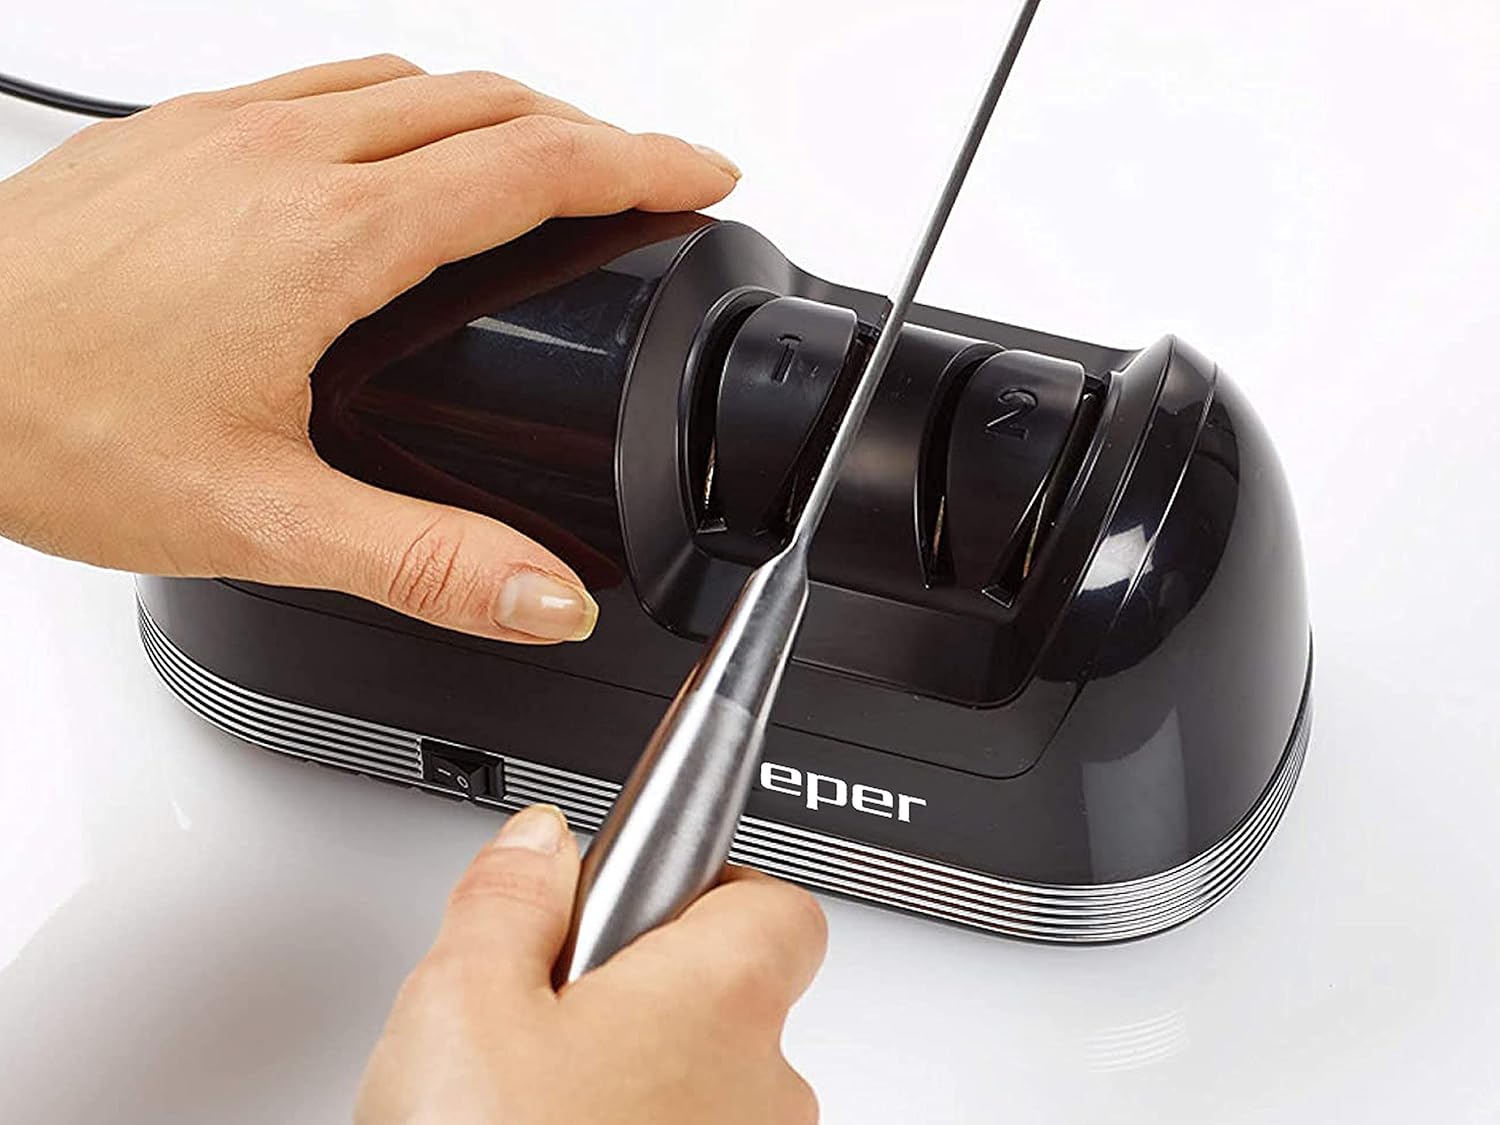
Image: Demonstrating the correct technique for sharpening a knife.
Noti Importanti:
- Always pull the knife in one direction (towards you) through the slots. Never move it back and forth.
- Do not apply excessive force, as this can damage the blade or the sharpener.
- For best results, alternate between the left and right sides of the blade to ensure an even edge.
5. Manutenzjoni
Regular maintenance ensures the longevity and optimal performance of your sharpener.
- Tindif ta' barra: After each use, unplug the sharpener. Wipe the exterior with a soft, damp drapp. Tużax tindif jew solventi li joborxu.
- Emptying the Debris Compartment: The sharpener features a magnetic compartment at the base to collect metal shavings. Regularly slide out this compartment and empty the accumulated debris. This prevents buildup and ensures efficient operation.

Image: Magnetic compartment for collecting sharpening debris.
6 Issolvi l-problemi
If you encounter any issues with your BEPER P102ACP010 Electric Knife Sharpener, refer to the following common troubleshooting tips:
- Sharpener does not turn on:
- Check if the power cord is securely plugged into both the sharpener and the electrical outlet.
- Kun żgur li s-swiċċ tal-enerġija jkun fil-pożizzjoni 'ON'.
- Verify that the electrical outlet is functioning correctly by testing it with another appliance.
- Is-skieken mhumiex qed jissann sew:
- Ensure you are using the correct sharpening stage for the knife's condition (Stage 1 for dull/damaged, Stage 2 for fine tuning).
- Confirm that you are pulling the knife through the slots with light, consistent pressure and in one direction only.
- Check the debris compartment; if it's full, empty it to ensure proper wheel function.
- If the knife is ceramic or serrated, this sharpener is not suitable for it.
- Ħoss jew vibrazzjoni mhux tas-soltu:
- Turn off and unplug the sharpener. Inspect the sharpening slots for any obstructions or debris.
- Kun żgur li l-sharpener jitqiegħed fuq wiċċ ċatt u stabbli.
If the issue persists after attempting these steps, please contact BEPER customer support for further assistance.
7. Speċifikazzjonijiet
| Karatteristika | Speċifikazzjoni |
|---|---|
| Numru tal-Mudell | P102ACP010 |
| Brand | BEPER |
| Qawwa | 40W |
| Sann Stages | 2 (Coarse, Fine) |
| Sharpening Material | Diamond Discs |
| Bażi | Li ma jiżloqx |
| Ġbir ta' Debris | Magnetic Compartment |
| Kulur | Iswed |
| Dimensjonijiet tal-Prodott | 23.5 x 13 x 13.5 ċm |
| Piż tal-Prodott | 1.07 kg |

Immaġni: Dijagramma tad-dimensjonijiet tal-prodott.
8. Garanzija u Appoġġ
For warranty information, product support, or service inquiries, please refer to the warranty card included with your purchase or contact BEPER customer service directly. Keep your proof of purchase for any warranty claims.
You can find contact details on the official BEPER websit jew permezz tal-bejjiegħ bl-imnut tiegħek.


