1. Introduzzjoni
Thank you for choosing the UGEARS Aero Clock 3D Wooden Puzzle. This mechanical model kit allows you to construct a fully functional wall clock with a pendulum. This manual provides essential information for assembly, operation, and maintenance to ensure a rewarding building experience and proper functioning of your clock.
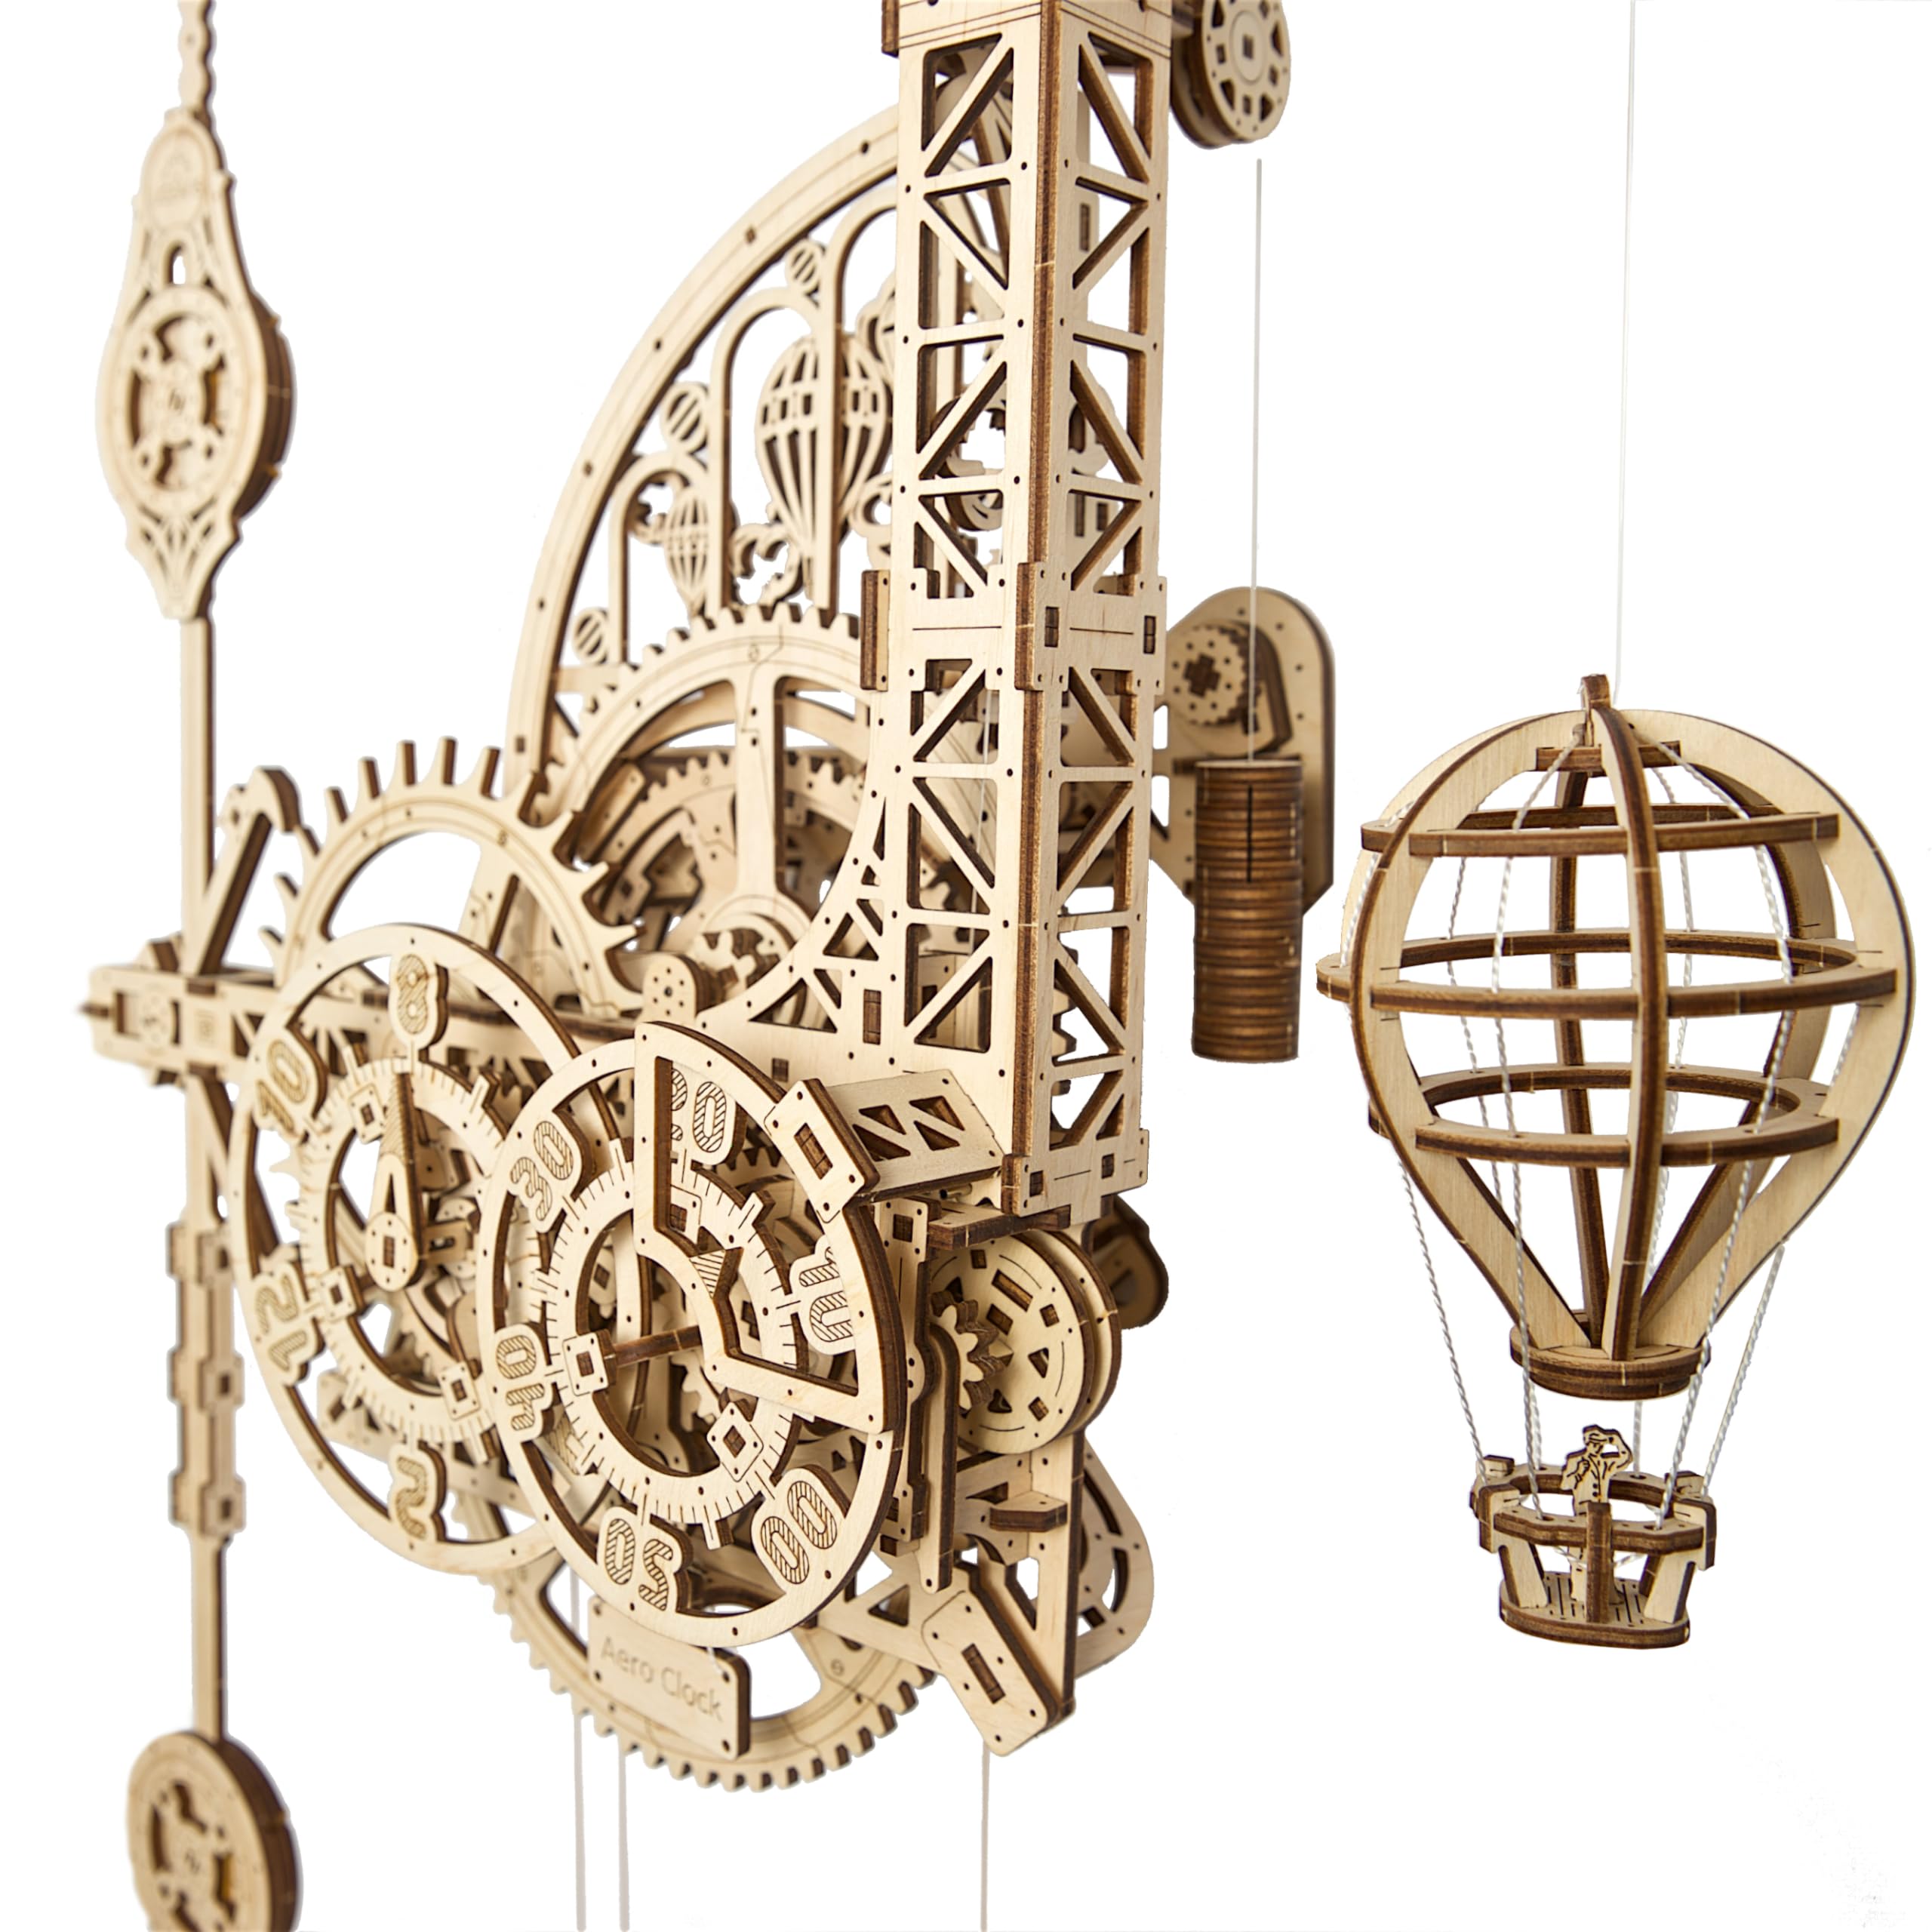
The UGEARS Aero Clock, a functional wooden wall clock with a pendulum.

The product packaging for the UGEARS Aero Clock kit.
2. Informazzjoni dwar is-Sigurtà
WARNING: CHOKING HAZARD - Small Parts. Not for children under 14 years old.
- Keep all parts out of reach of small children and pets.
- Exercise caution when detaching parts from the wooden sheets to avoid breakage or injury.
- Some edges may be sharp; handle with care.
- Do not ingest any parts or materials.
- Segwi l-istruzzjonijiet kollha tal-assemblaġġ bir-reqqa.
3. Kontenut tal-Pakkett
Before beginning assembly, verify that all components are present and undamaged. The kit includes:
- Laser-cut wooden plywood sheets with model parts.
- Detailed assembly instructions in multiple languages.
- Waxed cord.
- Nylon thread.
- Metal axles.
- Sandpaper.
- Candle wax.
- Fabric bag (for counterweight).

All components included in the UGEARS Aero Clock kit.
4. Istruzzjonijiet tal-Assemblea
Assembly requires patience and attention to detail. No glue or special tools are required, as all parts interlock precisely.
4.1. Preparazzjoni
- Aqra l-Istruzzjonijiet: B'attenzjoni mill-ġdidview il-manwal tal-istruzzjonijiet kollu qabel tibda.
- Organizza Partijiet: Gently remove parts from the wooden sheets. Use the provided sandpaper to smooth any rough edges or burrs.
- Lubrikazzjoni: Apply candle wax to all moving gears, axles, and connection points as indicated in the instructions. Proper lubrication is crucial for smooth operation.

Careful assembly of the clock's internal mechanisms.
4.2. Assemblea Pass Pass
Follow the illustrated instructions provided in your kit. Pay close attention to the orientation of parts and the order of assembly. The process typically involves:
- Constructing the main frame and gear system.
- Assembling the time-telling discs and indicator.
- Building the pendulum and escapement mechanism.
- Integrating the hot air balloon 'cuckoo' mechanism.
- Attaching the counterweight system.

Detailed work on the clock's gear assembly.
For additional guidance, you may visit the official UGEARS website for this model: UGEARS Aero Clock Product Page
5. Istruzzjonijiet Operattivi
The Aero Clock is a gravity-powered mechanical clock. Its operation relies on the descent of a weighted bag.
5.1. Immuntar tal-Arloġġ
Mount the assembled clock securely on a sturdy wall using appropriate hardware (not included). Ensure it is level to allow the pendulum to swing freely.

The Aero Clock displayed on a wall, ready for operation.
5.2. Winding and Setting the Time
- Fill the Weight Bag: Fill the provided fabric bag with approximately 2 kg of sand or other suitable weight material.
- Attach Weight: Connect the filled weight bag to the clock's winding mechanism using the provided cord.
- Wind the Clock: Lift the weight bag to its highest position. This action winds the clock.
- Issettja l-Ħin: Manually rotate the time-telling discs to set the current hour and minute. The hour hand is fixed, and the discs rotate counter-clockwise.
- Start the Pendulum: Gently push the pendulum to start its swing.

Detail of the clock's face and the hot air balloon indicator.
5.3. Time Indication
The clock indicates time using rotating discs. The hot air balloon mechanism acts as a 'cuckoo', descending on the hour and slowly rising over the next 60 minutes.
6. Manutenzjoni
- Regular Lubrication: Periodically reapply wax to moving parts, especially gears and axles, to ensure smooth operation and prevent wear.
- Tneħħija tat-Trab: Use a soft brush or compressed air to gently remove dust from the mechanisms. Avoid using liquids.
- Iċċekkja l-Konnessjonijiet: Ensure all interlocking parts remain securely fitted. Loose connections can affect accuracy.
- Kundizzjonijiet Ambjentali: Keep the clock in a stable environment, away from extreme temperature changes or high humidity, which can affect the wood.
7 Issolvi l-problemi
7.1. Clock Stops or Runs Inaccurately
- Insufficient Lubrication: Ensure all indicated moving parts are adequately waxed.
- Frizzjoni: Check for any parts rubbing against each other or the frame. Smooth any rough spots with sandpaper.
- Pendulum Swing: Verify the pendulum swings freely without obstruction. Ensure the clock is mounted level.
- Piż: Confirm the counterweight bag is filled to the recommended 2 kg.
- Konnessjonijiet sfużi: Inspect all assembled parts for any looseness. Re-secure if necessary.
- Perjodu ta' Break-in: New mechanical models often require a 'break-in' period. The clock's accuracy may improve with continued use.
7.2. Parts Break During Assembly
- Immaniġġjar delikat: Wooden parts, especially small ones, can be fragile. Always detach them carefully.
- Partijiet ta 'sostituzzjoni: If a critical part breaks, contact UGEARS customer support for assistance.
8. Speċifikazzjonijiet
| Numru tal-Mudell | 70154 |
| Brand | UGEARS |
| Materjal | Injam |
| Numru ta' Partijiet | 320 |
| Dimensjonijiet Immuntati (madwar) | 75 x 47 x 0.25 cm (Length x Width x Thickness of main board) |
| Età Rakkomandata | 14+ snin |
| Ħin tal-Assemblaġġ (madwar) | 11 sigħat |
| Għan Edukattiv | Motor Skills, Shape Recognition |

Approximate dimensions of the assembled Aero Clock.
9. Garanzija u Appoġġ
UGEARS products are designed for quality and precision. If you encounter any issues with your kit, such as missing or defective parts, please contact UGEARS customer support.
For support and further information, please visit the official UGEARS websit: UGEARS Official Store

UGEARS Mechanical Models


