1. Introduzzjoni
This manual provides essential information for the safe and effective operation, maintenance, and troubleshooting of your Crown CT11023 Multi-function Plunge Router. Please read this manual thoroughly before using the tool to ensure proper handling and to prevent injury or damage.
1.1 Informazzjoni dwar is-Sigurtà
Always observe general power tool safety guidelines. Failure to follow these instructions may result in electric shock, fire, and/or serious injury.
- Sigurtà taż-Żona tax-Xogħol: Żomm iż-żona tax-xogħol nadifa u mdawwal sew. Żoni imbarazz jew mudlama jistiednu inċidenti.
- Sigurtà Elettrika: Do not expose power tools to rain or wet conditions. Avoid body contact with earthed or grounded surfaces.
- Sigurtà Personali: Always wear eye protection, hearing protection, and a dust mask. Dress properly; avoid loose clothing or jewelry.
- Użu u Kura tal-Għodda: Tisforzax l-għodda tal-enerġija. Uża l-għodda tal-enerġija korretta għall-applikazzjoni tiegħek. Skonnettja l-plagg mis-sors tal-enerġija qabel ma tagħmel xi aġġustamenti, tibdel l-aċċessorji, jew taħżen l-għodda tal-enerġija.
1.2 Użu Intenzjonat
The Crown CT11023 Multi-function Plunge Router is designed for routing wood, plastic, and similar materials. It is suitable for creating decorative edges, grooves, dados, and other woodworking joints. This tool is intended for domestic and light professional use.
2. Prodott Aktarview
Familiarize yourself with the components of your Crown CT11023 Plunge Router before operation.
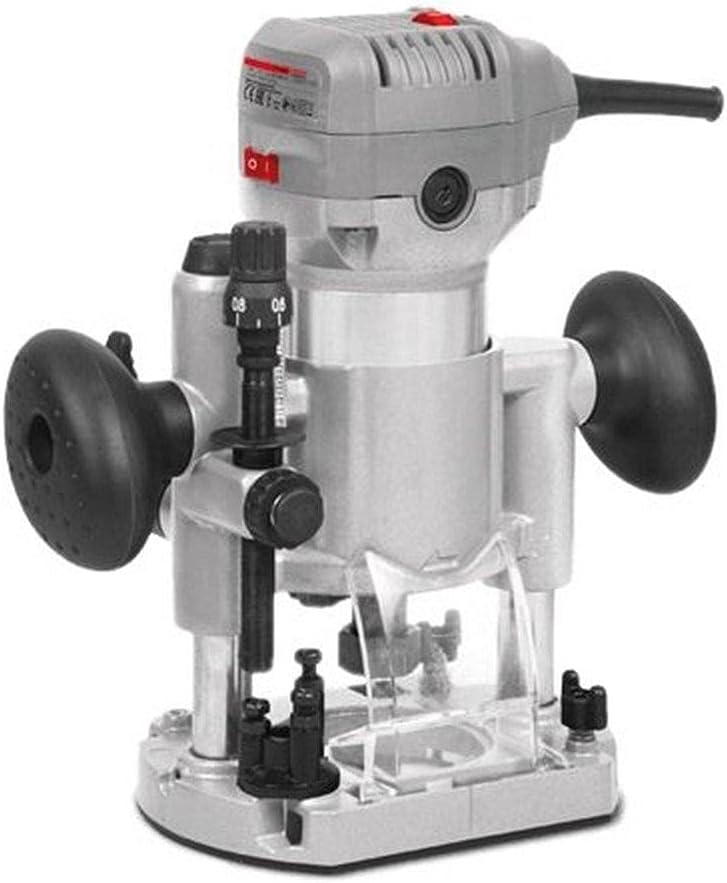
Figura 2.1: B'mod ġenerali view of the Crown CT11023 Multi-function Plunge Router. This image displays the main body, handles, depth adjustment mechanism, and power switch.
2.1 Komponenti Ewlenin
- Djar tal-Mutur: Contains the electric motor.
- Mankijiet: Ergonomic grips for control during operation.
- Swiċċ tal-Enerġija: On/Off control for the motor.
- Buttuna tal-Aġġustament tal-Fond: Used to precisely set the routing depth.
- Plunge Lock Lever: Secures the router at a desired depth.
- Ġewż tal-Collet: Secures the router bit in place.
- Pjanċa Bażi: Provides a stable surface for guiding the router over the workpiece.
- Port tal-Estrazzjoni tat-Trab: For connecting a dust collection system (if applicable).

Figura 2.2: Ġenb view of the Crown CT11023 Router, illustrating a fixed base attachment. This configuration is often used for edge routing or when a compact form factor is preferred.

Figura 2.3: Naħa oħra view of the Crown CT11023 Router, showing a different base configuration, potentially for trimming or specialized routing tasks. Note the black grip for enhanced control.
3. Setup
Installazzjoni ta' 3.1 Bit
- Kun żgur li r-router huwa skonnettjat mis-sors tal-enerġija.
- Press and hold the spindle lock button (if present) to prevent the spindle from rotating.
- Ħoll il-ġewż tal-kollett billi tuża l-wrench provdut.
- Insert the router bit into the collet, ensuring at least 3/4 of the shank is seated. Do not bottom out the bit.
- Tighten the collet nut firmly with the wrench. Do not overtighten.
- Itlaq il-lock tal-magħżel.
3.2 Aġġustament tal-Fond
- Kun żgur li r-router huwa skonnettjat.
- Place the router on a flat surface with the desired bit installed.
- Itlaq il-lieva tal-illokkjar tal-plunge.
- Lower the router until the bit touches the workpiece surface.
- Engage the plunge lock lever to hold the router at this zero depth.
- Adjust the depth adjustment knob or scale to the desired routing depth.
- Release the plunge lock lever before starting the router.
4. Joperaw
4.1 Tixgħel/Jitfi
- Biex Tixgħel: Ensure the router bit is clear of the workpiece. Press the power switch to the "ON" position. Allow the motor to reach full speed before contacting the workpiece.
- Biex Tintefa: Release the power switch or press it to the "OFF" position. Wait for the bit to stop completely before setting the tool down.
4.2 Tekniki ta' Rottaġġ
- Direzzjoni tal-Għalf: Always feed the router against the rotation of the bit. This provides better control and prevents the router from "climbing" over the workpiece.
- Shallow Cuts: For deeper cuts, make multiple shallow passes instead of one deep pass. This reduces strain on the motor and bit, and improves cut quality.
- Twaħħil tal-Biċċa tax-Xogħol: Dejjem clamp your workpiece securely to a stable surface.
- Prattika: Practice on scrap material before routing your final workpiece.
5. Manutenzjoni
Regular maintenance ensures the longevity and safe operation of your router.
5.1 Tindif
- Dejjem aqla l-għodda qabel tnaddaf.
- Use a soft brush or compressed air to remove dust and debris from the ventilation openings and around the collet area.
- Imsaħ il-barra bl-adamp drapp. Tużax kimiċi ħarxa jew solventi.
- Keep the base plate clean to ensure smooth gliding over the workpiece.
5.2 Ħażna
- Aħżen ir-router f'post niexef u sigur, fejn ma jintlaħaqx mit-tfal.
- Kun żgur li l-korda tal-enerġija tkun imkebba sew u mhux mgħawġa.
- Remove any router bits from the collet before storage.
6 Issolvi l-problemi
Din it-taqsima tindirizza kwistjonijiet komuni li tista' tiltaqa' magħhom bir-router tiegħek.
| Problema | Kawża Possibbli | Soluzzjoni |
|---|---|---|
| Ir-router ma jixgħelx. | Ebda provvista tal-enerġija; swiċċ difettuż; problema bil-mutur. | Check power connection. Ensure switch is "ON". If problem persists, consult qualified service personnel. |
| Poor cut quality (e.g., burning, rough edges). | Dull bit; incorrect feed rate; wrong bit for material; excessive depth of cut. | Replace or sharpen bit. Adjust feed rate. Use appropriate bit. Make multiple shallow passes. |
| Vibrazzjoni eċċessiva. | Bit maħlul; bit mgħawweġ; berings bil-ħsara. | Ensure bit is securely tightened. Replace bent bit. If bearings are suspected, seek professional service. |
7. Speċifikazzjonijiet
Technical data for the Crown CT11023 Multi-function Plunge Router.
| Karatteristika | Dettall |
|---|---|
| Numru tal-Mudell | CT11023 |
| Brand | Kuruna |
| Sors tal-Enerġija | Corded Elettriku |
| Input tal-Enerġija | 710 W |
| Daqs Kollet | 6 mm |
| Piż tal-oġġett | 209 gramma (0.21 kg) |
| Dimensjonijiet tal-Prodott | 10 x 20 x 37 ċm |
| Kulur | Grey-Black |
8. Garanzija u Appoġġ
For warranty information, please refer to the warranty card included with your product or contact your local Crown dealer. Keep your purchase receipt as proof of purchase.
For technical support or service inquiries, please contact Crown customer service or an authorized service center. Contact details can typically be found on the manufacturer's official webis-sit jew fuq l-imballaġġ tal-prodott.


