1. Prodott Aktarview
The Forte TEZAUR Computer Desk is designed to provide a functional workspace with integrated features. It includes an elevated monitor shelf, a metal headphone holder, a cup holder, and cable management openings. The desk features integrated LED lighting with adjustable colors, powered via USB. An additional storage unit with open compartments can be positioned on either the left or right side of the main desk.

Immaġni 1.1: Fuqview of the Forte TEZAUR Computer Desk with its integrated features.
2. Twissijiet tas-Sigurtà
Attention: This desk requires assembly. Please follow all instructions carefully and use appropriate tools. Ensure the desk is fully assembled and stable before placing any items on it or using it. Failure to do so may result in injury or damage to the product.
- Dejjem arma l-iskrivanija fuq wiċċ artab u nadif biex tevita l-grif.
- It is recommended that two adults assemble this product.
- Tissikkax iżżejjed il-viti, għax dan jista' jagħmel ħsara lill-materjal.
- Żomm il-partijiet żgħar u l-materjali tal-ippakkjar 'il bogħod mit-tfal.
- Iċċekkja li l-komponenti kollha huma preżenti qabel tibda l-assemblaġġ.
3. Istruzzjonijiet ta' Twaqqif u Assemblaġġ
Jekk jogħġbok mill-ġdidview all steps before beginning assembly. Ensure you have sufficient space and the necessary tools (e.g., screwdriver, hammer).
3.1 Identifikazzjoni tal-Komponent
Unpack all components and identify them against the parts list provided in your packaging. Familiarize yourself with the different panels and hardware.
3.2 Main Desk Assembly
- Begin by assembling the main desk frame according to the provided diagrams. Attach the side panels to the main desktop using the designated hardware.
- Secure the back panel to enhance stability.
- Install the elevated monitor shelf onto the main desktop. Ensure it is securely fastened.
3.3 Storage Unit Assembly and Placement
The additional storage unit can be mounted on either the left or right side of the main desk, offering flexibility to suit your space and preference.
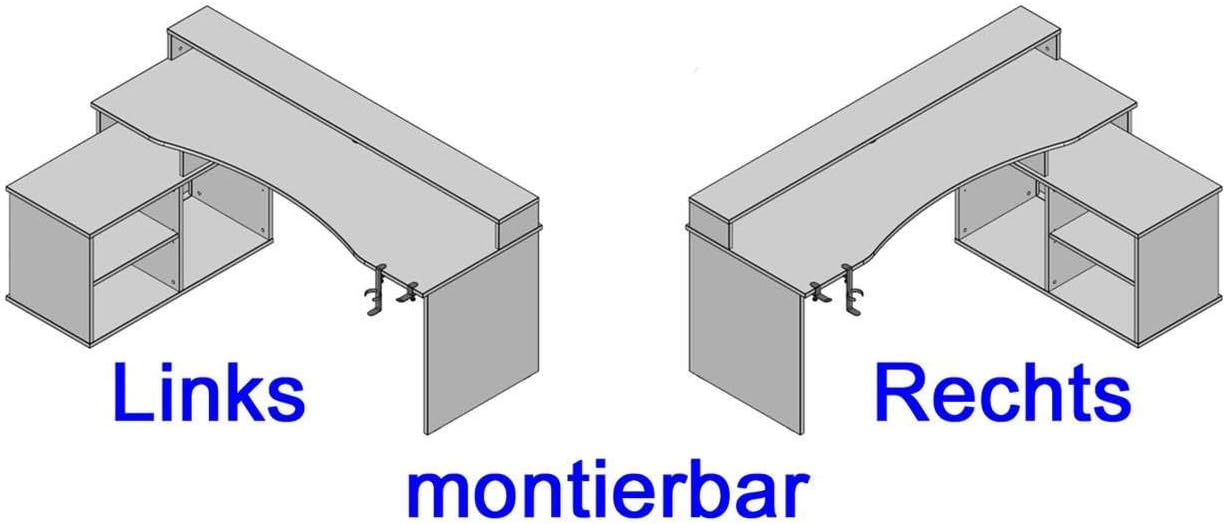
Image 3.1: The storage unit can be configured on either the left or right side of the desk.
- Assemble the storage unit's frame and internal shelves.
- Attach the assembled storage unit to the main desk structure on your preferred side (left or right) using the provided connectors.
3.4 Aċċessorji twaħħil
- Attach the metal headphone holder and cup holder to the underside of the desk. These are typically clamp-on designs.

Image 3.2: Detail of the headphone holder attachment.

Image 3.3: Headphone and cup holder in position.
3.5 LED Lighting Installation
- Carefully place the LED strip into the designated channel on the elevated monitor shelf.
- Connect the LED strip's USB cable to a compatible USB power source (e.g., computer, USB wall adapter).
3.6 Ġestjoni tal-Cable
Utilize the cable grommets and openings on the desk surface and back panel to route and organize your cables, maintaining a tidy workspace.

Image 3.4: Cable grommet for organized cable routing.
4. Istruzzjonijiet Operattivi
4.1 Dawl LED
The integrated LED lighting is powered via a USB connection. Once connected, use the provided remote control to turn the lights on/off and change colors. Refer to the remote control's specific instructions for detailed functionality.
4.2 Headphone and Cup Holder
The detachable headphone and cup holders can be positioned as desired along the desk edge. Ensure they are securely clamped before use to prevent items from falling.
5. Manutenzjoni
5.1 Tindif
To clean the desk surfaces, use a soft, damp cloth. Avoid abrasive cleaners, harsh chemicals, or solvents, as these can damage the finish. Wipe spills immediately.
5.2 Kontroll tal-Istabbiltà
Periodically check all screws and fasteners to ensure they remain tight. Retighten if necessary to maintain the desk's stability.
6 Issolvi l-problemi
6.1 Id-Dwal LED Ma Jaħdmux
- Ensure the USB cable is securely connected to a functioning USB power source.
- Iċċekkja l-batterija tal-kontroll remot u ibdelha jekk meħtieġ.
- Verify the LED strip is correctly seated in its channel.
6.2 Desk Instability
- Iċċekkja l-viti kollha tal-assemblaġġ u ssikka dawk li huma maħlula.
- Kun żgur li l-iskrivanija titqiegħed fuq wiċċ livell.
- Verify that all components are correctly assembled according to the instructions.
7. Speċifikazzjonijiet tal-Prodott
| Karatteristika | Dettall |
|---|---|
| Brand | Forte |
| Numru tal-Mudell | TZRB214B3-Z113 |
| Kulur | Iswed Matt |
| Dimensjonijiet (L x W x H) | 200 ċm x 125.4 ċm x 91.1 ċm (78.7 pulzieri x 49.4 pulzieri x 35.9 pulzieri) |
| Materjal | Engineered Wood, Metal, Melamine |
| Piż tal-oġġett | 86.2 kg (190 lbs) |
| Karatteristiċi Speċjali | Elevated Monitor Shelf, Ergonomic Design, Cup Holder, Headphone Holder, LED Lighting (USB, color changeable) |
| Max Load - Tabletop | 40 kg (88 lbs) |
| Max Load - Monitor Shelf | 10 kg (22 lbs) |
| Max Load - Storage Compartment | 5 kg (11 lbs) |

Image 7.1: Detailed dimensions and maximum load capacities of the desk.
8. Garanzija u Appoġġ
This product is covered by a manufacturer's warranty. Please refer to your purchase documentation for specific warranty terms and conditions. Spare parts availability is typically 2 years from the date of purchase.
For technical assistance, missing parts, or warranty claims, please contact your retailer or the Forte customer support directly. Keep your proof of purchase handy when contacting support.


