Introduzzjoni
This manual provides detailed instructions for the installation, operation, and maintenance of your Eridanus Vitreous Ceramic Bathroom Sink, Model 063. Please read all instructions carefully before beginning installation to ensure proper function and longevity of your product. Retain this manual for future reference.

Immaġni: Minn fuq għal isfel view of the Eridanus Vitreous Ceramic Bathroom Sink, showcasing its rectangular shape and glossy white finish.
Karatteristiċi tal-Prodott
The Eridanus Vitreous Ceramic Bathroom Sink is designed for durability and ease of use, offering versatile installation options.
- Kostruzzjoni taċ-ċeramika dejjiema: Made from premium quality vitreous china, resistant to scratches, chips, and fading.
- Non-Porous Surface: Ensures low water absorption, acid resistance, and a smooth, hygienic finish.
- Installazzjoni flessibbli: Supports both vessel countertop and wall-mount installation methods.
- Overflow Integrat: Catches rising water and facilitates efficient drainage.
- Ftuħ Standard tad-Drain: Features a 1.75-inch drain opening, compatible with universal pop-up drain sets (drain not included).
- Pre-drilled Faucet Hole: Designed for single-hole faucet installations (faucet not included).

Image: Diagram highlighting the sink's durable vitreous china, pre-drilled faucet hole, included overflow, flexible installation options, and standard drain opening.

Image: Visual representation of product attributes including rectangular shape, smooth surface, rounded design, ease of cleaning, simple installation, crack resistance, high-temperature firing, and durable materials.
X'hemm fil-Kaxxa
Meta tiftaħ il-pakkett, jekk jogħġbok ivverifika li l-komponenti kollha huma preżenti u mhux imħassra:
- Eridanus Bathroom Sink (Model 063)
- Mounting Hardware (for wall-mount installation)
- Gwida għall-Installazzjoni (dan id-dokument)

Image: Contents of the product packaging, showing the sink, mounting screws, anchors, washers, and nuts.
Setup u Installazzjoni
The Eridanus Vitreous Ceramic Bathroom Sink can be installed as a vessel on a countertop or mounted directly to a wall. Choose the method that best suits your bathroom design and functional needs.
Installazzjoni tal-Countertop
- Ensure your countertop is level and structurally sound to support the sink's weight (approximately 70 lbs).
- Cut openings of corresponding size on the countertop for the drain and faucet, if not already present. Refer to the dimensions diagram for precise measurements.
- Applika biċċa siġillant tas-silikon madwar il-perimetru tal-ftuħ tad-drejn fuq il-countertop.
- Carefully place the sink onto the countertop, aligning the drain and faucet holes.
- Secure the sink to the countertop using appropriate adhesive or clips (not included), following the adhesive manufacturer's instructions.
- Install the faucet and drain assembly according to their respective manufacturer's instructions.

Image: Step-by-step diagram illustrating the countertop installation process, including cutting openings, applying sealant, and placing the sink.
Installazzjoni Mmuntata mal-ħajt
This installation method allows for adjustable height, providing increased accessibility and freeing up floor space.
- Determine the desired height for your sink. Mark the wall accurately for the mounting points, ensuring the marks are level.
- Drill pilot holes at the marked locations. Ensure the holes are appropriate for the included mounting screws and wall anchors.
- Daħħal l-ankri tal-ħajt fit-toqob imtaqqbin.
- Attach the mounting screws into the anchors, leaving enough thread exposed to hang the sink.
- Carefully lift the sink and align its mounting holes with the exposed screws. Slide the sink onto the screws.
- Tighten the nuts and washers onto the mounting screws from underneath the sink to secure it firmly to the wall. Do not overtighten.
- Install the faucet and drain assembly according to their respective manufacturer's instructions.

Image: Step-by-step diagram illustrating the wall-mounted installation process, including marking, drilling, and securing the sink to the wall.
Manutenzjoni u Tindif
Proper care will help maintain the glossy finish and extend the life of your Eridanus sink.
- Tindif regolari: Wipe the sink with a damp cloth and mild soap or non-abrasive cleaner.
- Tnixxif: After cleaning, wipe with a dry cloth to prevent water spots and maintain shine.
- Evita kimiċi ħorox: Do not use abrasive cleaners, scouring pads, or strong chemical solutions, as these can damage the ceramic surface.
- Tneħħija tat-tebgħa: For stubborn stains, use a ceramic-safe cleaner and follow its instructions.

Immaġni: Close-up view demonstrating the smooth, non-porous surface of the sink, highlighting its ease of maintenance and cleaning.
Speċifikazzjonijiet
| Brand | Eridanu |
| Numru tal-Mudell | 063 |
| Materjal | Vitreous Ceramic |
| Kulur | Abjad |
| Dimensjonijiet tal-Prodott (L x W x H) | 39.5" x 16.5" x 5.75" |
| Drain Opening Size | 1.75" |
| Tip ta' Installazzjoni | Countertop & Wall Mount |
| Piż tal-oġġett | 70 Liri |
| Tip Finish | Tleqq |
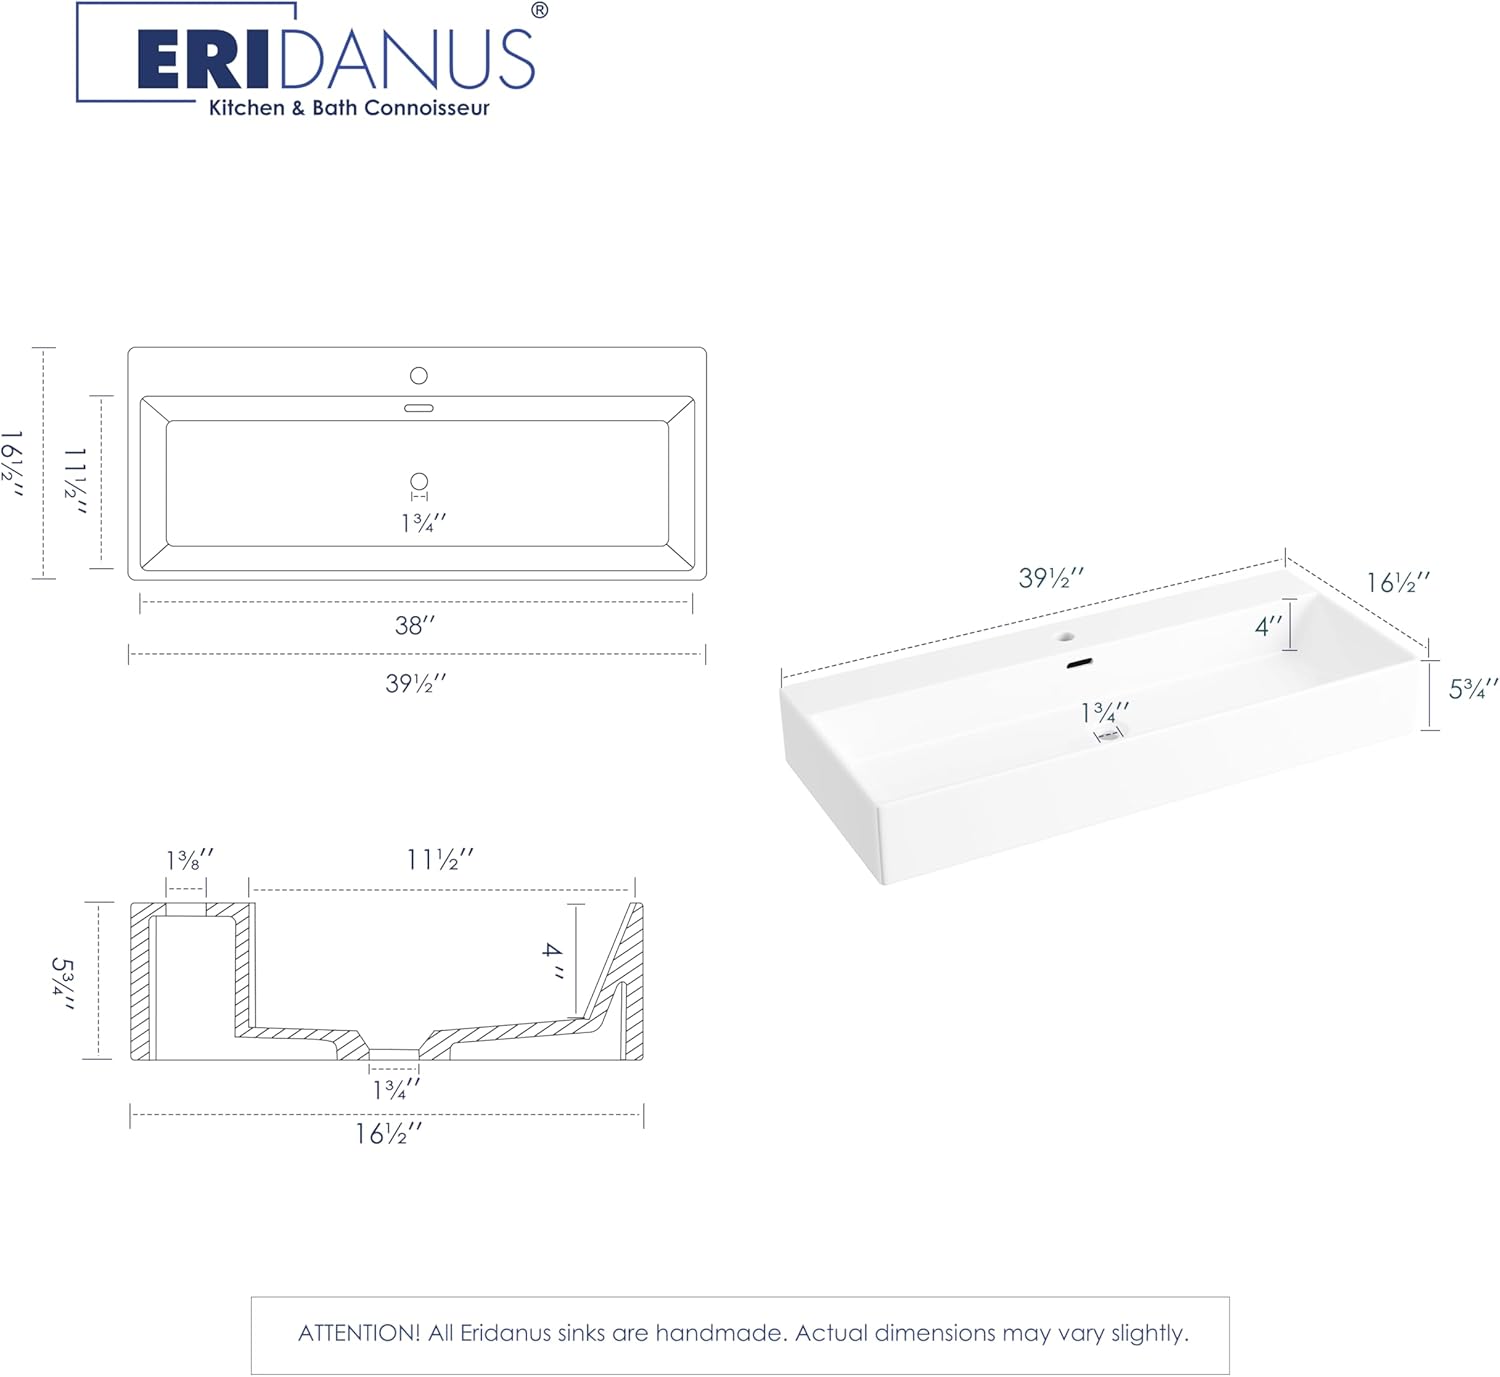
Image: Technical drawing providing precise measurements and dimensions of the Eridanus sink for planning and installation.
Issolvi l-problemi
This section addresses common issues you might encounter with your Eridanus sink. For problems not listed here, please contact customer support.
- Leaking around drain: Ensure the drain assembly is properly sealed with plumber's putty or silicone and all connections are tightened according to the drain manufacturer's instructions.
- Slow drainage: Check for obstructions in the drain or P-trap. Ensure the overflow channel is clear.
- Sink not level: For countertop installation, verify the countertop surface is level before placing the sink. For wall-mount, ensure mounting points are level and screws are tightened evenly.
Garanzija u Appoġġ
Eridanus is committed to providing quality products and customer satisfaction.
- Appoġġ: Eridanus offers 2-year support and 24/7 customer assistance.
- Ritorni: Hassle-free returns are available within the specified period.
For further assistance, product registration, or warranty claims, please visit the official Eridanus store or contact customer service:


