Introduzzjoni
Grazzi tax-xiriasing the DBPOWER RD828 Native 1080P WiFi Projector. This manual provides essential information for setting up, operating, maintaining, and troubleshooting your projector. Please read it thoroughly before use to ensure optimal performance and longevity of your device.
The DBPOWER RD828 projector delivers a Full HD 1080P native resolution experience with advanced features like 4-point keystone correction, wireless screen mirroring, and direct USB file playback, making it suitable for various home entertainment and business presentation needs.
Setup
1. Żpakkjar u Komponenti
Neħħi bir-reqqa l-komponenti kollha mill-imballaġġ. Il-pakkett għandu jinkludi:
- DBPOWER RD828 Projector
- Kontroll mill-bogħod
- Cable HDMI
- Audio/Video (AV) Adapter Cable
- Kejbil tal-Enerġija
- Manwal għall-Utent (dan id-dokument)
- Gwida Quick Start

Figure 1: DBPOWER RD828 Projector and included accessories.
The projector comes in a convenient travel case, which can also function as a backpack for easy portability.

Figure 2: The DBPOWER RD828 Projector packaged in its travel case.
2. Fiżiku Żejjedview
Familiarize yourself with the projector's ports and controls:
- Quddiem: Projection lens with removable lens cap, IR receiver.
- Fuq: Control panel with power, OK, navigation (up, down, left, right), and input selection buttons. The top surface features a fabric material.
- Dahar: Power input, 2x USB ports, Headphone jack, AV input, 2x HDMI ports, Speaker grille.
- Ġnub: Ventilation grilles, removable air filter on one side.
- Qiegħed: Four rubber feet (removable for ceiling mounting), adjustable front foot for tilt adjustment, mounting points for ceiling installation.

Figura 3: Wara view of the projector displaying its various input and output ports.

Figura 4: Fuq view of the projector with its integrated control panel.
3. Tqegħid u Konnessjoni tal-Enerġija
- Place the projector on a stable, flat surface or mount it to a ceiling. Ensure adequate ventilation around the device.
- Qabbad il-kejbil tal-enerġija mad-dħul tal-enerġija tal-proġettazzjoni u mbagħad ma' sokit tal-enerġija.
- Agħfas il-buttuna tal-qawwa fuq il-proġekter jew il-kontroll mill-bogħod biex tixgħel l-apparat.
Istruzzjonijiet Operattivi
1. Initial Setup and Focus Adjustment
Upon first power-on, the projector will display the home screen. Adjust the focus using the +/- buttons on the remote control until the image is clear.
2. Għażla tas-Sors tal-Input
The home screen provides shortcuts for various input sources:
- HDMI 1 / HDMI 2: Għall-konnessjoni ta' apparati permezz ta' kejbil HDMI (eż., laptops, consoles tal-logħob, TV sticks).
- TA’: For connecting older devices using the included AV adapter cable.
- iOS Cast / Miracast: For wireless screen mirroring from iOS and Android devices.
- Film / Music / Photo / Office Suite: For playing media directly from a USB drive.

Figure 5: The main interface of the projector, showing various input options and media categories.
3. Wireless Screen Mirroring (WiFi Sync)
The RD828 supports wireless screen mirroring for iOS and Android devices. Ensure your device and the projector are connected to the same Wi-Fi network.
- Għal apparati iOS: Select "iOS Cast" on the projector. On your iOS device, open Control Center and tap "Screen Mirroring." Select the projector from the list.
- Għal apparati Android: Select "Miracast" on the projector. On your Android device, open the settings menu, access display settings or screen mirroring, and select the projector.

Figure 6: Step-by-step guide for connecting iOS and Android devices via wireless screen mirroring.
4. Keystone Correction and Zoom Function
The projector features 4-point keystone correction and a digital zoom function to adjust the image shape and size.
- 4-Point Keystone Correction: This advanced feature allows you to adjust each of the four corners of the projected image independently, correcting distorted images when the projector is not perfectly aligned with the screen. Access this setting via the "Projection Setting" menu.
- Żum diġitali: Use the zoom function to shrink the image size up to 50% using the remote control without physically moving the projector.

Figure 7: Visual representation of 4-point keystone correction and the digital zoom feature.
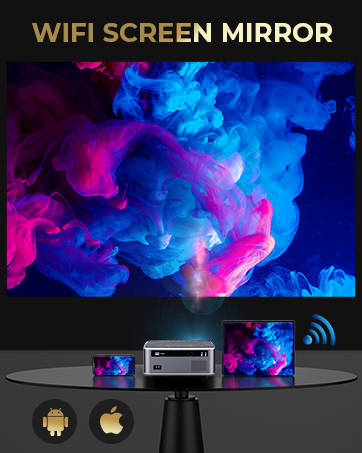
Figure 8: Illustrates how digital keystone correction can be applied from different projector positions (rear, front, ceiling/wall).
5. USB Playback and Office Suite
The DBPOWER RD828 is capable of playing Microsoft Office (Word, Excel, PowerPoint) and Adobe PDF files directly from a USB stick, eliminating the need for a connected computer for presentations.

Figure 9: The projector displaying a business presentation directly from a USB drive.
6. Output tal-Awdjo
The projector includes dual built-in stereo speakers. For enhanced audio experience, you can connect external speakers or a soundbar via the headphone jack or a Bluetooth adapter (not included).

Figure 10: Illustration of the projector's built-in dual stereo speakers.
Manutenzjoni
1. Tindif tal-Lentijiet
Use a soft, lint-free cloth specifically designed for optical lenses to clean the projector lens. Avoid abrasive materials or harsh chemicals that could scratch the lens.
2. Tindif tal-Filtru tal-Arja
Naddaf il-filtru tal-arja regolarment biex tevita l-akkumulazzjoni tat-trab, li jista' jaffettwa l-prestazzjoni u l-amp life. The air filter is located on the side of the projector and can be removed for cleaning.
3. Lamp Ħajja
The DBPOWER RD828 projector utilizes an LED light source designed for a long lifespan of up to 100,000 hours, minimizing the need for frequent lamp sostituzzjoni.

Figure 11: Visual representation of the projector's extended lamp ħajja.
4. Aġġornamenti tas-Sistema
The projector supports both local and online system upgrade methods. Check for updates periodically to ensure your device has the latest features and performance improvements. Access system updates via the "System Update" option in the settings menu.
Issolvi l-problemi
| Problema | Kawża Possibbli | Soluzzjoni |
|---|---|---|
| L-ebda immaġni jew immaġni mgħawġa | Incorrect focus, keystone distortion, incorrect input source, loose cable connection. | Adjust focus using remote. Use 4-point keystone correction. Select correct input source. Check HDMI/AV cable connections. |
| L-ebda ħoss | Volume too low, muted, external speakers not connected properly, audio format not supported. | Increase volume. Unmute. Ensure external speakers are connected correctly or use built-in speakers. Check audio format compatibility. |
| Il-kontroll mill-bogħod ma jaħdimx | Low battery, IR receiver blocked, out of range. | Replace batteries. Ensure no obstructions between remote and projector's IR receiver. Operate within effective range. |
| Overheating or automatic shutdown | Blocked ventilation, excessive use in hot environment. | Ensure ventilation grilles are clear. Operate in a well-ventilated area. Allow projector to cool down. |
| Wireless mirroring issues | Network connectivity issues, device compatibility. | Ensure both devices are on the same Wi-Fi network. Restart Wi-Fi router. Check device compatibility with Miracast/iOS Cast. |
Speċifikazzjonijiet
| Karatteristika | Dettall |
|---|---|
| Numru tal-Mudell | RD828 |
| Riżoluzzjoni Nattiva | 1920 x 1080P Full HD |
| Luminożità | 20000 Lumen / 500 ANSI |
| Proporzjon ta' Kuntrast | 10000:1 |
| Lamp Ħajja | Sa 100,000 sigħat |
| Daqs tal-Projezzjoni | 50" - 300" (Aġġustabbli) |
| Korrezzjoni Keystone | Korrezzjoni Keystone 4-Punti |
| Funzjoni Zoom | Digital Zoom (-50%) |
| Konnettività | 2x HDMI, 2x USB, AV, Headphone Jack, 5G/2.4G WiFi |
| Awdjo | Dual Built-in Stereo Speakers |
| Dimensjonijiet tal-Prodott | 10.2 x 9 x 4.3 pulzieri |
| Piż tal-oġġett | 7.15 liri |

Figure 12: Illustrates the adjustable projection screen sizes from 50 to 300 inches based on projection distance.
Garanzija u Appoġġ
DBPOWER offers a 3-YEAR warranty for the RD828 projector. Professional customer service and lifetime technical support are available to assist you with any issues or questions.
For support, please refer to the contact information provided in your Quick Start Guide or visit the official DBPOWER websit.

Figure 13: DBPOWER company logo.


