1. Introduzzjoni
This manual provides comprehensive instructions for the installation, operation, and maintenance of the SINOTIMER TM919B 30A Programmable Electronic Timer Switch. This device is designed to automatically control the ON/OFF switching of various electrical appliances based on user-defined daily or weekly programs. Please read this manual carefully before installation and use to ensure proper function and safety.
2. Informazzjoni dwar is-Sigurtà
WARNING: Risk of electric shock. Installation should only be performed by a qualified electrician or trained personnel.
- Always disconnect power at the circuit breaker before installing or servicing the timer switch.
- Kun żgur li l-konnessjonijiet kollha tal-wajers huma sikuri u jikkonformaw mal-kodiċijiet elettriċi lokali.
- Do not exceed the maximum load rating of 30A.
- This device is intended for indoor use only. Avoid exposure to moisture or extreme temperatures.
- Tippruvax tiżżarma jew issewwi l-unità int stess. Ikkuntattja persunal tas-servizz kwalifikat.
3. Prodott Aktarview
The SINOTIMER TM919B is a digital timer switch featuring a large LCD display, multiple programming options, and a manual override function. It is designed for DIN rail mounting.
3.1. Komponenti u Kontrolli
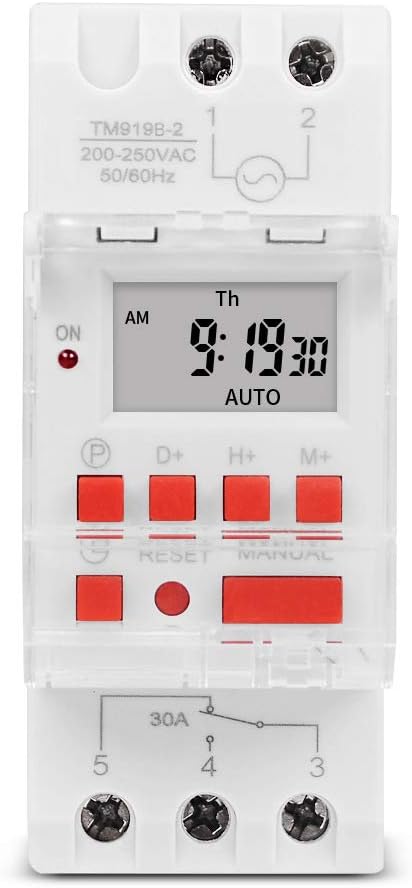
Figura 1: Quddiem view of the TM919B timer switch, showing the LCD display, control buttons, and terminal connections.

Figura 2: Angolat view of the TM919B with the transparent protective cover open, revealing the programming buttons (P, D+, H+, M+, RESET, MANUAL).
- Display LCD: Juri l-ħin, il-jum u l-istatus tal-programm attwali.
- P (Program) Button: Enters/exits program setting mode.
- D+ (Day) Button: Adjusts day of the week in setting modes.
- H+ (Hour) Button: Jaġġusta s-siegħa fil-modi tal-issettjar.
- M+ (Minute) Button: Jaġġusta l-minuti fil-modi tal-issettjar.
- Buttuna RESET: Clears all settings and resets the timer to factory defaults.
- MANUAL Button: Toggles between ON, AUTO, and OFF modes.
- Konnessjonijiet Terminali: For power input and load output.
4. Speċifikazzjonijiet
| Karatteristika | Speċifikazzjoni |
|---|---|
| Mudell | TM919B |
| Voltage | 220V (AC200-250V) |
| Frekwenza | 50/60Hz |
| Tagħbija Max | 30A (Tagħbija Reżistiva) |
| Programmi | 16 ON/OFF programs per day/week |
| Intervall Minimu | 1 minuta |
| Backup tal-batterija | Built-in rechargeable battery (for memory retention) |
| Immuntar | Ferrovija DIN ta '35mm |
| Dimensjonijiet | Irreferi għall-Figura 3 |

Figura 3: Detailed dimensions of the TM919B timer switch, showing height, width, and depth measurements.
5. Setup u Installazzjoni
Follow these steps for safe and correct installation of your timer switch.
5.1. Immuntar
- Kun żgur li l-enerġija hija skonnettjata mis-circuit breaker prinċipali.
- Mount the TM919B onto a standard 35mm DIN rail. The device features a clip mechanism on the back for secure attachment.
- Press the orange clip at the bottom of the unit to release it from the DIN rail if removal is necessary.

Figura 4: Ġenb view of the TM919B, highlighting the orange DIN rail mounting clip.

Figura 5: Lura view of the TM919B, illustrating the DIN rail mounting mechanism.
5.2. Dijagramma tal-Wajers
Refer to the diagram below for correct wiring connections. Ensure all connections are tight and insulated.

Figura 6: Ġenb view of the TM919B showing the wiring diagram printed on the casing. Terminals 1 and 2 are for power input (L and N). Terminals 3, 4, and 5 are for load output (Common, Normally Open, Normally Closed).
- Terminali 1 u 2: Power Input (L - Live, N - Neutral). Connect your 220V AC supply here.
- Terminal 3: Common (COM) for the output relay.
- Terminal 4: Normally Open (NO) output. The load will be powered when the timer is ON.
- Terminal 5: Normally Closed (NC) output. The load will be powered when the timer is OFF.
For typical applications where the load is switched ON by the timer, connect the load between Terminal 3 (COM) and Terminal 4 (NO).
6. Istruzzjonijiet Operattivi
6.1. Initial Setup and Reset
- After connecting power, the display may be blank or show random characters. Press the RESET button with a pointed object (e.g., a pen tip) to clear all memory and reset the timer. The display will show "0:00" and "MO".
- Allow the internal battery to charge for at least 30 minutes before programming for optimal performance and memory retention during power outages.
6.2. Issettjar tal-Ħin u l-Jum Kurrenti
- Agħfas u żomm il- D+ button to set the current day of the week (MO, TU, WE, TH, FR, SA, SU).
- Agħfas u żomm il- H+ button to set the current hour (0-23).
- Agħfas u żomm il- M+ button to set the current minute (0-59).
- Release the buttons when the correct time and day are displayed. The timer will automatically save the settings.
6.3. Programmazzjoni taċ-Ċikli ON/OFF
The TM919B supports up to 16 ON/OFF programs. Each program consists of an ON time and an OFF time.
- Agħfas il- P button once. The display will show "1 ON". This is for the first ON program.
- Użu D+ to select the day(s) for this program. Options include:
- MO TU WE TH FR SA SU (Every day)
- MO (Monday only)
- TU (Tuesday only)
- ...
- MO TU WE TH FR (Weekdays)
- SA SU (Weekends)
- MO TU WE (Mon-Wed)
- TH FR SA (Thu-Sat)
- MO WE FR (Mon, Wed, Fri)
- TU TH SA (Tue, Thu, Sat)
- MO TU WE TH FR SA (Mon-Sat)
- Użu H+ u M+ biex tissettja s-siegħa u l-minuta mixtieqa biex tkun ON.
- Agħfas il- P button again. The display will show "1 OFF". This is for the first OFF program.
- Użu D+, H+, u M+ to set the desired OFF day, hour, and minute. Ensure the OFF time is after the ON time for the same program.
- Repeat steps 1-5 for additional ON/OFF programs (up to 16). If you don't need all 16 programs, simply press P to cycle through unused programs until you return to the current time display.
- To exit programming mode and save settings, press the clock button (usually labeled with a clock icon, or simply wait for 30 seconds without input).
6.4. Override Manwali
Agħfas il- MANWAL button to cycle through the operating modes:
- FUQ: The timer output is continuously ON, ignoring all programs.
- AUTO: It-tajmer jopera skont iċ-ċikli ON/OFF ipprogrammati. Din hija l-modalità standard ta' tħaddim.
- MITFI: The timer output is continuously OFF, ignoring all programs.
Kun żgur li t-tajmer huwa ssettjat għal AUTO for programmed operation.
7. Manutenzjoni
- The TM919B is designed for maintenance-free operation.
- Naddaf il-barra b'ċarruta ratba u niexfa. Tużax prodotti tat-tindif jew solventi li joborxu.
- Ensure the internal battery is charged by keeping the unit powered for at least 24 hours initially, and periodically thereafter, to maintain time and program memory during power outages.
8 Issolvi l-problemi
| Problema | Kawża Possibbli | Soluzzjoni |
|---|---|---|
| Il-wiri huwa vojt. | L-ebda provvista tal-enerġija; il-batterija interna skargata. | Check power connections. Allow unit to charge for 30 minutes. |
| Timer not switching load. | Incorrect wiring; timer in MANUAL ON/OFF mode; incorrect program settings. | Verify wiring (refer to Figure 6). Ensure timer is in AUTO mode. Check program times and days. |
| Il-programmi jintilfu wara li tintefa' l-enerġijatage. | Internal battery not fully charged or faulty. | Ensure unit is powered for at least 24 hours to fully charge the battery. If problem persists, contact support. |
| Il-buttuni ma jirrispondux. | Unit frozen; temporary glitch. | Agħfas il- RESET buttuna. |
9. Garanzija u Appoġġ
Il-prodotti SINOTIMER huma manifatturati skont standards ta’ kwalità għolja. Għal informazzjoni dwar il-garanzija jew appoġġ tekniku, jekk jogħġbok irreferi għad-dokumentazzjoni pprovduta max-xiri tiegħek jew żur is-sit uffiċjali ta’ SINOTIMER. websit. Żomm l-irċevuta tax-xiri tiegħek bħala prova tax-xiri.
For further assistance, you may contact SINOTIMER customer service through their official channels.


