1. Introduzzjoni
This manual provides detailed instructions for the installation, operation, maintenance, and troubleshooting of your ASRock B460M PRO4 Motherboard. Designed to support 10th Generation Intel Core Processors (Socket 1200), this motherboard offers a robust platform for personal computing with features like DDR4 2933MHz memory support, multiple PCIe 3.0 slots, and M.2 connectivity.

Image 1.1: ASRock B460M PRO4 Motherboard and its retail packaging.
2. Kontenut tal-Pakkett
Iċċekkja li l-oġġetti kollha elenkati hawn taħt huma inklużi fil-pakkett tal-motherboard tiegħek. Jekk xi oġġett huwa nieqes jew bil-ħsara, ikkuntattja lill-bejjiegħ tiegħek.
- Motherboard tal-ASRock B460M PRO4
- Gwida ta 'Installazzjoni Mgħaġġla
- Support CD (containing drivers and utilities)
- Tarka I / O
- 2 x Kejbils tad-Data SATA
- 3 x Viti għal Sokits M.2
- 1 x Standoff għal Sokit M.2
3. Setup
3.1. Installazzjoni tas-CPU
The ASRock B460M PRO4 motherboard features an LGA 1200 socket, compatible with 10th Generation Intel Core Processors. Carefully align the CPU with the socket, ensuring the gold triangle on the CPU matches the triangle on the socket. Gently lower the CPU into place without forcing it, then secure the retention arm.
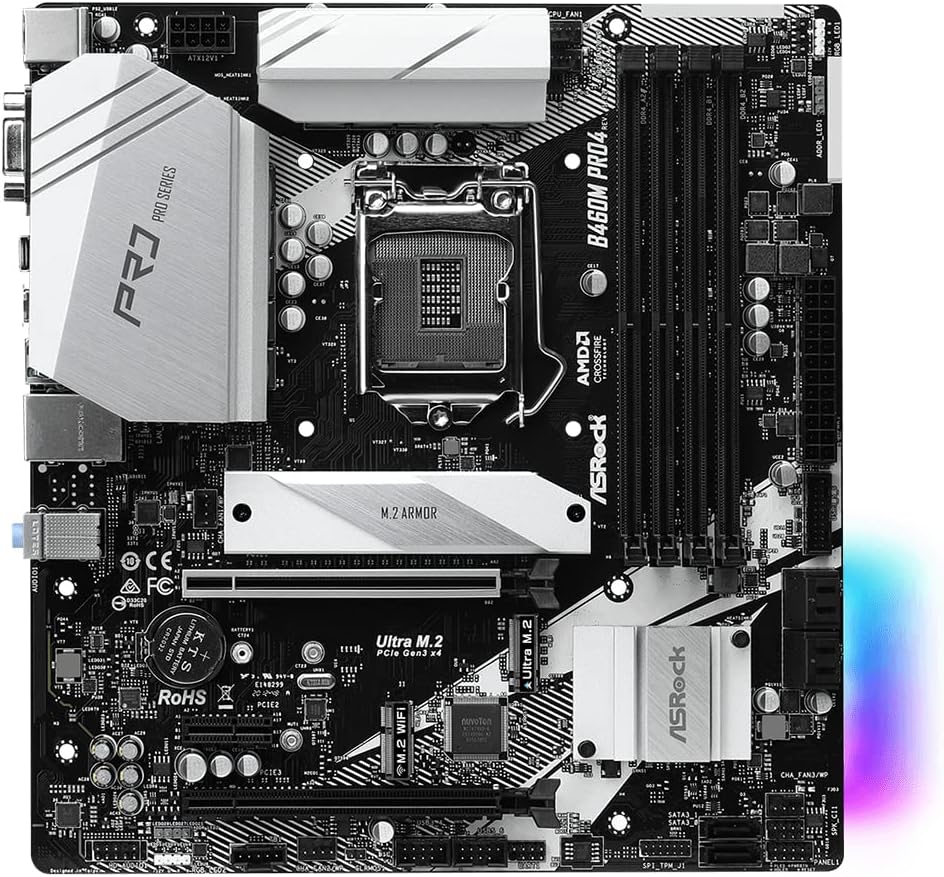
Immaġni 3.1: Minn fuq għal isfel view of the ASRock B460M PRO4 Motherboard, highlighting the LGA 1200 CPU socket.
3.2. Installazzjoni tal-Memorja (RAM)
This motherboard supports DDR4 memory modules up to 2933MHz. It features four DIMM slots. For optimal performance, install memory modules in matched pairs into the designated primary slots as indicated in the motherboard's detailed manual. Open the retention clips, align the memory module notch with the slot key, and press firmly until the clips snap into place.
3.3. Installazzjoni ta' Apparat tal-Ħażna
The B460M PRO4 includes M.2 slots for high-speed NVMe SSDs and SATA ports for traditional hard drives or SSDs. Use the provided M.2 screws and standoffs for M.2 drive installation. Connect SATA data cables (included) from your storage devices to the SATA ports on the motherboard.

Immaġni 3.2: Angolata view of the ASRock B460M PRO4 Motherboard, illustrating the M.2 slots and SATA ports for storage devices.
3.4. Installazzjoni tal-Karta tal-Espansjoni
The motherboard provides 2 PCIe 3.0 x16 slots for graphics cards and 1 PCIe 3.0 x1 slot for other expansion cards. Additionally, it includes 1 M.2 (Key E) slot specifically for a WiFi module. Ensure expansion cards are properly seated in their respective slots and secured with chassis screws.

Image 3.3: ASRock B460M PRO4 Motherboard, showcasing the various PCIe expansion slots.
3.5. Konnessjonijiet tal-Enerġija
Connect the 24-pin ATX power connector and the 8-pin CPU power connector from your power supply unit (PSU) to the corresponding ports on the motherboard. The 9 Power Phase Design ensures stable power delivery to critical components.
4. Joperaw
4.1. Konfigurazzjoni tal-BIOS/UEFI
Upon initial boot, press the designated key (usually DEL or F2) to enter the BIOS/UEFI setup utility. Here, you can configure system settings, boot order, and monitor hardware status. Refer to the ASRock website for a detailed BIOS/UEFI user manual specific to your model.
4.2. Installazzjoni tas-sewwieq
After installing your operating system (Microsoft Windows 10 64-bit / 11 64-bit), install the necessary drivers from the included Support CD or download the latest versions from the official ASRock website. This ensures optimal performance and compatibility for all motherboard components.
4.3. Utilitajiet tas-Softwer
ASRock provides various software utilities to enhance your system's functionality, including monitoring tools, fan control, and system tuning options. These can be found on the Support CD or ASRock's official websit.
5. Manutenzjoni
5.1. Tindif
Naddaf l-intern tal-kompjuter tiegħek regolarment biex tevita l-akkumulazzjoni tat-trab, li jista' jwassal għal sħana żejda u prestazzjoni mnaqqsa. Uża arja kkompressata biex tneħħi t-trab mill-fannijiet, is-sinkijiet tas-sħana, u komponenti oħra. Kun żgur li s-sistema tkun mitfija u skonnettjata qabel ma tnaddafha.
5.2. Aġġornamenti tal-BIOS
Iċċekkja l-ASRock perjodikament website for BIOS/UEFI updates. Updates can improve system stability, add support for new hardware, or fix bugs. Follow the instructions provided by ASRock carefully when performing a BIOS update to avoid system damage.
6 Issolvi l-problemi
If you encounter issues with your ASRock B460M PRO4 Motherboard, consider the following basic troubleshooting steps:
- Ebda Qawwa/Ebda Boot: Double-check all power connections (24-pin ATX, 8-pin CPU, GPU). Ensure the power supply is functioning correctly.
- Ebda Display: Verify that your monitor is connected to the correct graphics output (either integrated graphics or a dedicated graphics card). Reseat your graphics card and RAM modules.
- Instabbiltà/Ħsarat tas-Sistema: Check RAM seating and compatibility. Ensure all drivers are up-to-date. Monitor CPU and GPU temperatures to rule out overheating.
- Kwistjonijiet Periferali: Test peripherals in different USB ports. Ensure relevant drivers are installed.
For more advanced troubleshooting or persistent issues, consult the detailed troubleshooting section in the full user manual available on the ASRock support webis-sit jew ikkuntattja l-appoġġ tekniku tal-ASRock.
7. Speċifikazzjonijiet
Below are the key technical specifications for the ASRock B460M PRO4 Motherboard:
| Karatteristika | Speċifikazzjoni |
|---|---|
| Brand | ASRock |
| Isem tal-Mudell | B460M PRO4 |
| Socket tas-CPU | LGA 1200 |
| Proċessuri Kompatibbli | 10 Ġenerazzjoni Intel Core |
| Tip ta' Ċipset | Intel B460 |
| Teknoloġija tal-Memorja RAM | DDR4 SDRAM |
| Veloċità tal-Arloġġ tal-Memorja | 2933 MHz |
| Numru ta 'USB 2.0 Ports | 2 |
| Appoġġ tas-Sistema Operattiva | Microsoft Windows 10 64-bit / 11 64-bit |
| Dimensjonijiet tal-Prodott (LxWxH) | 10.9 x 10.3 x 2.5 pulzieri |
| Piż tal-oġġett | 2.2 liri |

Image 7.1: Rear I/O panel of the ASRock B460M PRO4 Motherboard, showing various connectivity ports.
8. Appoġġ u Garanzija
Għal assistenza teknika, downloads ta' sewwieqa, aġġornamenti tal-BIOS, u informazzjoni dettaljata dwar il-prodott, jekk jogħġbok żur is-sit uffiċjali tal-appoġġ tal-ASRock. website. You can find comprehensive FAQs and contact information for customer service there.
For specific warranty terms and conditions applicable to your ASRock B460M PRO4 Motherboard, please refer to the warranty card included in your product packaging or visit the ASRock official websit. Il-politiki tal-garanzija jistgħu jvarjaw skont ir-reġjun u l-bejjiegħ bl-imnut.
Nota: Il-prodott fuqview video provided in the source data is for a different motherboard (MSI B760M-P) and is not relevant to the ASRock B460M PRO4. Therefore, no video content has been embedded in this manual.
9. Informazzjoni Importanti dwar is-Sigurtà
Dejjem osserva l-prekawzjonijiet ta' sigurtà li ġejjin meta timmaniġġja jew tħaddem il-motherboard tiegħek:
- Disconnect the power cord from the wall outlet before touching any components inside the computer.
- Ilbes ċinga tal-polz anti-statika jew tmiss spiss oġġett tal-metall ertjat biex teħles mill-elettriku statiku qabel ma timmaniġġja l-komponenti.
- Żomm il-motherboard 'il bogħod mill-umdità u minn temperaturi estremi.
- Do not attempt to repair the motherboard yourself. Refer to qualified service personnel.


