1. Introduzzjoni
This manual provides detailed instructions for the setup, operation, maintenance, and troubleshooting of your Beelink MINI S12 Mini PC. Please read this manual thoroughly before using the device to ensure proper functionality and to maximize your user experience.

A compact, dark blue Beelink MINI S12 Mini PC with a textured top surface and front ports visible.
2. Kontenut tal-Pakkett
Iċċekkja li l-oġġetti kollha elenkati hawn taħt huma inklużi fil-pakkett tiegħek:
- Beelink MINI S12 Mini PC
- Manwal għall-Utent
- Parentesi immuntati mal-ħajt
- Kejbils HDMI (2)
- Adapter tal-Enerġija (12V/3A)
- Pakkett ta 'Viti
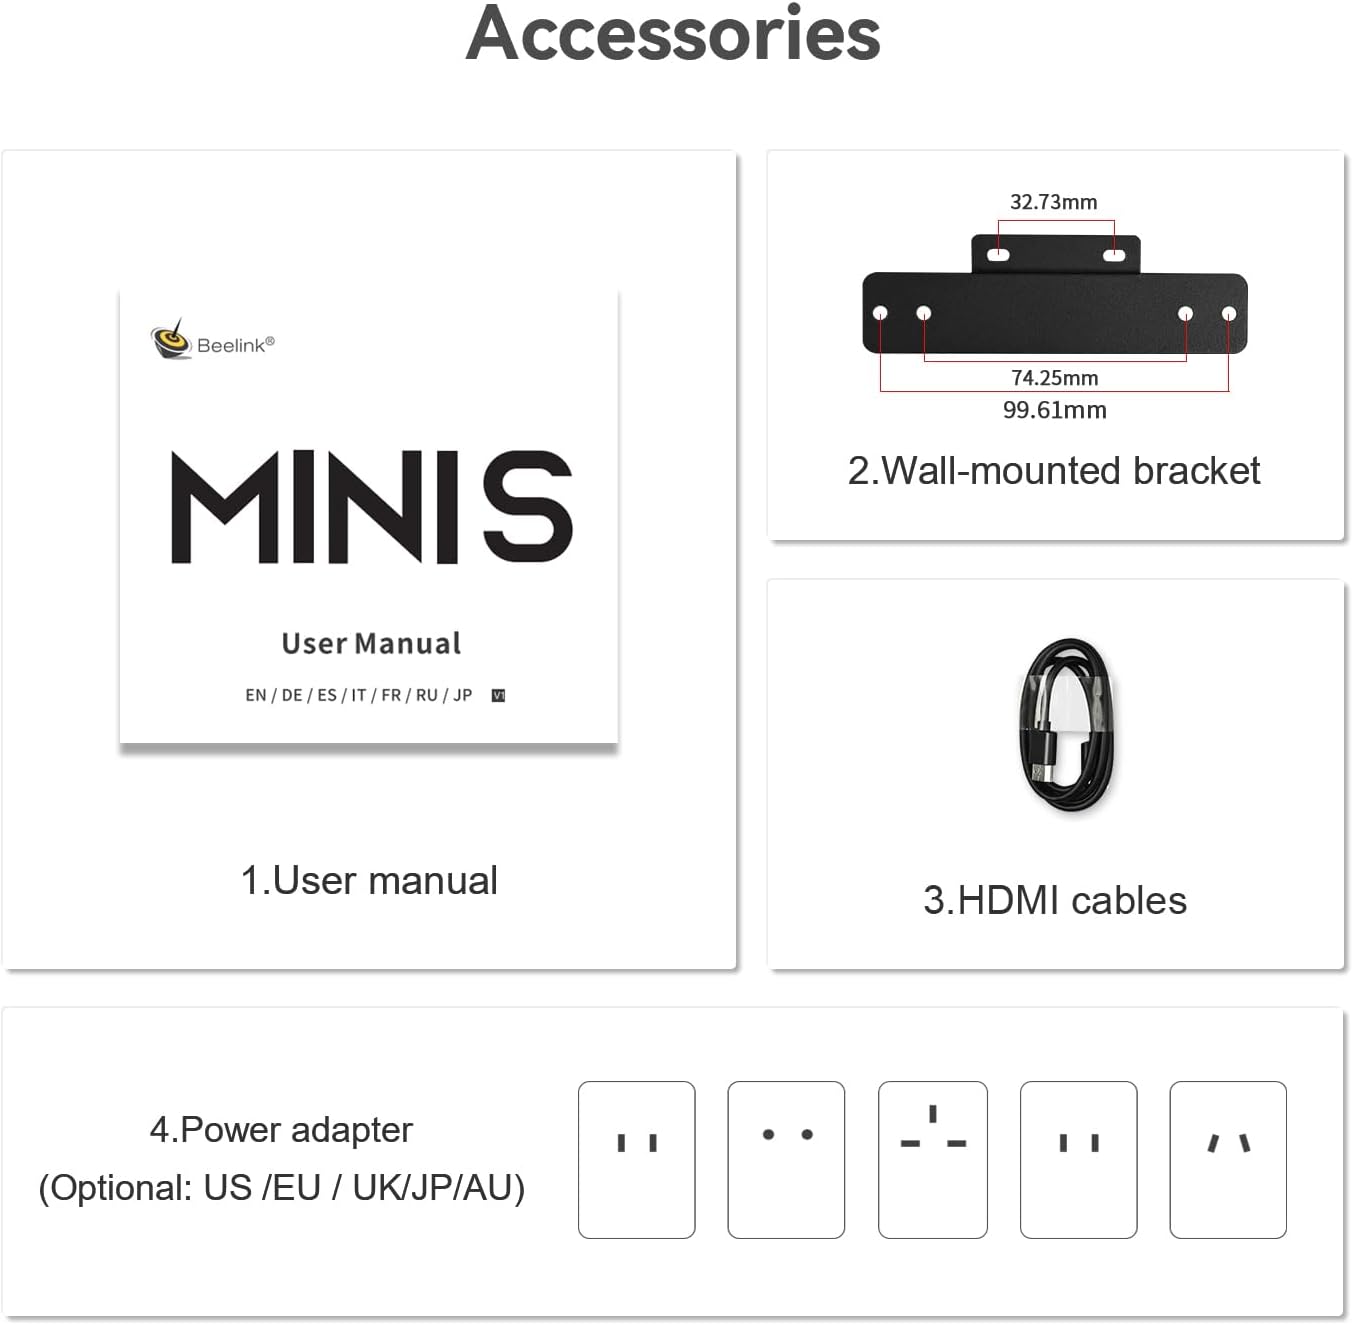
A visual representation of the accessories provided with the mini PC, including the user manual, wall-mounted bracket, HDMI cables, and power adapter.
3. Prodott Aktarview
The Beelink MINI S12 is a compact and efficient mini PC designed for various applications, from office work to home entertainment. It features an N95 processor, 12GB LPDDR5 RAM, and 256GB SSD storage, offering reliable performance in a small form factor.

An infographic highlighting key features such as N95 processor, UHD Graphics, LPDDR5 memory, WiFi 5, Bluetooth 4.2, 2.5G LAN, SSD storage, and cooling system.
Portijiet u Interfaces
The MINI S12 offers a variety of ports for connectivity:
- Panel ta' quddiem:
- CLR CMOS Button: For resetting BIOS settings.
- USB 3.2 Gen2 (10Gbps) Ports (2): For high-speed data transfer.
- Earphone Jack (3.5mm): For audio output.
- Power Button: To power on/off the device.
- Panel ta 'wara:
- USB 3.2 Gen2 (10Gbps) Ports (2): Additional high-speed USB ports.
- LAN (2.5G) Port: For wired network connection.
- HDMI Ports (2): Supports 4K 60Hz dual display output.
- DC Power Input: For connecting the power adapter.
- Locking Slot: For security cables.

Images showing the front panel with RTC Key, USB 3.2 Gen2 ports, earphone jack, and power button, and the rear panel with USB 3.2 Gen2 ports, LAN (2.5G), HDMI ports, and DC power input.
4. Setup
4.1 Setup Inizjali
- Connect your monitor(s) to the HDMI ports on the rear panel of the Mini PC using the provided HDMI cables.
- Qabbad it-tastiera u l-maws tiegħek mal-portijiet USB disponibbli.
- Plug the power adapter into the DC power input port on the rear panel, then connect it to a power outlet.
- Agħfas il-Buttuna tal-Power fuq il-pannell ta' quddiem biex tixgħel il-Mini PC.
4.2 Konnessjoni tan-Netwerk
- Konnessjoni bil-fili: Connect an Ethernet cable from your router or modem to the 2.5G LAN port on the rear panel.
- Konnessjoni bla fili: The Mini PC supports WiFi 5 (802.11ac). Once the system boots, navigate to Windows settings to connect to your preferred Wi-Fi network.
4.3 VESA Mount Installation
The included VESA mount allows you to attach the Mini PC to the back of a compatible monitor or to a wall, saving desk space.
- Secure the VESA bracket to the back of your monitor or desired surface using the provided screws.
- Slide the Mini PC onto the mounted bracket until it clicks securely into place.

An infographic illustrating features like energy efficiency, Wake On LAN, dual display support, 2.5G LAN, and VESA wall mount capability.
5. Istruzzjonijiet Operattivi
5.1 Power On/Off
- Qawwa Mixgħul: Press the Power Button on the front panel.
- Itfi: In Windows 11, click the Start button, then Power > Shut down.
5.2 Windows 11 Home
Your Beelink MINI S12 comes pre-installed with Windows 11 Home. Follow the on-screen instructions for initial setup, including language, region, and user account creation.
5.3 Dual Display Setup
The Mini PC supports dual display output via its two HDMI ports. Connect two monitors to the HDMI ports. Windows 11 will automatically detect the displays. You can configure display settings (extend, duplicate, or second screen only) by right-clicking on the desktop and selecting 'Display settings'.
5.4 Wake On LAN (WOL) and Auto Power On
The MINI S12 supports Wake On LAN (WOL) and Auto Power On features. These can be configured in the BIOS settings to automatically power on the device at a scheduled time or remotely via a network signal. For detailed instructions on configuring these features, please refer to the official Beelink website or support resources.
6. Espansjoni tal-Ħażna
The Beelink MINI S12 includes a 256GB M.2 SATA3 SSD. For additional storage, you can install a 2.5-inch SATA HDD or SSD (up to 2TB) into the dedicated bay.
6.1 Installing a 2.5-inch SATA Drive
- Ensure the Mini PC is powered off and disconnected from the power adapter.
- Carefully remove the four screws from the bottom cover of the Mini PC.
- Gently lift the bottom cover to reveal the internal components and the 2.5-inch drive bay.
- Connect the pre-attached SATA data and power cable to your 2.5-inch SATA HDD/SSD.
- Place the drive into the bay and secure it with the provided screws.
- Replace the bottom cover and secure it with the four screws.

An internal diagram showing the two M.2 SSD slots (PCIe 3.0 x1 and PCIe 3.0 x4) for storage expansion, compatible with SATA3 SSDs.
6.2 Video Guide for Storage Expansion
Video demonstrating the installation of a 2.5-inch SATA hard drive or SSD into the Beelink MINI S12 Mini PC.
7. Manutenzjoni
7.1 Tindif
To maintain optimal performance, regularly clean the exterior of the Mini PC with a soft, dry cloth. Ensure ventilation openings are free from dust and obstructions. Do not use liquid cleaners directly on the device.
7.2 Aġġornamenti tas-Software
Keep your Windows 11 operating system and device drivers updated. Regular updates improve system stability, security, and performance. Access Windows Update through the Settings menu. For driver updates, visit the Beelink official website or use Intel's Driver & Support Assistant.
8 Issolvi l-problemi
- Ebda Display: Ensure all HDMI cables are securely connected to both the Mini PC and the monitor. Verify the monitor input source is correctly selected. Try a different HDMI cable or monitor if possible.
- Ebda Qawwa: Check if the power adapter is correctly connected to the Mini PC and a working power outlet. Ensure the power button is pressed firmly.
- Kwistjonijiet ta' Konnettività tan-Netwerk: For wired connections, check the Ethernet cable and router status. For Wi-Fi, ensure the Wi-Fi adapter is enabled in Windows settings and you are connected to the correct network with the correct password.
- Prestazzjoni bil-mod: Close unnecessary applications. Check for background processes consuming high resources (Task Manager). Ensure sufficient free storage space. Consider running a disk cleanup or antivirus scan.
- Irrisettjar tal-BIOS: If experiencing system instability or issues after configuration changes, use the CLR CMOS button on the front panel to reset BIOS settings to default.
If issues persist, refer to the Beelink support websit jew ikkuntattja lis-servizz tal-konsumatur.
9. Speċifikazzjonijiet
Key technical specifications for the Beelink MINI S12 Mini PC:
| Karatteristika | Speċifikazzjoni |
|---|---|
| Tip ta' Prodott | Mini PC (Navy Blue) |
| Dimensjonijiet | 4.52" x 4.01" x 1.54" (115x102x39mm) |
| CPU | Intel Alder Lake-N N95 Processor (4C/4T, 6MB Smart Cache, Max Turbo Frequency 3.4GHz) |
| Grafika | Intel UHD Graphics 1.20 GHz (16EUs) |
| RAM | 12GB LPDDR5 4800MT/s |
| Sistema Disk | M.2 2280 SSD (NVMe/SATA3 SSD Max 2TB) - 256GB included |
| Internal Slot | M.2 2280 SSD (M.2 PCIe X1 Max 2TB), 2.5" SATA HDD/SSD bay |
| Interfaces | 4x USB 3.2 Gen2, 1x 2.5G LAN, 2x HDMI (4K 60Hz), 1x 3.5mm Phone Jack, 1x DC Jack, 1x CLR CMOS Button, 1x Locking Slot |
| Netwerk | WiFi 5 (802.11ac), Bluetooth 4.2 |
| Sistema Operattiva | Windows 11 Home |
| Adapter tal-Enerġija | Input: 100-240V AC, 50/60Hz; Output: 12V 3A |
| Temperatura tax-Xogħol | 0°C–40°C, 90% @40°C Humidity |
| Temperatura tal-Ħażna | -20°C–60°C, 90% @40°C Humidity |
| Funzjonijiet Addizzjonali | WOL (Wake On LAN), Auto Power On |

A comprehensive table listing the product type, dimensions, CPU, graphics, system disk, internal slot, interface, network, CLR CMOS button, power button, adapter, working temperature, storage temperature, additional functions, and accessories.
10. Garanzija u Appoġġ
Beelink provides comprehensive support for your MINI S12 Mini PC:
- Garanzija: A 1-year worry-free warranty is included from the date of purchase.
- Appoġġ Tekniku: Lifetime technical support is available for all Beelink Mini PCs.
- Servizz tal-Klijent: 7/24 customer service is provided to assist with any questions or issues.
All Beelink Mini PCs have obtained FCC, CE, and RoHS certifications, ensuring product quality and safety.
For technical assistance or warranty claims, please visit the official Beelink support webis-sit jew ikkuntattja lit-tim tas-servizz tal-konsumatur tagħhom direttament.


