1. Introduzzjoni
This manual provides comprehensive instructions for the installation, operation, and maintenance of your VELUX KLI 311 US Skylight Remote Control Keypad. This keypad is designed exclusively for controlling VELUX motor-powered skylights, including both solar-powered and electric models. It functions as a wireless, wall-mounted control unit, offering convenient one-touch operation for opening, closing, and stopping your skylights. The KLI 311 US can control a single skylight or multiple skylights of the same product type simultaneously using a 1-way io-Homecontrol RF signal. It is a direct replacement for KLI 110 US and KLI 310 US models, specifically for skylight operation.
2. Prodott Aktarview
The VELUX KLI 311 US keypad is a sleek, white, wall-mounted unit featuring intuitive controls for your skylights.

Figura 1: Quddiem view of the VELUX KLI 311 US Skylight Remote Control Keypad, showing the circular control pad with up, down, and stop buttons.

Figura 2: Close-up view of the VELUX KLI 311 US Keypad, highlighting the VELUX logo and the control buttons.
Keypad Components:
- Buttuna tal-Vleġġa 'l fuq: Initiates the opening of the skylight.
- Buttuna tal-Vleġġa 'l isfel: Initiates the closing of the skylight.
- Buttuna taċ-Ċentru: Stops the skylight's movement at any desired position.
- Kompartiment tal-batterija: Located on the rear of the unit.
- Pjanċa tal-Immuntar: Għal installazzjoni sigura mal-ħajt.
3. Setup
3.1 Installazzjoni tal-batterija
- Gently remove the back cover of the keypad to access the battery compartment.
- Daħħal żewġ (2) batteriji AAA, waqt li tiżgura l-polarità korretta (+/-) kif indikat ġewwa l-kompartiment.
- Ibdel il-qoxra ta' wara b'mod sikur.
Note: Batteries are not included with the keypad and must be purchased separately.
3.2 Immuntar tat-Tastiera
The KLI 311 US is designed for wireless wall-mounted installation.
- Choose a convenient location on a wall, within range of your VELUX skylight(s). Ensure the surface is clean and dry.
- Use the provided mounting hardware (screws or adhesive, depending on the kit) to secure the mounting plate to the wall.
- Snap the keypad onto the mounted plate. Ensure it is firmly attached.

Figure 3: The VELUX KLI 311 US Keypad mounted on a wall, positioned conveniently near a VELUX skylight.
3.3 Pairing with Skylight(s)
Follow the specific pairing instructions provided with your VELUX motor-powered skylight. Generally, this involves:
- Activating the pairing mode on your VELUX skylight (refer to your skylight's manual for exact steps).
- Within a short timeframe, press and hold a specific button combination on the KLI 311 US keypad (e.g., the 'stop' button or a combination of up/down) until the skylight responds, indicating successful pairing.
- Test the operation to confirm the keypad is controlling the skylight correctly.
4. Istruzzjonijiet Operattivi
The VELUX KLI 311 US keypad offers simple, intuitive control over your VELUX motor-powered skylights.
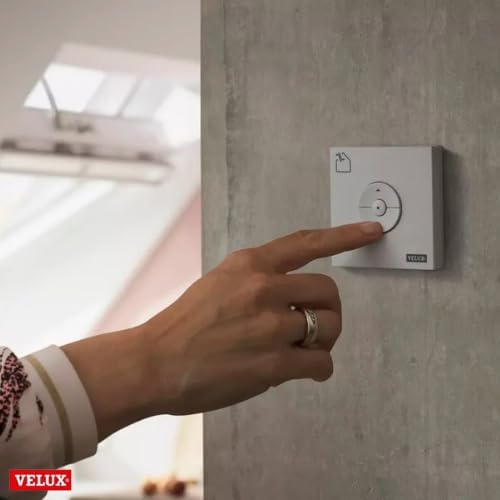
Figure 4: A hand pressing one of the control buttons on the wall-mounted VELUX KLI 311 US Keypad.
4.1 Operazzjoni Bażika
- Biex tiftaħ: Agħfas il- ▲ (Up Arrow) button. The skylight will open fully.
- Biex tagħlaq: Agħfas il- ▼ (Down Arrow) button. The skylight will close fully.
- Biex Tieqaf: Agħfas il- ● (Center) button at any point during opening or closing to halt the skylight's movement.
4.2 Controlling Multiple Skylights
If multiple VELUX motor-powered skylights of the same product type are paired with the KLI 311 US keypad, they will operate simultaneously when a command is issued. This allows for convenient control of all linked skylights with a single touch.
5. Manutenzjoni
5.1 Sostituzzjoni tal-batterija
When the keypad's response becomes inconsistent or stops functioning, it is likely time to replace the batteries.
- Remove the keypad from its mounting plate.
- Iftaħ il-kompartiment tal-batterija fuq wara.
- Remove the old AAA batteries and dispose of them responsibly.
- Insert two new AAA batteries, observing correct polarity.
- Close the battery compartment and reattach the keypad to the mounting plate.
5.2 Tindif
To clean the keypad, use a soft, dry, or slightly damp cloth. Do not use abrasive cleaners, solvents, or excessive moisture, as these can damage the unit.
6 Issolvi l-problemi
| Problema | Kawża Possibbli | Soluzzjoni |
|---|---|---|
| It-tastiera ma tirrispondix. | Batteriji mejta. | Ibdel iż-żewġ batteriji AAA. |
| Skylight does not respond to keypad. | Keypad not paired or pairing lost. | Re-pair the keypad with your VELUX skylight(s) following the instructions in Section 3.3. |
| Kontroll intermittenti. | Low battery power or signal interference. | Replace batteries. Ensure no large metal objects or strong electronic devices are blocking the signal path. |
| Keypad controls wrong skylight. | Tqabbil mhux korrett. | Reset the keypad (refer to VELUX support if needed) and re-pair with the correct skylight(s). |
7. Speċifikazzjonijiet
- Mudell: KLI 311 US
- Manifattur: VELUX
- Kompatibilità: VELUX Motor-Powered Skylights (Solar and Electric)
- Funzjoni: Open, Close, Stop Skylight Operation Only (Not for Blinds)
- Teknoloġija bla fili: 1-way io-Homecontrol RF signal
- Sors tal-Enerġija: 2 x Batteriji AAA (mhux inklużi)
- Kulur: Abjad
- Piż tal-oġġett: 4.8 uqija
- Dimensjonijiet tal-pakkett: 5.9 x 4.3 x 1 pulzieri
8. Garanzija u Appoġġ
For specific warranty information regarding your VELUX KLI 311 US Skylight Remote Control Keypad, please refer to the warranty documentation included with your purchase or visit the official VELUX website. For technical support, troubleshooting assistance beyond this manual, or to inquire about replacement parts, please contact VELUX customer service directly.
VELUX Customer Support: Jekk jogħġbok żur www.veluxusa.com or refer to your product packaging for contact details.


