Introduzzjoni
The SilverStone FARA B1 is an ATX tower chassis designed to provide efficient cooling and ample space for various hardware configurations. This manual provides detailed instructions for the assembly, operation, and maintenance of your FARA B1 chassis.

Figure 1: SilverStone FARA B1 ATX Chassis
Setup u Installazzjoni
1. Spakkjar u Spezzjoni
Carefully remove the chassis from its packaging. Inspect for any damage that may have occurred during transit. Retain the packaging for future transport or storage.
2. Tempered Glass Side Panel Removal
To access the interior, unscrew the four thumb screws securing the tempered glass side panel. Gently pull the panel away from the chassis and set it aside on a soft, flat surface to prevent scratches.
3. Installazzjoni tal-Motherboard
The FARA B1 supports ATX, Micro-ATX, and Mini-ITX motherboards. Ensure the standoffs align with your motherboard's mounting holes. Install the I/O shield into the rear opening of the chassis. Carefully place the motherboard onto the standoffs and secure it with screws.
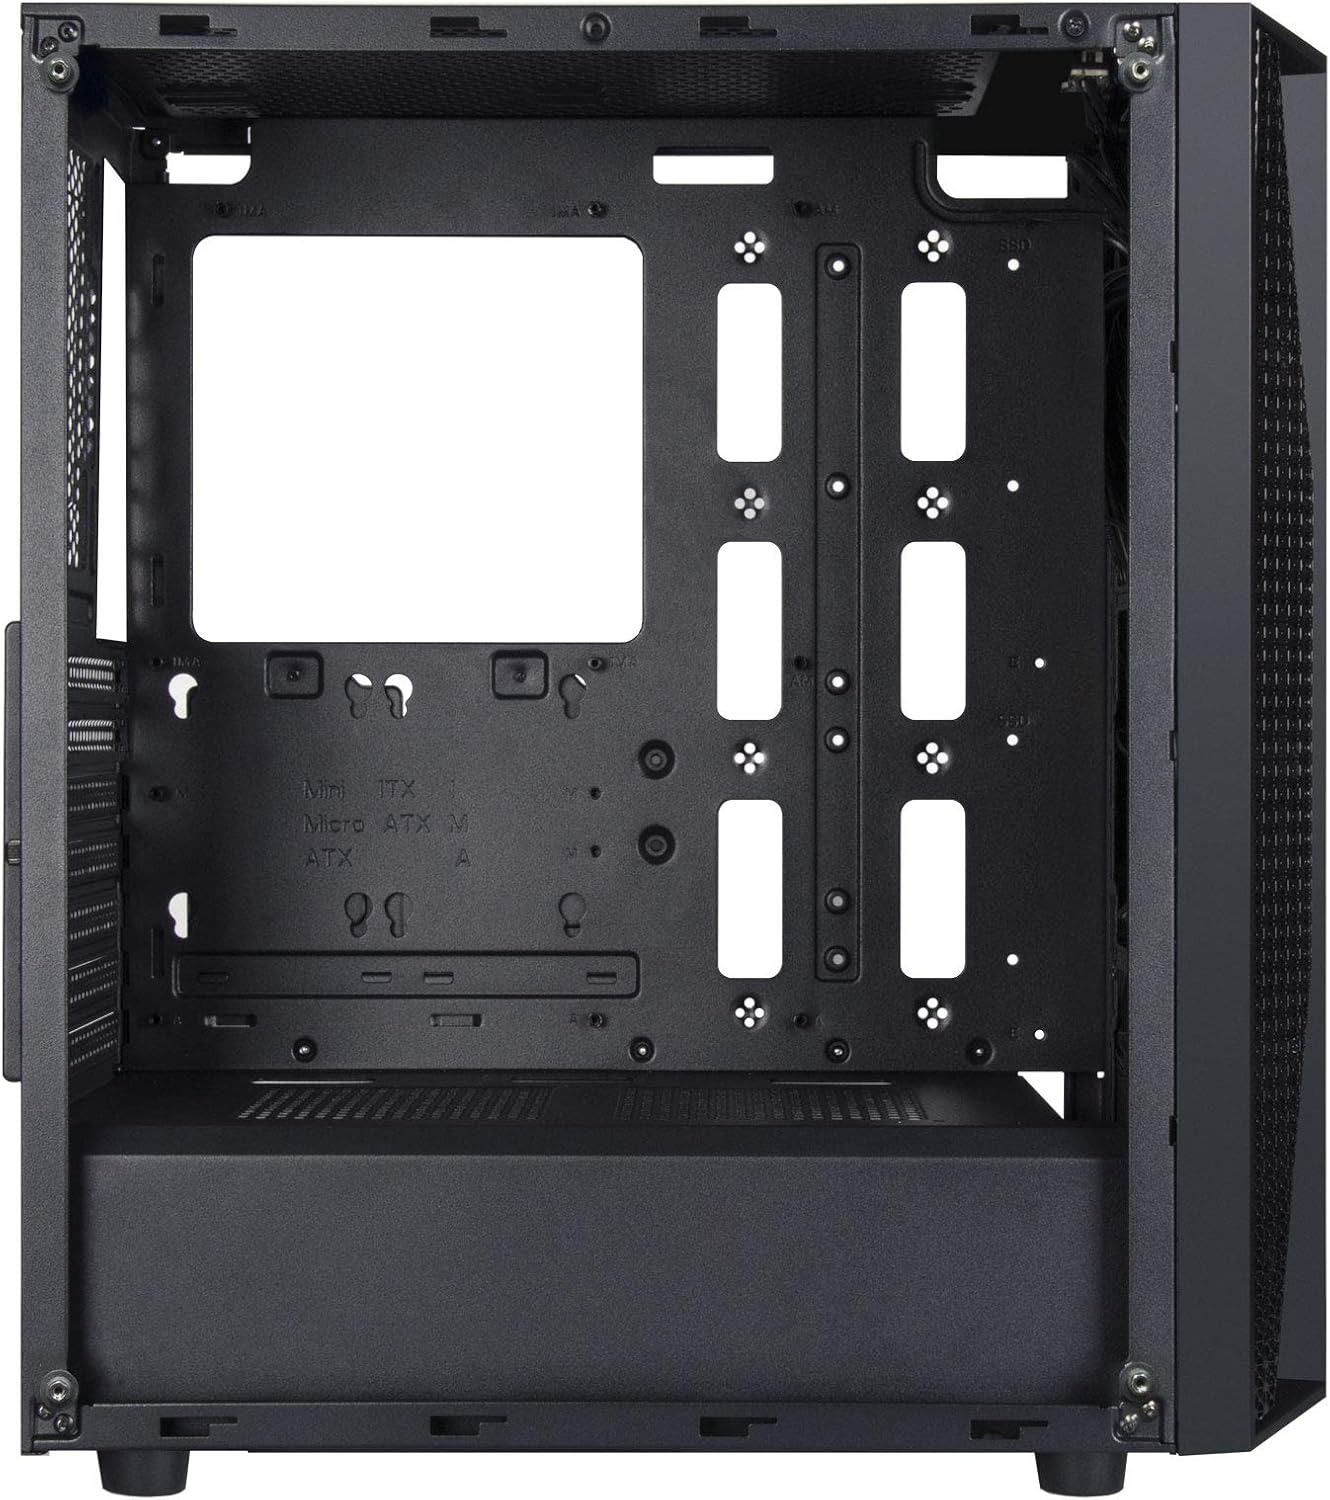
Figure 2: Chassis Interior with Motherboard Tray
4. Installazzjoni tad-Drajv tal-Ħażna
The chassis supports one 3.5" drive and four 2.5" drives.
- HDD ta' 3.5 pulzieri: Locate the drive cage beneath the PSU shroud. Slide the 3.5" HDD into the drive tray and secure it with screws.
- SSD ta' 2.5": Mount 2.5" SSDs to the dedicated mounting points behind the motherboard tray or on top of the PSU shroud. Secure with screws.

Figura 3: Gaġġa tad-Drive tal-HDD ta' 3.5"

Figure 4: 2.5" SSD Mounting Points
5. Installazzjoni ta 'Provvista ta' Enerġija
Install the ATX power supply into the dedicated compartment at the bottom rear of the chassis. Secure it with screws from the rear of the case.
6. Installazzjoni tal-Karta tal-Grafika u l-Karta tal-Espansjoni
Remove the necessary PCIe slot covers from the rear of the chassis. Insert your graphics card or other expansion cards into the motherboard's PCIe slots and secure them with screws.
7. Fan and Cooling System Installation
The FARA B1 supports multiple cooling options, including up to four 140mm fans or five 120mm fans. Install fans in the front, top, and rear positions as desired. Ensure proper airflow direction for optimal cooling.
8. Ġestjoni tal-Kejbil
Uża l-qtugħ tar-rotta tal-kejbils u l-punti ta' rbit wara t-trej tal-motherboard biex timmaniġġja l-kejbils. Dan itejjeb il-fluss tal-arja u l-estetika.
9. Konnessjonijiet I/O ta 'quddiem
Connect the front panel cables (USB 3.0, USB 2.0, HD Audio, Power, Reset, LED indicators) to the corresponding headers on your motherboard. Refer to your motherboard manual for specific header locations.

Figure 5: Top I/O Panel
Istruzzjonijiet Operattivi
1. Tixgħil / Mitfi
Press the power button located on the top I/O panel to turn your system on or off. A short press typically initiates a soft shutdown, while a long press (several seconds) forces a hard shutdown.
2. Using Front Panel Ports
The front I/O panel provides convenient access to USB 3.0, USB 2.0 ports, and a combined 3.5mm audio jack for headphones or headsets with a microphone. Ensure all necessary drivers are installed for proper functionality.

Figura 6: Eżample of a Built System
Manutenzjoni
1. Tindif tal-Filtru tat-Trab
The FARA B1 features a magnetic dust filter on the top panel and a removable filter at the bottom for the power supply intake. Regularly clean these filters to maintain optimal airflow and prevent dust buildup inside the chassis.
- Gently lift the magnetic top filter for cleaning.
- Slide out the bottom filter from the rear of the chassis.
- Uża arja kkompressata jew pinzell artab biex tneħħi t-trab akkumulat.

Figure 7: Removing Top Dust Filter
2. Tindif Ġenerali
Wipe the exterior of the chassis with a soft, damp drapp. Evita li tuża kimiċi ħarxa jew materjali li joborxu li jistgħu jagħmlu ħsara lill-finitura jew lill-ħġieġ ittemprat.
Issolvi l-problemi
Is-Sistema Mhux Mixgħul
- Kun żgur li l-provvista tal-enerġija hija mixgħula u konnessa sew mas-sokit tal-ħajt.
- Verify all power cables (24-pin ATX, 8-pin CPU, PCIe power) are securely connected to the motherboard and components.
- Iċċekkja li l-kejbil tas-swiċċ tal-enerġija tal-pannell ta' quddiem huwa konness sew mal-header tal-pannell ta' quddiem tal-motherboard.
Poor Airflow or Overheating
- Naddaf il-filtri tat-trab kollha regolarment.
- Ensure case fans are installed with the correct orientation for intake and exhaust.
- Ivverifika li l-cooler tas-CPU u l-fannijiet tal-GPU qed jaħdmu sew.
- Ittejjeb il-ġestjoni tal-kejbil biex tnaqqas l-ostruzzjonijiet għall-fluss tal-arja.
Front Panel Ports Not Working
- Check that the USB and audio cables from the front panel are securely connected to the corresponding headers on your motherboard.
- Ensure necessary drivers for USB and audio are installed and up to date.
Speċifikazzjonijiet
| Karatteristika | Dettall |
|---|---|
| Brand | SilverStone |
| Isem tal-Mudell | FARA B1 |
| Numru tal-Mudell tal-Oġġett | SST-FAB1B-G |
| Tip ta' Każ | Torri tan-Nofs |
| Kompatibbiltà tal-motherboard | ATX, Mikro-ATX, Mini-ITX |
| Materjal | Ħġieġ ittemprat, Azzar |
| Dimensjonijiet (LxWxH) | 15.79 x 8.15 x 17.56 pulzieri (401 x 207 x 446 mm) |
| Piż tal-oġġett | 13.12 liri (5.95 kg) |
| Drive Bays | 1 x 3.5", 4 x 2.5" |
| Metodu tat-tkessiħ | Arja, Ilma |
| Appoġġ tal-fann | Up to four 140mm fans / five 120mm fans |
| Portijiet I / O ta 'quddiem | USB 3.0 x 2, USB 2.0 x 1, Audio x 1 (combined 3.5mm) |
| Tip ta' Immuntar tal-Provvista tal-Enerġija | Mount tal-qiegħ |
Garanzija u Appoġġ
For warranty information, technical support, or further assistance, please visit the official SilverStone Technology webis-sit jew ikkuntattja lid-dipartiment tas-servizz tal-konsumatur tagħhom. Żomm il-prova tax-xiri tiegħek għal talbiet ta’ garanzija.
Official SilverStone Websit: www.silverstonetek.com


