1. Introduzzjoni
Thank you for choosing the MEDION MD 18085 Cordless Cyclonic 2-in-1 Stick Vacuum Cleaner. This manual provides essential information for the safe and effective use, assembly, operation, and maintenance of your appliance. Please read these instructions thoroughly before first use and keep them for future reference.
The MD 18085 is designed for dry vacuuming of dust, crumbs, and lint from smooth floors, short-pile carpets, upholstery, and car interiors. It features a powerful 120W motor, two suction power levels, and a motorized brush with LED lighting for thorough cleaning.
2. Istruzzjonijiet Importanti dwar is-Sigurtà
Biex tnaqqas ir-riskju ta’ nar, xokk elettriku, jew korriment, dejjem segwi l-prekawzjonijiet bażiċi ta’ sigurtà meta tuża apparat elettriku.
- Aqra l-istruzzjonijiet kollha qabel tuża l-apparat.
- Dan l-apparat huwa għall-użu domestiku biss. Tużax barra jew fuq uċuħ imxarrbin.
- Tħallix li l-apparat jintuża bħala ġugarell. Attenzjoni mill-qrib hija meħtieġa meta tintuża minn jew ħdejn it-tfal.
- Uża biss kif deskritt f'dan il-manwal. Uża biss l-aċċessorji rakkomandati mill-manifattur.
- Tużax b'korda jew plagg bil-ħsara. Jekk l-apparat ma jkunx qed jaħdem kif suppost, ikun waqa’, saritlu ħsara, tħalla barra, jew waqa’ fl-ilma, erġa’ lura f’ċentru ta’ servizz.
- Tiġbedx jew iġorrux bil-korda, uża korda bħala manku, agħlaq bieb fuq korda, jew iġbed korda madwar truf jew kantunieri li jaqtgħu. Tmexxix l-apparat fuq il-korda. Żomm il-korda 'l bogħod minn uċuħ imsaħħna.
- Tneħħix il-plagg billi tiġbed il-korda. Biex tneħħi l-plagg, aqbad il-plagg, mhux il-korda.
- M'għandekx timmaniġġja l-plagg jew l-apparat b'idejhom imxarrbin.
- Tpoġġi l-ebda oġġett fil-fetħiet. Tużax b'xi ftuħ imblukkat; żomm ħieles minn trab, lint, xagħar, u kull ħaġa li tista 'tnaqqas il-fluss ta' l-arja.
- Żomm ix-xagħar, il-ħwejjeġ maħlula, is-swaba’, u l-partijiet kollha tal-ġisem 'il bogħod mill-fetħiet u l-partijiet li jiċċaqilqu.
- Tiġborx xi ħaġa li tkun qed taħraq jew tpejjep, bħal sigaretti, lofarini, jew irmied jaħraq.
- Tużax biex tiġbor likwidi li jaqbdu jew kombustibbli, bħall-gażolina, jew tuża f'żoni fejn jistgħu jkunu preżenti.
- Tiġborx materjal tossiku, bħal bliċ tal-kloru, ammonja, jew prodott għat-tindif tad-drejns.
- Tużax mingħajr tazza tat-trab u/jew filtri f'posthom.
- Itfi l-kontrolli kollha qabel ma splaggja.
- Uża attenzjoni żejda meta tnaddaf it-taraġ.
- Tiċċarġjax l-apparat barra.
- Uża biss il-ċarġer speċifikat mill-manifattur.
3. Kontenut tal-Pakkett
Carefully unpack all items and ensure you have received all components listed below. If any parts are missing or damaged, contact customer support.
- MEDION MD 18085 Cordless Cyclonic Vacuum Cleaner (main unit)
- Floor Brush (motorized with LED lighting)
- Multi-function Nozzle (includes upholstery brush and crevice tool)
- Mount Wall
- Adapter tal-Enerġija

Figure 3.1: Multi-function nozzle and wall mount accessories.
4. Setup
4.1 Assemblea
- Attach the extension tube to the main handheld unit until it clicks into place.
- Connect the floor brush to the other end of the extension tube, ensuring it is securely fastened.
- Alternatively, for handheld use, attach the multi-function nozzle directly to the main unit.

Figure 4.1: Fully assembled vacuum cleaner.
4.2 Iċċarġjar tal-batterija
Before first use, fully charge the vacuum cleaner's battery. The battery provides approximately 30 minutes of runtime on a full charge.
- Qabbad l-adapter tal-enerġija mal-port tal-iċċarġjar fuq l-unità prinċipali.
- Ipplaggja l-adapter tal-enerġija f'sokit tal-ħajt adattat.
- The charging indicator lights will illuminate, showing the charging status. Allow the unit to charge until the indicators show a full charge.

Figure 4.2: Charging the vacuum cleaner.
4.3 Installazzjoni tal-Wall Mount
Il-muntatura tal-ħajt inkluża tippermetti ħażna u ċċarġjar konvenjenti.
- Choose a suitable location near a power outlet, ensuring it is at an appropriate height for easy access.
- Mark the drilling points on the wall using the wall mount as a template.
- Drill holes and insert wall plugs (if necessary, depending on wall material).
- Secure the wall mount to the wall using appropriate screws.
- Hang il-vacuum cleaner fuq il-muntaġġ tal-ħajt.
5. Istruzzjonijiet Operattivi
5.1 Power On/Off and Suction Levels
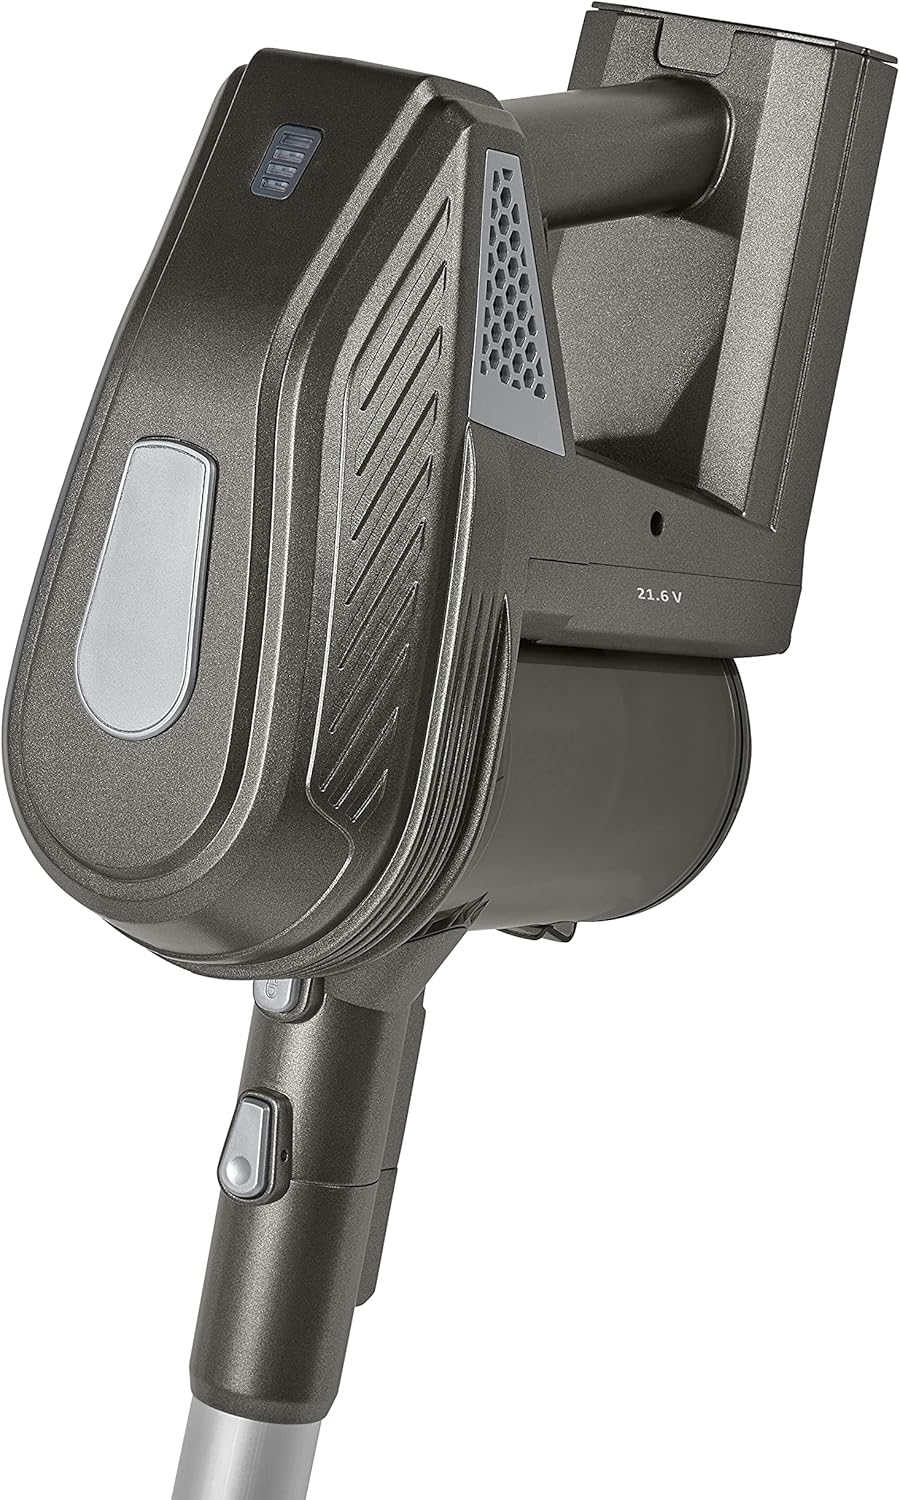
Figure 5.1: Handheld unit with controls.
- To turn on the vacuum cleaner, press the power button located on the handle. The appliance will start in the standard suction mode.
- To switch to the higher suction power level, press the power button again.
- To turn off the vacuum cleaner, press the power button a third time.
5.2 L-Użu tal-Annessi
- Xkupilja tal-art: Use the motorized floor brush for cleaning hard floors and short-pile carpets. The integrated LED lights illuminate dark areas, ensuring no dust is missed.
- Multi-function Nozzle: This attachment combines an upholstery brush and a crevice tool. Use the upholstery brush for cleaning furniture, curtains, and car seats. The crevice tool is ideal for narrow gaps, corners, and edges.
6. Manutenzjoni
Manutenzjoni regolari tiżgura prestazzjoni ottimali u testendi l-ħajja tal-vacuum cleaner tiegħek.
6.1 Tbattil tal-Kontenitur tat-Trab
Empty the dust container regularly, preferably after each use, to maintain strong suction power.
- Kun żgur li l-vacuum cleaner huwa mitfi.
- Locate the dust container release button, usually near the handle.
- Press the button to detach the dust container from the main unit.
- Hold the dust container over a waste bin and open its bottom flap to release the collected dust and debris.
- Close the flap and reattach the dust container to the main unit until it clicks securely.
6.2 Tindif tal-Filtru
The cartridge filter should be cleaned periodically to prevent clogging and maintain suction efficiency.
- Neħħi l-kontenitur tat-trab kif deskritt hawn fuq.
- Carefully remove the filter from inside the dust container.
- Tap the filter gently over a waste bin to remove loose dust. For a more thorough clean, rinse the filter under cold running water.
- Allow the filter to air dry completely for at least 24 hours before reinserting it. Do not use the vacuum cleaner with a wet filter.
- Once dry, place the filter back into the dust container and reattach the container to the main unit.
6.3 Aċċessorji għat-Tindif
Regularly check and clean the floor brush and other nozzles.
- Xkupilja tal-art: Remove any tangled hair or fibers from the brush roll using scissors or a brush cleaning tool. Ensure the brush roll spins freely.
- Other Nozzles: Wipe down the multi-function nozzle and crevice tool with a damp drapp biex tneħħi kwalunkwe ħmieġ jew debris.
7 Issolvi l-problemi
Jekk tiltaqa' ma' problemi bil-vacuum cleaner tiegħek, irreferi għat-tabella li ġejja għal problemi u soluzzjonijiet komuni.
| Problema | Kawża Possibbli | Soluzzjoni |
|---|---|---|
| Vacuum cleaner ma jixgħelx. | Il-batterija mhix iċċarġjata. | Iċċarġja l-batterija kompletament. |
| Il-buttuna tal-qawwa mhux ippressata sew. | Kun żgur li l-buttuna tal-qawwa hija ppressata sew. | |
| Qawwa baxxa ta 'ġbid. | Il-kontenitur tat-trab huwa mimli. | Battal il-kontenitur tat-trab. |
| Il-filtru huwa misdud. | Naddaf jew ibdel il-filtru. | |
| Il-pajp jew iż-żennuna huma mblukkati. | Check for and remove any blockages in the extension tube or attachments. | |
| Ir-romblu tal-pinzell mhux qed idur. | Xagħar jew debris imħabbel fir-romblu tal-pinzell. | Naddaf ir-roll tal-pinzell. |
| Floor brush not properly connected. | Ensure the floor brush is securely attached to the extension tube. |
8. Speċifikazzjonijiet
| Karatteristika | Speċifikazzjoni |
|---|---|
| Numru tal-Mudell | MD 18085 |
| Brand | MEDION |
| Qawwa | 120 Watts |
| Voltage | 21.6 Volts |
| Qawwa tal-ġbid | 7 kPa (approximate, depending on mode) |
| Runtime | Sa 30 minuta |
| Sors tal-Enerġija | Li jaħdem bil-batterija |
| Fattur tal-Formola | Stick, Handheld (2-in-1) |
| Karatteristika Speċjali | Bagless, Cordless, Motorized brush with LED |
| Tip ta 'filtru | Skartoċċ |
| Rakkomandazzjoni tal-wiċċ | Art iebsa, Tapit |
| Kulur | Griż |
9. Garanzija u Appoġġ
For warranty information or technical support, please refer to the warranty card included with your product or visit the official MEDION websit. Żomm il-prova tax-xiri tiegħek għal kwalunkwe talba ta' garanzija.
If you have questions or require assistance, please contact MEDION customer service. Contact details can typically be found on the manufacturer's websit jew fl-ippakkjar tal-prodott.


