1. Introduzzjoni
This manual provides detailed instructions for the installation and proper use of the Brinonac Screen Replacement for iPhone 7 Plus 5.5 inch. This product is designed to replace damaged or malfunctioning screens, restoring your device's display and touch functionality.
Kompatibilità: This screen replacement is exclusively designed for iPhone 7 Plus 5.5 inch models A1661, A1784, and A1785. It is not compatible with other iPhone models or brands. Please verify your device model before proceeding with installation.
This replacement screen addresses common issues such as cracked glass, unresponsive touch, dead pixels, display color abnormalities, and a completely black screen.

Image 1.1: The Brinonac iPhone 7 Plus screen replacement kit, including the LCD digitizer assembly and a set of repair tools.
2. Prekawzjonijiet ta' Sigurtà Importanti
Adhering to these precautions is crucial to prevent damage to your device or the new screen and to ensure a successful repair.
- Apparat mitfi: Before beginning any repair, ensure your iPhone is completely powered off and disconnected from any power source.
- Immaniġġja b'Kura: The screen assembly contains delicate components. Avoid excessive force, bending, or dropping the screen.
- Elettriku Statiku: Discharge any static electricity from your body before handling internal components. Consider using an anti-static wrist strap.
- Organizza l-Viti: iPhone screws vary in size. Keep track of each screw's original location to avoid damaging internal components during reassembly.
- Test Qabel l-Assemblaġġ Finali: It is imperative to test the new screen's functionality (display, touch, 3D Touch) before fully reassembling the device.

Image 2.1: Visual reminder to test the screen's functionality before completing the installation process.
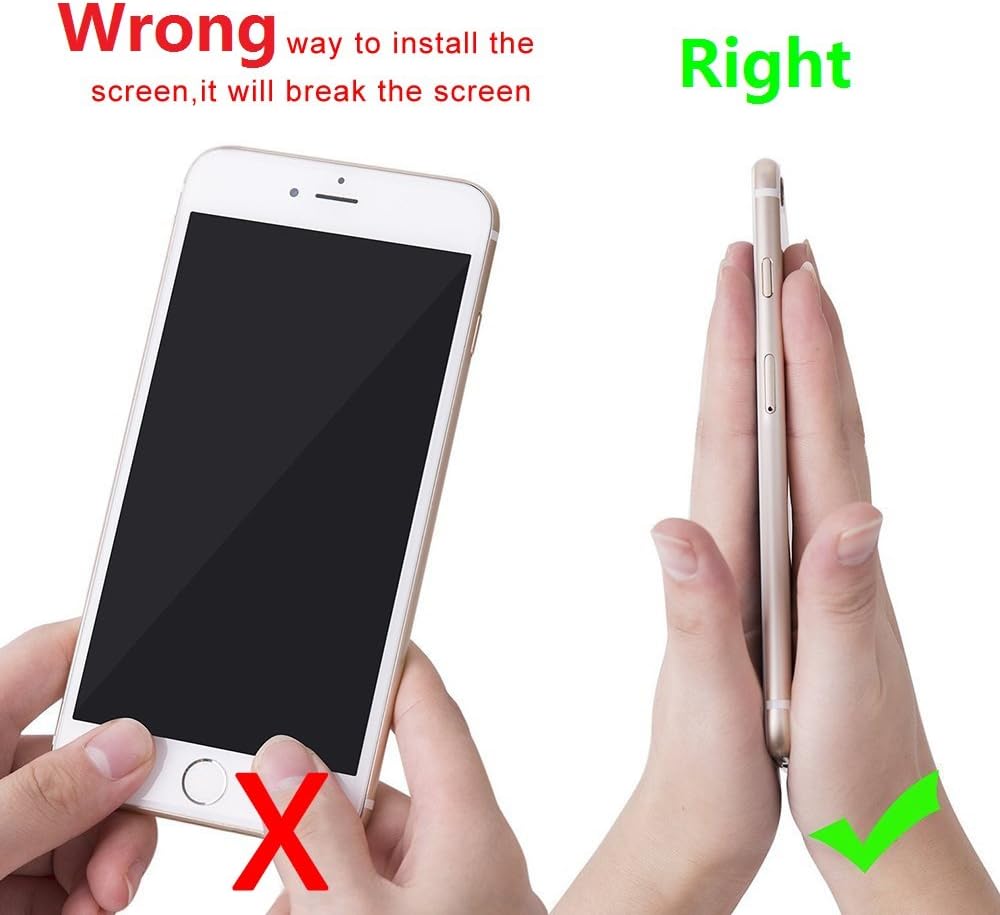
Image 2.2: Illustration demonstrating the correct method for installing the screen to prevent damage, contrasting with an incorrect method.
3. Kontenut tal-Pakkett
Your Brinonac iPhone 7 Plus screen replacement kit typically includes the following items:
- Brinonac LCD Digitizer Touch Screen Assembly for iPhone 7 Plus
- Set of precision repair tools (various screwdrivers, pry tools, suction cup, SIM ejector pin)
- Waterproof frame adhesive sticker
- Protettur tal-iskrin
- Manwal ta' struzzjonijiet (dan id-dokument)
Please inspect all items upon receipt to ensure everything is present and undamaged.
4. Setup u Installazzjoni
The installation process requires careful attention to detail. It is highly recommended to watch a comprehensive online instruction video before starting. Many resources are available on video-sharing platforms that provide step-by-step visual guidance for iPhone 7 Plus screen replacement.
4.1. Passi ta 'qabel l-installazzjoni
- Backup Your Device: Ensure all important data on your iPhone is backed up to iCloud or your computer.
- Itfi: Completely power off your iPhone.
- Remove SIM Tray: Use the SIM ejector tool to remove the SIM card tray.
- Neħħi l-Viti Pentalobe: Locate and remove the two pentalobe screws at the bottom edge of the iPhone, next to the charging port.
4.2. Disassembly (General Overview)
Using a suction cup and pry tools, carefully separate the old screen assembly from the phone's frame. Work slowly around the edges to release the adhesive. Once the screen is slightly lifted, open it like a book from the left side, being careful not to strain the ribbon cables connecting it to the logic board.
4.3. Transferring Components
The Brinonac screen replacement typically does not include the front camera, earpiece speaker, or home button assembly. These components must be carefully transferred from your original screen to the new replacement screen. This involves:
- Disconnecting and removing the metal shield covering the display cables.
- Disconnecting the battery connector to prevent accidental power-on.
- Carefully detaching the old screen's display and digitizer flex cables.
- Removing the home button assembly, front camera, and earpiece speaker from the old screen.
- Attaching these original components to the new Brinonac screen assembly.

Immaġni 4.1: Close-up view of the flexible ribbon cables and connectors on the back of the replacement screen, which connect to the iPhone's logic board.

Image 4.2: A pair of hands using specialized tools to work on the internal components of a smartphone, illustrating the delicate nature of the screen replacement process.
4.4. Connecting the New Screen and Testing
- Carefully connect the flex cables of the new screen to the corresponding connectors on the iPhone's logic board. Ensure they are seated correctly and securely.
- Erġa' qabbad il-batterija.
- Power on the iPhone to test the new screen. Check for display quality, touch responsiveness across the entire screen, 3D Touch functionality, and ensure the transferred home button, front camera, and earpiece speaker are working correctly.
- If any issues arise, power off the phone, disconnect the battery, and re-check all cable connections.
4.5. Assemblea Finali
- Once testing is complete and satisfactory, power off the iPhone and disconnect the battery.
- Apply the waterproof frame adhesive sticker around the perimeter of the phone's frame.
- Carefully align the new screen assembly with the phone's frame, ensuring the top edge is inserted first, then gently pressing down the sides and bottom until it clicks into place.
- Reinstall the two pentalobe screws at the bottom of the phone.
- Reinsert the SIM tray.
5. Istruzzjonijiet Operattivi
After successful installation, your iPhone 7 Plus should operate as expected with the new Brinonac screen.
- Qawwa Mixgħul: Press and hold the power button until the Apple logo appears.
- Funzjonalità Touch: Verify smooth and accurate touch response across the entire screen.
- Kwalità tal-Wiri: The screen offers high resolution and brightness up to 450 nits, providing clear and vibrant visuals.
- 3D Touch: Confirm that the 3D Touch feature is fully functional.

Image 5.1: An iPhone displaying a vibrant image, demonstrating the visual quality and clarity of the newly installed Brinonac screen.
6. Manutenzjoni
To ensure the longevity and optimal performance of your new screen, consider the following maintenance tips:
- Protezzjoni tal-iskrin: Utilize the included screen protector to guard against scratches and minor impacts.
- Tindif Ġentili: Clean the screen with a soft, lint-free cloth, preferably microfiber. Avoid harsh chemicals or abrasive materials.
- Evita l-waqgħat u l-impatti: While the screen is durable, severe drops or impacts can still cause damage. Consider a protective case for your device.
- Reżistenza għall-Ilma: The included waterproof frame adhesive sticker helps restore some of the iPhone's original water resistance. However, it is not guaranteed to be fully waterproof after repair. Avoid submerging your device in water.
7 Issolvi l-problemi
If you encounter issues after installation, refer to the following common problems and solutions:
| Problema | Kawża Possibbli | Soluzzjoni |
|---|---|---|
| Screen not turning on / Black screen | Loose display cable connection; Battery not reconnected; Damaged screen during installation. | Power off, disconnect battery, re-seat all display and digitizer flex cables. Ensure battery is connected. If still black, the screen may be faulty or damaged. |
| Il-mess ma jirrispondix / Mess fantażmatiku | Loose digitizer cable connection; Debris on connectors; Screen defect. | Power off, disconnect battery, re-seat digitizer flex cable. Clean connectors gently. If issue persists, the screen may be faulty. |
| Lines on display / Discoloration | Loose display cable connection; Screen damage during installation; Screen defect. | Power off, disconnect battery, re-seat display flex cable. If lines persist, the screen may be faulty or damaged. |
| Home button / Front camera / Earpiece not working | Components not transferred correctly; Flex cables for components are loose or damaged. | Power off, disconnect battery, re-check connections for the specific component. Ensure components were transferred without damage. |
If these troubleshooting steps do not resolve the issue, please contact Brinonac customer service for further assistance.
8. Speċifikazzjonijiet tal-Prodott
- Isem tal-Prodott: Brinonac Screen Replacement for iPhone 7 Plus
- Numru tal-Mudell: B7PB01
- Kompatibilità: iPhone 7 Plus 5.5 inch (Models A1661, A1784, A1785)
- Tip ta' wiri: LCD Digitizer Touch Screen
- Kulur: Iswed
- Luminożità: Sa 450 nits
- Dimensjonijiet tal-Prodott: 5.91 x 0.31 x 2.36 pulzieri
- Piż tal-oġġett: 5.6 uqija
9. Garanzija u Servizz tal-Klijent
Brinonac provides a one-year warranty service for quality issues that are not caused by human error or improper installation. Each screen undergoes strict testing before shipment to ensure quality.
If you encounter any problems with your Brinonac iPhone 7 Plus screen replacement or are dissatisfied with the product, please contact Brinonac customer service. Our support team is available to assist you with troubleshooting and warranty claims.
For warranty service or technical support, please refer to the contact information provided with your purchase or visit the official Brinonac websit.


