1. Introduzzjoni
This manual provides detailed instructions for the installation, operation, and maintenance of your DEATTI 8-Channel 2K Wireless Security Camera System. Please read this manual thoroughly before using the product to ensure proper setup and functionality.

Immaġni 1.1: Fuqview of the DEATTI 8-Channel 2K Wireless Security Camera System, showing the NVR unit, eight cameras, and a 1TB hard drive.
The DEATTI 2K wireless surveillance system features an integrated router and Wi-Fi antenna for stable and long-range wireless connectivity. It supports motion detection, P2P remote access, and offers a true plug-and-play setup experience.
2. Kontenut tal-Pakkett
Iċċekkja li l-oġġetti kollha elenkati hawn taħt huma preżenti fil-pakkett tiegħek. Jekk xi oġġetti huma neqsin jew bil-ħsara, jekk jogħġbok ikkuntattja l-appoġġ għall-klijenti.

Image 2.1: Visual representation of the complete package contents, including the NVR, cameras, and accessories.
- 1 x Reġistratur tal-Vidjo tan-Netwerk ta' 8 Kanali (NVR)
- 8 x Kameras IP bla fili ta' 3MP
- 1 x 1TB Hard Disk Drive (Pre-installed)
- 1 x USB Mouse
- 8 x Adapters tal-Enerġija tal-Kamera
- 1 x Adapter tal-Enerġija NVR
- 8 x Screw Bags (for camera mounting)
- 1 x Antenna (for NVR, if not pre-attached)
- 1 x Gwida Quick Start
3. Setup tas-Sistema
3.1 Konnessjoni Inizjali
Follow these steps for the initial setup of your security system:
- Connect the NVR to a monitor using an HDMI or VGA cable.
- Connect the USB mouse to the NVR's USB port.
- Qabbad l-NVR ma' sors ta' enerġija billi tuża l-adapter tal-enerġija tal-NVR ipprovdut.
- Connect each camera to its respective power adapter and plug them into an electrical outlet. The cameras will automatically pair with the NVR.
- For internet access and remote viewing, connect the NVR to your router using an Ethernet cable.

Image 3.1: NVR system connection ports for monitor, internet, mouse, and power.
3.2 Wireless Connection and Range
The system utilizes a wireless connection between the cameras and the NVR. Each camera can also function as a Wi-Fi repeater to extend the wireless range.
- Firxa ta' Spazju Miftuħ: Sa 1000 pied (madwar 300-il metru).
- With Obstacles: Up to 200 feet (approximately 60 meters), depending on the type and number of obstacles (e.g., walls).

Image 3.2: Illustration of the auto-pairing feature between a camera and the NVR.

Image 3.3: Wireless signal range comparison: up to 1000ft in open space and up to 200ft with obstacles.
4. Konfigurazzjoni tal-Aċċess Remot
The system supports P2P (Peer-to-Peer) remote access, allowing you to view foo ħajtage and recordings from your mobile device or computer without complex network configurations.
4.1 Konfigurazzjoni tal-App Mobbli
To access your system remotely via a smartphone or tablet:
- Download the recommended mobile application (e.g., 'IP Pro' or 'EseeCloud') from your device's app store.
- Irreġistra kont u illoggja.
- Add your NVR device by scanning the QR code displayed on your NVR's monitor or by manually entering the device ID.
- Ladarba żżidha, tista' view live feeds and manage settings from your mobile device.
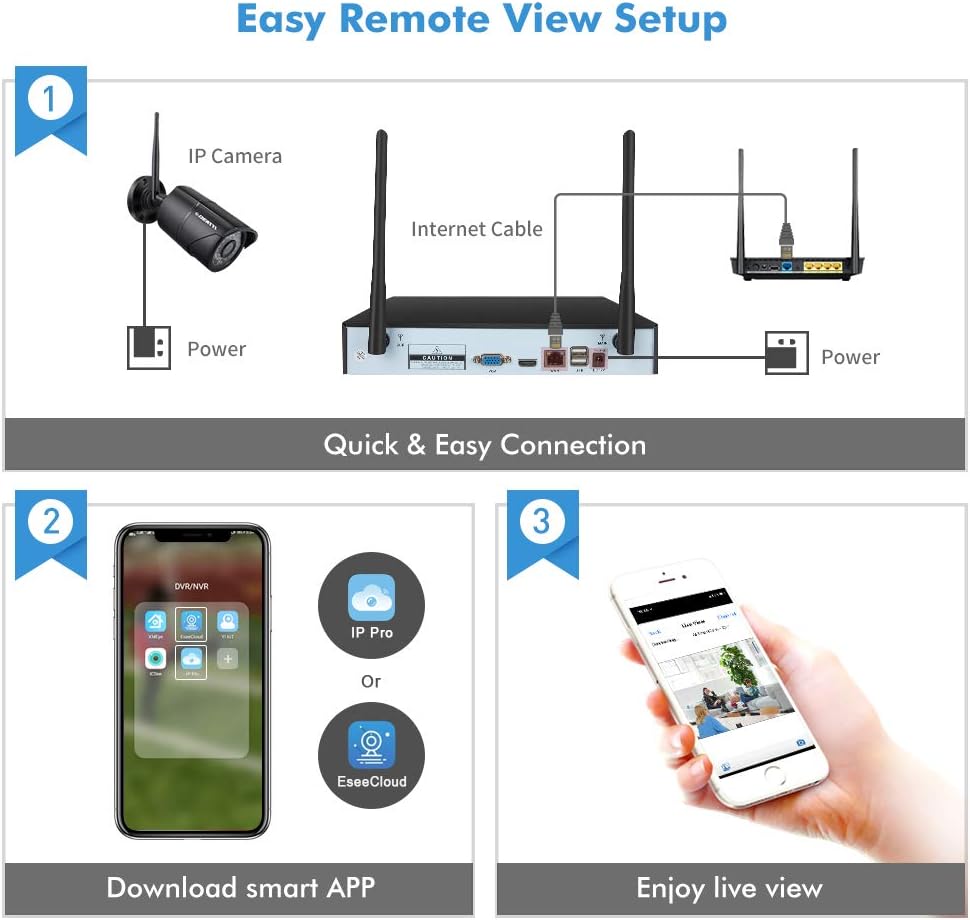
Image 4.1: Guide for setting up remote viewing, including NVR-router connection, app download, and live monitoring.
5. Istruzzjonijiet Operattivi
5.1 Ħaj View u Reġistrazzjoni
After successful setup, the NVR will display live feeds from all connected cameras. The pre-installed 1TB HDD will automatically begin recording based on default settings (typically continuous recording or motion-triggered recording).
- Viewing: Use the connected monitor and USB mouse to navigate the NVR interface. You can switch between single-camera view u grilja b'ħafna kameras view.
- Daqq: Aċċess irreġistrat footage through the NVR's playback menu. You can search by date, time, and event type.
5.2 Sejbien tal-Mozzjoni u Twissijiet
The system features integrated motion detection. When motion is detected in a camera's field of view, it can trigger recording and send alerts.
- Konfigurazzjoni: Access the NVR's menu to configure motion detection zones, sensitivity, and recording schedules for each camera.
- Twissijiet: Enable email notifications or push notifications to your mobile app to receive instant alerts when motion is detected.

Immaġni 5.1: Eż.ample of an instant email alert received on a smartphone after motion detection.
5.3 Viżjoni ta' Binhar u ta' Bil-Lejl
The cameras are equipped with infrared (IR) LEDs for night vision, providing clear surveillance in low-light or no-light conditions. The system automatically switches between day (color) and night (black and white IR) modes.

Image 5.2: Visual comparison of camera performance in daylight and nighttime conditions.
6. Manutenzjoni
6.1 Camera Care
- Tindif: Naddaf il-lentijiet tal-kamera regolarment b'drapp artab u dryer.amp drapp biex tiżgura kwalità ta' immaġni ċara. Evita prodotti tat-tindif li joborxu.
- Protezzjoni tat-Temp: The cameras are IP66 weatherproof, designed to withstand various outdoor conditions. However, extreme weather may affect performance.

Image 6.1: An outdoor camera operating in snowy conditions, highlighting its weatherproof construction.
6.2 NVR Maintenance
- Ventilazzjoni: Kun żgur li l-NVR jitqiegħed f'żona ventilata tajjeb biex tevita li jisħon iżżejjed.
- Aġġornamenti tal-Firmware: Periodically check for and install firmware updates to ensure optimal performance and security.
- Ġestjoni tal-Hard Drive: The 1TB hard drive will overwrite older footage once full. Back up important recordings regularly.
7 Issolvi l-problemi
- L-ebda Immaġni fuq il-Monitor:
- Check power connections for both NVR and monitor.
- Verify HDMI/VGA cable connection.
- Ensure the correct input source is selected on your monitor. - Cameras Not Connecting:
- Ensure cameras are powered on.
- Check the distance between cameras and NVR; reduce obstacles if possible.
- Re-pair cameras with the NVR if necessary (refer to the Quick Start Guide for pairing instructions). - Ebda Aċċess Remot:
- Ensure the NVR is connected to your router via Ethernet cable.
- Verify your internet connection.
- Check app settings and device ID for accuracy. - Viżjoni fqira bil-lejl:
- Clean the camera lens.
- Ensure there are no obstructions blocking the IR LEDs.
- Adjust camera angle to avoid reflective surfaces.
8. Speċifikazzjonijiet
| Brand | DEATTI |
| Numru tal-Mudell | DE-DET-8Na2M8WCa2M1TB |
| Teknoloġija tal-Konnettività | Bil-fili, bla fili |
| Riżoluzzjoni ta' Reġistrazzjoni tal-Vidjo | 1440p (2K) |
| Karatteristika Speċjali | Sejbien tal-Moviment |
| Numru ta 'Kanali | 8 |
| Kulur | Iswed |
| Sors tal-Enerġija | Power Adapter Operated |
| Dimensjonijiet (L x W x H) | 33.3 x 29.9 x 29 ċm |
| Użi Rakkomandati | Motion Detection, Surveillance |
| Apparati Kompatibbli | Smartphones, Tablets, Laptops, Personal Computers |
9. Garanzija u Appoġġ
Your DEATTI 8-Channel 2K Wireless Security Camera System comes with the following:
- Garanzija ta' 30 Jum ta' Money Back: Jekk m'intix sodisfatt bix-xiri tiegħek, tista' tirritornah fi żmien 30 jum għal rifużjoni sħiħa.
- Garanzija tal-Manifattur ta' Sena: This product is covered by a 1-year manufacturer warranty against defects in materials and workmanship.
For technical assistance or warranty claims, please contact DEATTI customer support via email. Support is available in English and German.


