1. Introduzzjoni
This manual provides detailed instructions for the proper use, setup, operation, and maintenance of your Clockwise Tools DITR-0105N Digital Indicator. This precision instrument is designed for accurate dimensional measurement in various applications, including machining, metalworking, and quality control. Please read this manual thoroughly before operating the device to ensure optimal performance and longevity.
2. Informazzjoni dwar is-Sigurtà
- Handle the digital indicator with care to avoid damage to the precision components.
- Tesponix l-apparat għal temperaturi estremi, umdità, jew dawl tax-xemx dirett.
- Evita li twaqqa’ l-istrument jew li tissottomettih għal impatti qawwija.
- Keep the device clean and free from dust, oil, and other contaminants.
- Store the indicator in its protective case when not in use.
3. Prodott Aktarview
The Clockwise Tools DITR-0105N Digital Indicator features a large LCD display, dual unit conversion, and a robust design for reliable measurements.
Karatteristiċi ewlenin:
- Dual Unit Conversion: Supports both inch and metric readings.
- Extra-Large LCD Display: 1.6" x 0.7" high-contrast screen for easy readability.
- High Precision & Accuracy: 0-1" (25.4mm) measuring range, 0.00005" (0.001mm) resolution, and ±0.0002" (0.005mm) accuracy.
- Immuntar versatili: Includes flat back and lug back options (6.5mm hole size), 3/8" stem diameter, and UNF 4-48 threaded tip.
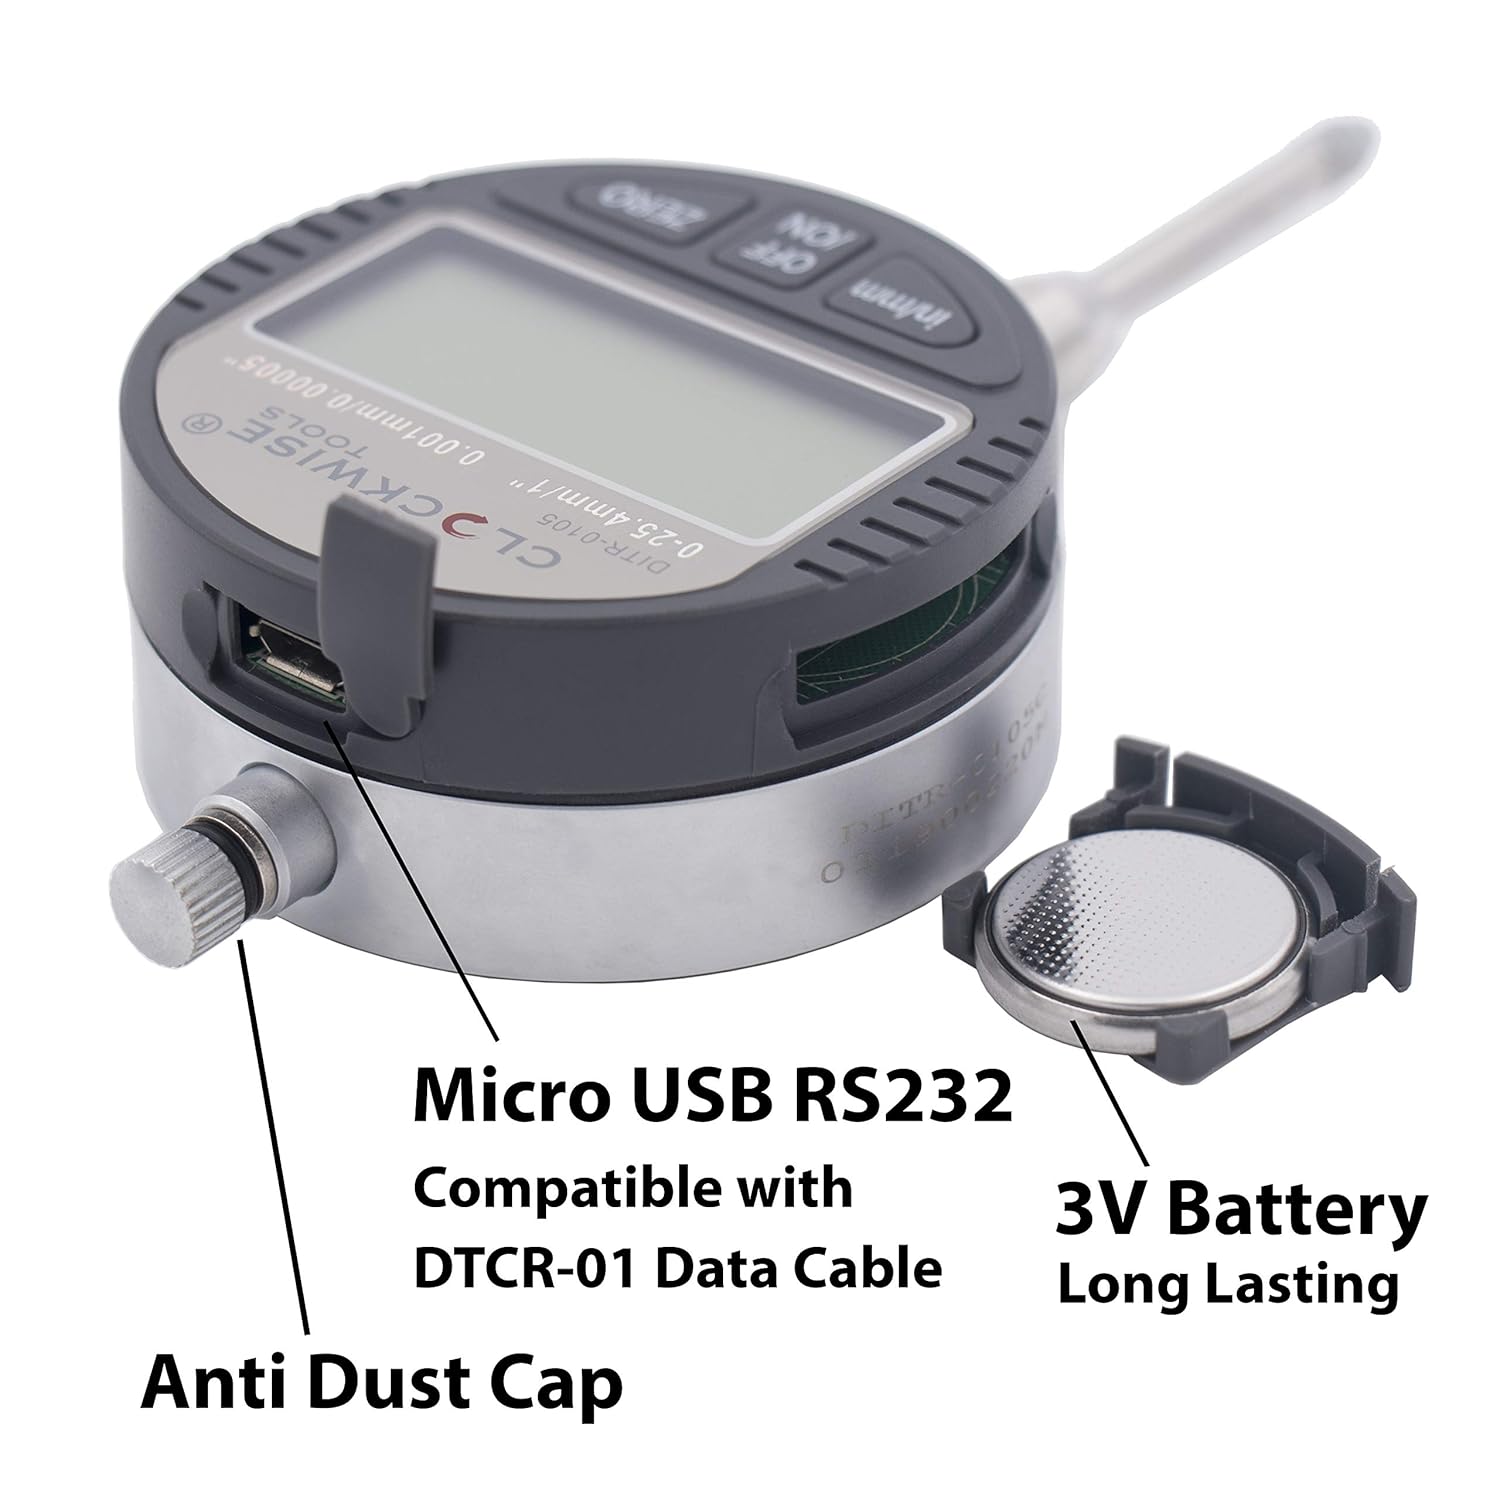
- RS232 Data Transfer: Equipped with a port for seamless measurement logging (requires Clockwise Tools DTCR-01 cable, sold separately).
Komponenti:
- Display LCD
- Pulzier/mm Buttuna
- Buttuna OFF/ON
- Buttuna ZERO
- Measuring Spindle/Contact Point
- Mounting Stem
- Data Output Port (Micro USB RS232 compatible)
- Kompartiment tal-batterija

4. Setup
4.1 Installazzjoni tal-batterija
The DITR-0105N requires two CR2032 batteries (included). To install or replace batteries:
- Locate the battery compartment cover on the back of the indicator.
- Use a small screwdriver or coin to gently open the cover.
- Insert the two CR2032 batteries with the positive (+) side facing up.
- Agħlaq l-għatu tal-kompartiment tal-batterija sew.

4.2 Immuntar tal-Indikatur
The indicator can be mounted using its 3/8" stem or via the included lug back attachment.
- Stem Mounting: Insert the 3/8" diameter stem into a compatible fixture or stand and secure it.
- Lug Back Mounting: Attach the lug back plate to the indicator's rear using the provided screws. Then, mount the lug back to a fixture using its 6.5mm hole.

5. Operazzjoni
5.1 Power On/Off
- Agħfas il- OFF/ON button to turn the indicator on.
- Agħfas u żomm il- OFF/ON button to turn the indicator off. The device does not have an auto-off feature.
5.2 Żero tal-Wiri
To set a reference point (zero) for your measurements:
- Position the measuring spindle at the desired reference point.
- Agħfas il- ŻERO button. The display will show '0.0000' (or '0.000' in metric), and all subsequent measurements will be relative to this point.
5.3 Inch/Metric Conversion
To switch between inch and millimeter units:
- Agħfas il- pulzier / mm button. The display will toggle between inch (in) and millimeter (mm) readings.

5.4 Data Transfer (RS232)
The DITR-0105N is equipped with an RS232 data transfer port for connecting to a PC for measurement logging. This functionality requires the separate purchase of the Clockwise Tools DTCR-01 data cable.
- Connect the DTCR-01 data cable to the indicator's data port and to your computer.
- Follow the instructions provided with the DTCR-01 cable for software installation and data acquisition.
- Note: The data port is Micro USB RS232 compatible, but it is NOT a standard USB port for direct PC connection without the specific DTCR-01 cable.

6. Manutenzjoni
6.1 Tindif
- Wipe the indicator's body with a soft, dry cloth.
- Għal ħmieġ iebes, uża drapp imnixxef ħafifampened with mild soap and water, then dry thoroughly.
- Do not use harsh chemicals, solvents, or abrasive cleaners, as these can damage the display or finish.
- Keep the measuring spindle and contact point clean and free of debris to ensure accurate readings.
6.2 Ħażna
- Store the digital indicator in its original protective case when not in use.
- Ensure the storage environment is dry, clean, and free from extreme temperatures or humidity.
- Neħħi l-batteriji jekk l-apparat ma jkunx se jintuża għal perjodu estiż biex tevita t-tnixxija.

7 Issolvi l-problemi
- Wiri Mhux Taħdem: Check battery installation. Ensure batteries are correctly oriented and have sufficient charge. Replace batteries if necessary.
- Qari mhux eżatt: Clean the measuring spindle and contact point. Ensure the indicator is securely mounted and stable. Re-zero the display. Verify the workpiece is clean and properly positioned.
- Buttuni ma jirrispondux: Ensure the device is powered on. If issues persist after checking batteries, contact customer support.
- Kwistjonijiet ta' Trasferiment tad-Dejta: Verify the DTCR-01 cable is correctly connected to both the indicator and the PC. Ensure the correct software/drivers are installed on the PC. Consult the DTCR-01 cable manual for specific troubleshooting steps.
8. Speċifikazzjonijiet
| Karatteristika | Speċifikazzjoni |
|---|---|
| Medda ta' Kejl | 0-1 inch (0-25.4 mm) |
| Riżoluzzjoni | 0.00005 pulzier (0.001 mm) |
| Eżattezza | ±0.0002 inch (±0.005 mm) |
| Dijametru taz-zokk | 3/8 pulzier |
| Contact Point Thread | UNF 4-48 |
| Wiri | Extra-Large LCD (1.6" x 0.7") |
| Sors tal-Enerġija | 2 x CR2032 3V Lithium Batteries (included) |
| Output tad-Data | RS232 (Micro USB compatible, requires DTCR-01 cable) |
| Materjal | Metall |
| Numru tal-Mudell tal-Oġġett | DITR-0105N |
| Dimensjonijiet tal-Pakkett | 6.13 x 4.38 x 1.63 pulzieri |
| Piż tal-oġġett | 4.4 uqija |
9. Garanzija u Appoġġ
Clockwise Tools products are manufactured to high-quality standards. For warranty information or technical support, please refer to the warranty card included with your product or visit the official Clockwise Tools website. Please have your model number (DITR-0105N) and purchase information ready when contacting support.