1. Introduzzjoni
Thank you for choosing the NEDIS Automatic Lead Acid Battery Charger, model BACCH02. This charger is designed for safe and efficient charging and maintenance of 2V, 6V, and 12V lead-acid batteries. Please read this manual thoroughly before use to ensure proper operation and to prevent damage to the charger or battery.
2. Istruzzjonijiet tas-Sigurtà
Dejjem osserva l-prekawzjonijiet ta' sigurtà li ġejjin meta tuża l-ċarġer tal-batterija:
- This charger is for indoor use only. Do not expose to rain or moisture.
- Żomm fejn ma jintlaħaqx mit-tfal.
- Ensure adequate ventilation during charging to prevent gas accumulation.
- Avoid sparks, flames, or smoking near the battery during charging. Batteries can produce explosive gases.
- Ilbes protezzjoni għall-għajnejn u ilbies protettiv meta taħdem bil-batteriji.
- Always disconnect the AC power supply before connecting or disconnecting the battery clamps.
- Qabbad l-aħmar (+) clamp mat-terminal pożittiv tal-batterija u l-polz iswed (-)amp għat-terminal negattiv tal-batterija.
- Tippruvax tiċċarġja batteriji ffriżati, bil-ħsara, jew li ma jistgħux jiġu ċċarġjati mill-ġdid.
- Do not open the charger casing. Irreferi s-servizz kollu lil persunal kwalifikat.
- Jekk il-korda tal-provvista tkun bil-ħsara, għandha tiġi sostitwita mill-manifattur, l-aġent tas-servizz tiegħu, jew persuni kwalifikati bl-istess mod biex jiġi evitat periklu.
3. Prodott Aktarview
The NEDIS BACCH02 is a compact and automatic battery charger. It features a main unit with LED indicators and a voltage selection switch, connected to an AC power cable and DC output cables with battery clamps.

Image: The main unit of the NEDIS BACCH02 charger, showing the LED indicators for polarity and charge status, and the voltage swiċċ tal-għażla.
Komponenti:
- Unità tal-Ċarġer: Main body containing the electronics.
- Voltage Swiċċ tal-Għażla: Allows selection between 2V, 6V, and 12V charging modes.
- Polarity LED (Red): Indicates incorrect battery connection.
- Charge LED (Green): Indicates charging status (blinking for charging, solid for fully charged).
- Batterija Clamps: Red (+) and Black (-) for connecting to the battery terminals.
- Kejbil tal-Enerġija AC: For connecting to a wall outlet.
4. Setup
Segwi dawn il-passi biex twaqqaf il-ċarġer tal-batterija tiegħek:
- Ensure Charger is Unplugged: Before making any connections, ensure the charger's AC power cable is disconnected from the wall outlet.
- Identify Battery Voltage: Iddetermina l-voltage of the battery you intend to charge (2V, 6V, or 12V).
- Select Correct Voltage: Uża l-voltage selection switch on the charger unit to set the appropriate voltage (2V, 6V, or 12V) for your battery.
- Qabbad Battery Clamps:
- Qabbad il- aħmar (+) batterija clamp għat-terminal pożittiv (+) tal-batterija.
- Qabbad il- iswed (-) batterija clamp għat-terminal negattiv (-) tal-batterija.
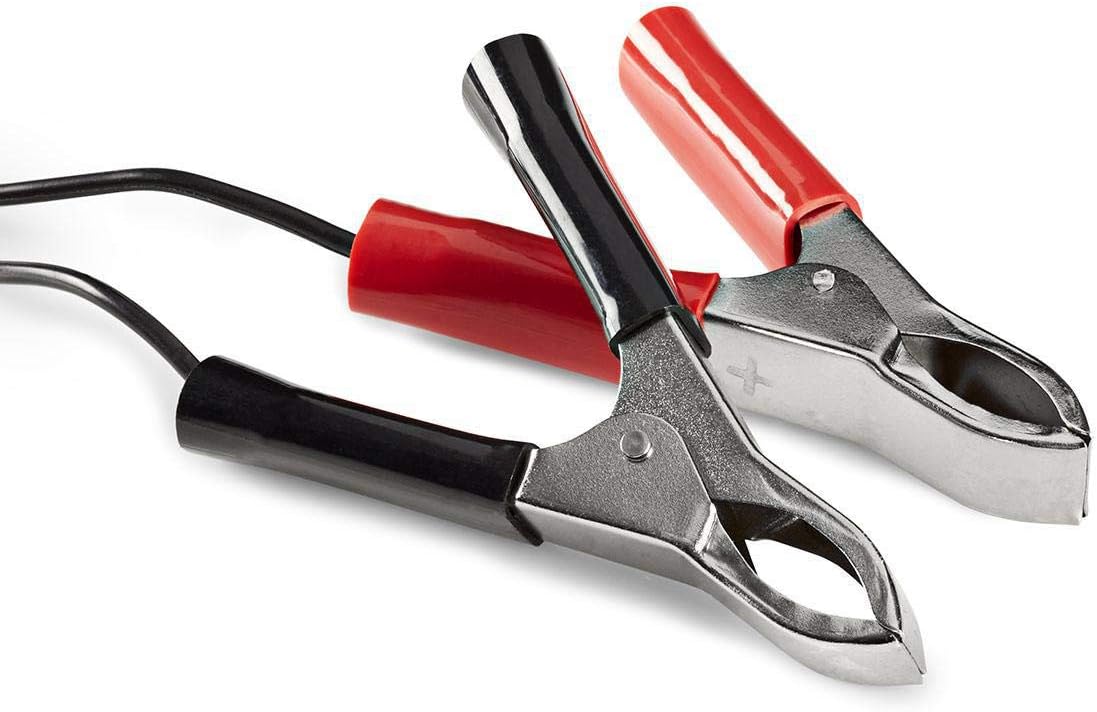
Image: Close-up of the red (positive) and black (negative) battery clamps.
- Qabbad mal-Enerġija: Ladarba l-batterija clamps are securely connected, plug the charger's AC power cable into a standard 220V wall outlet.
5. Istruzzjonijiet Operattivi
The NEDIS BACCH02 is a fully automatic charger. Once connected to the battery and power, it will automatically begin the charging process.
Proċess tal-Iċċarġjar:
- Iċċekkja tal-polarità: If the red 'Polarity' LED illuminates, it indicates that the battery clamps are connected incorrectly. Immediately unplug the charger from the AC outlet and correct the connections before plugging it back in.
- Indikazzjoni tal-Iċċarġjar: The green 'Charge' LED will blink when the battery is actively charging.
- Indikazzjoni tal-Ħlas Sħiħ: When the battery is fully charged, the green 'Charge' LED will stop blinking and remain solid. The charger will then automatically switch to a maintenance (float) charge mode to keep the battery at optimal capacity without overcharging.
Skonnettjar tal-Ċarġer:
To disconnect the charger after use:
- Unplug the charger's AC power cable from the wall outlet first.
- Disconnect the black (-) battery clamp from the negative terminal of the battery.
- Disconnect the red (+) battery clamp mit-terminal pożittiv tal-batterija.
6. Manutenzjoni
Manutenzjoni xierqa tiżgura l-lonġevità tal-ċarġer tiegħek:
- Keep the charger clean and dry. Wipe with a soft, dry cloth. Do not use abrasive cleaners or solvents.
- Aħżen il-ċarġer f'post frisk u niexef meta ma tkunx qed tuża.
- Regularly inspect the AC power cable, DC output cables, and battery clampIċċekkja għal kwalunkwe sinjal ta’ ħsara, xedd, jew korrużjoni. Ibdel jekk meħtieġ.
7 Issolvi l-problemi
Jekk tiltaqa' ma' problemi bil-ċarġer tiegħek, irreferi għat-tabella li ġejja:
| Problema | Kawża Possibbli | Soluzzjoni |
|---|---|---|
| Charger not turning on / No LEDs lit | No power supply; Faulty outlet; Damaged cable. | Check AC power connection; Try a different outlet; Inspect cable for damage. |
| Red 'Polarity' LED is lit | Konnessjoni ta 'polarità inversa. | Unplug charger, correct battery clamp connections (red to +, black to -), then plug back in. |
| Green 'Charge' LED not blinking / Battery not charging | Battery too deeply discharged; Incorrect voltage selected; Damaged battery. | Tiżgura vol korretttage is selected; Battery may be beyond recovery; Have battery tested by a professional. |
| Charger unit feels excessively hot | Normal operation (some warmth is expected); Overload; Internal fault. | Ensure adequate ventilation; Disconnect immediately if excessively hot and contact support. |
8. Speċifikazzjonijiet
| Karatteristika | Speċifikazzjoni |
|---|---|
| Mudell | BACCH02 |
| Numru tal-Mudell tal-Oġġett | 5412810284245 |
| Input Voltage | 220V AC |
| Ħruġ Voltage | 2V / 6V / 12V DC (selectable) |
| Suitable Battery Capacity | 2.2 Ah sa 10 Ah |
| Karatteristiċi ta' Protezzjoni | Polarità Inversa, Ċirkwit Qasir |
| Dimensjonijiet tal-Prodott (L x W x H) | 7 x 10 x 6 ċm |
| Piż tal-oġġett | 680 gramma |
| Konformità | CE |
| Kulur | Iswed |
9. Garanzija u Appoġġ
This product is covered by the standard warranty terms provided by the retailer at the time of purchase. For specific warranty details, please refer to your purchase documentation or contact the retailer directly.
For technical support, troubleshooting assistance beyond what is provided in this manual, or inquiries regarding parts and service, please contact your point of purchase or the manufacturer's customer service department.


