Prodott Overview
The Lux Pro Model P111 is a non-programmable thermostat designed for straightforward and reliable temperature control in your home. It offers essential features for managing your heating and cooling systems with ease.

Figure 1: Lux Pro P111 Non-Programmable Thermostat. This image displays the front view of the thermostat, showing its LCD screen, fan and system mode switches, and temperature adjustment buttons.
- Installazzjoni faċli: Designed for simple setup with clear instructions.
- Operazzjoni Mhux Programmabbli: Provides direct temperature control without complex scheduling.
- Qawwa Doppju: Operates on 2 AA alkaline batteries (included) or 24-volt system power.
- Display backlit: Features an easy-view backlight for clear temperature readings.
- Protezzjoni tat-Tagħmir: Includes a selectable 5- or 2-minute time delay to safeguard your HVAC equipment.
- Adjustable Limits: Allows setting of heating and cooling temperature limits.
- Għażliet tal-Wiri tat-Temperatura: Switch between Fahrenheit (℉) or Celsius (℃) display.

Figure 2: Key Features of Lux Pro P111 Thermostat. This graphic highlights features such as Keyboard Lockout, Adjustable Heating and Cooling Limits, Back-Lit Display, Dual Power, and a 5-Year Limited Warranty.
Kompatibilità tas-Sistema
The Lux Pro P111 thermostat is designed for compatibility with various HVAC systems. Please review the following compatibility chart to ensure it meets your system requirements.

Figure 3: System Compatibility Chart. This chart details which heating and cooling systems are compatible (e.g., Gas/Oil/Electric Furnace, Heat Pump without Auxiliary Heat, 2-wire Hydronic, 750 Millivolt, Gas Fireplaces, Single Stage Cooling) and which are not (e.g., Heat Pump Multistage, Radiant Ceiling Heat, Electric Baseboards, 3-wire Hydronic, Multistage systems, Portable space heaters, Plug-in air conditioners).
Setup u Installazzjoni
Proper installation is crucial for the optimal performance of your thermostat. If you are unsure about any steps, it is recommended to consult a qualified HVAC technician.
1. Rekwiżiti tal-Enerġija
The P111 thermostat can be powered by two (2) AA alkaline batteries or by a 24-volt system. Batteries are included for convenience and reliable operation.
2. Dijagrammi tal-Wajers
Refer to the following diagrams for common wiring configurations. Ensure power to your HVAC system is turned off at the circuit breaker before beginning any wiring.
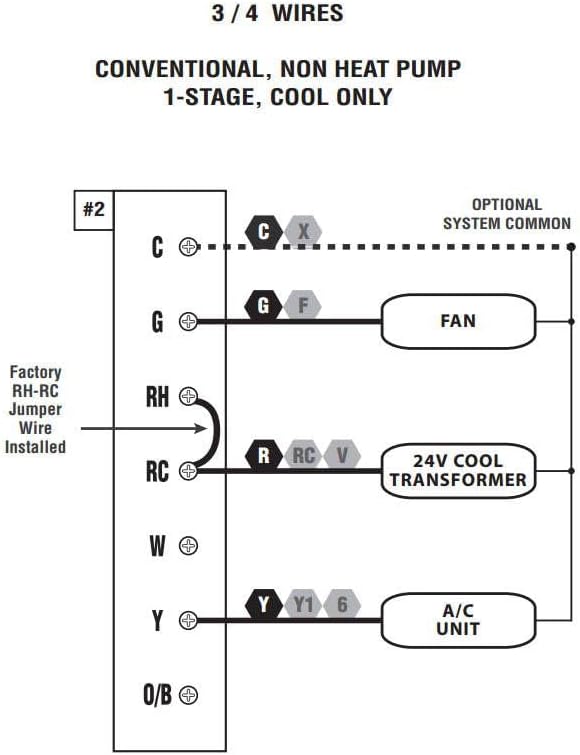
Figure 4: Wiring Diagram for 3/4 Wires. This diagram illustrates the wiring for a conventional, non-heat pump, 1-stage, cool-only system, showing connections for C (optional system common), G (FAN), RH (24V COOL TRANSFORMER), RC (24V COOL TRANSFORMER), and Y (A/C UNIT). A factory RH-RC jumper wire is installed.

Figure 5: Wiring Diagram for 4/5 Wires. This diagram shows the wiring for a conventional, non-heat pump, 1-stage sħana u 1-stage cool system, with connections for C (optional system common), G (FAN), RH (24V TRANSFORMER), RC (24V TRANSFORMER), W (HEATER), and Y (A/C UNIT). A factory RH-RC jumper wire is installed.

Figure 6: Wiring Diagram for 5/6 Wires. This diagram illustrates the wiring for a conventional, non-heat pump, 1-heat / 1-cool system with two transformers, showing connections for C (optional system common), G (FAN), RH (24V HEAT TRANSFORMER), RC (24V COOL TRANSFORMER), W (HEATER), and Y (A/C UNIT). The factory RH-RC jumper wire must be removed for this configuration.
3. Immuntar
The thermostat is designed for wall mounting. Use the provided screws and wall anchors for secure installation. Ensure the thermostat is level for accurate temperature readings.
Istruzzjonijiet Operattivi
The Lux Pro P111 thermostat features an intuitive control panel for easy operation.

Figure 7: Control Panel Diagram. This diagram labels the key components of the thermostat's front panel: Fan Mode Switch (Fan Auto/On), System Mode Switch (Heat/Off/Cool), LCD Display Screen, SET Button, and UP and DOWN Buttons.
1. System Mode Switch
- SĦANA: Jattiva s-sistema tat-tisħin.
- MITFI: Itfi kemm is-sistemi tat-tisħin kif ukoll dawk tat-tkessiħ.
- Kessaħ: Jattiva s-sistema tat-tkessiħ.
2. Fan Mode Switch
- AUTO: Il-fann jaħdem biss meta s-sistema tat-tisħin jew tat-tkessiħ tkun qed taħdem b'mod attiv.
- FUQ: Il-fann jaħdem kontinwament, irrispettivament minn jekk is-sistema tat-tisħin jew tat-tkessiħ hijiex attiva.
3. Aġġusta tat-Temperatura
Uża l- UP (▲) u 'L isfel (▼) buttons to set your desired temperature. The current temperature will be displayed prominently on the LCD screen.
4. Attivazzjoni tad-Dawl ta' Wara
Press any button to activate the backlight for improved visibility in low-light conditions. The backlight will automatically turn off after a short period of inactivity.
5. Temperature Display (Fahrenheit/Celsius)
The thermostat allows you to switch between Fahrenheit (℉) and Celsius (℃) temperature displays. Refer to the full instruction manual for specific steps on how to change this setting, typically found in the advanced settings menu.
6. Equipment Protection Time Delay
The thermostat features a selectable 5- or 2-minute time delay for equipment protection. This delay prevents short cycling of your heating and cooling system, which can extend the lifespan of your equipment. This setting is usually configured during initial setup or in advanced settings.
7. Lockout tat-Tastiera
To prevent unauthorized adjustments, the thermostat includes a keypad lockout feature. Consult the detailed manual for instructions on how to activate and deactivate this function.
Manutenzjoni
1. Sostituzzjoni tal-batterija
When the battery indicator appears on the display, replace the two (2) AA alkaline batteries. Ensure proper polarity when inserting new batteries. The thermostat retains settings during battery replacement.
2. Tindif
Naddaf il-barra tat-termostat b'ċarruta ratba uamp drapp. Tużax prodotti tat-tindif jew solventi li joborxu, għax jistgħu jagħmlu ħsara lill-finitura jew lill-komponenti interni.
Issolvi l-problemi
If you encounter issues with your Lux Pro P111 thermostat, consider the following common solutions:
- L-ebda Wiri jew Indikatur ta' Batterija Baxxa: Replace the batteries with fresh AA alkaline batteries.
- Is-Sistema Mhux Tirrispondi (Tisħin/Tkessiħ):
- Check that the system mode switch is set to HEAT or COOL.
- Ensure the fan mode switch is set to AUTO or ON.
- Verify that the circuit breaker for your HVAC system is not tripped.
- Confirm that the wiring connections are secure and correct according to the installation diagrams.
- Allow for the equipment protection time delay (5 or 2 minutes) to elapse before the system activates.
- Qari tat-Temperatura Mhux Korrett: Kun żgur li t-termostat ma jkunx espost għax-xemx diretta, kurrenti tal-arja, jew sorsi ta' sħana li jistgħu jaffettwaw is-senser tiegħu.
- It-Tastiera Ma Tirrispondix: Check if the keypad lockout feature is active. Refer to the manual for deactivation steps.
For persistent issues, refer to the complete user manual or contact customer support.
Speċifikazzjonijiet
| Karatteristika | Dettall |
|---|---|
| Brand | LUX |
| Isem tal-Mudell | P111 |
| Dimensjonijiet tal-Prodott | 4"D x 7"W x 7"H |
| Tip ta' Kontrollur | Imbotta Buttuna |
| Karatteristiċi Speċjali | Lighted Display, Temperature Display |
| Kulur | P111-white |
| Użi Speċifiċi | Kondizzjonatur tal-Arja, Pompa tas-Sħana |
| Tip ta' Kontroll tat-Temperatura | Manwal |
| Komponenti Inklużi | Pro P111 Non-Programmable Thermostat; 1 Heat, 1 Cool |
| Sors tal-Enerġija | Battery Powered (2 AA batteries required), 24V System Powered |
| Piż tal-oġġett | 1.6 uqija |
| Voltage | 24 Volts |
| Materjal | Plastik |
| Tip ta 'Immuntar | Mount Wall |
| Stil | Mhux programmabbli |
| Dawl ta' wara | Iva |
| UPC | 021079141111 |
Garanzija u Appoġġ
Informazzjoni dwar Garanzija
The Lux Pro P111 thermostat comes with a Garanzija limitata ta 'senaDin il-garanzija tkopri difetti fil-materjali u fix-xogħol taħt użu normali. Jekk jogħġbok żomm il-prova tax-xiri tiegħek għal talbiet ta' garanzija.
Appoġġ għall-Klijent
For technical assistance, troubleshooting not covered in this manual, or warranty inquiries, please contact Lux customer support. Refer to the product packaging or the official Lux webis-sit għall-aktar informazzjoni ta' kuntatt aġġornata.
You can visit the official LUX Store for more information: Ħanut LUX fuq Amazon


