1. Introduzzjoni
This manual provides essential information for the proper handling, installation, and maintenance of the OEM 1-87830-716-0 King Pin Kit. This kit is designed for specific FRR, FSR, and FTR truck models manufactured between 1987 and 1996. Understanding the components and following recommended practices will ensure optimal performance and longevity of the king pin assembly.
A king pin kit is a critical component in a vehicle's steering system, connecting the steering knuckle to the axle beam and allowing the wheels to pivot for steering. Proper installation and maintenance are crucial for vehicle safety and handling.
2. Prodott Aktarview u Komponenti
The OEM 1-87830-716-0 King Pin Kit includes all necessary components for replacing the king pin assembly in compatible vehicles. Please verify that all parts are present and undamaged before beginning installation.
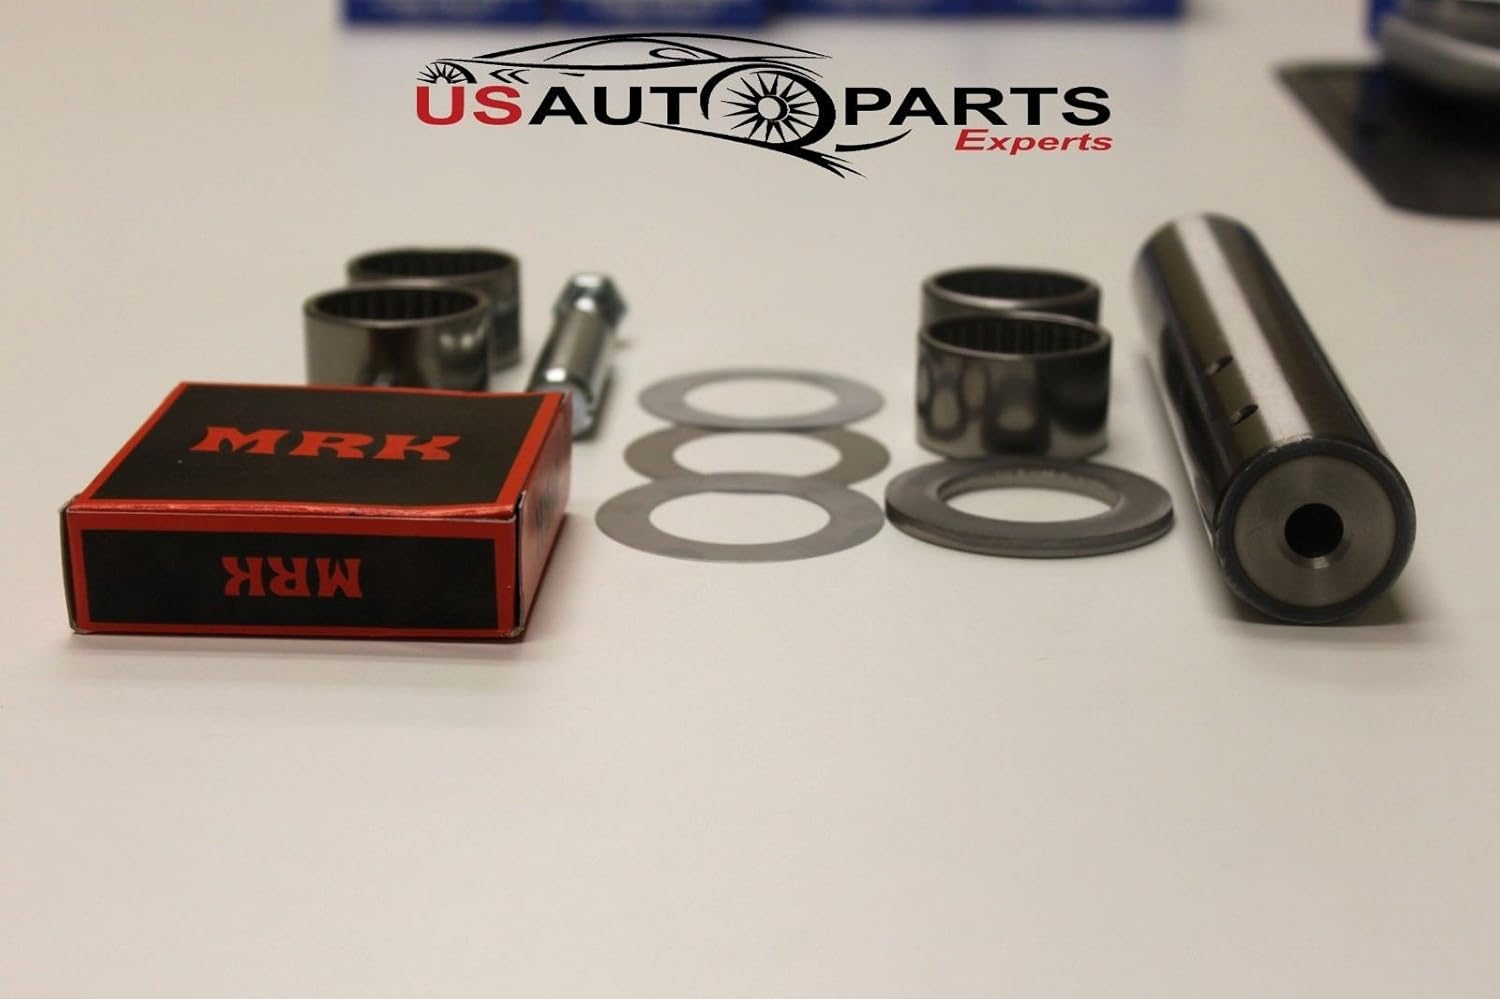
Figura 2.1: Fuqview of the OEM 1-87830-716-0 King Pin Kit components. This image displays the complete kit, including the main king pin, several bushings, various washers, a bolt, and a small box containing additional parts, all arranged on a clean white surface.

Figura 2.2: Dettaljati view of the King Pin Kit components. This image provides a closer look at the individual parts, highlighting the precision-machined king pin, the four cylindrical bushings, the securing bolt, and the assortment of flat and thrust washers.

Figura 2.3: Close-up of specific King Pin Kit parts. This image focuses on the larger components, including two bushings, the main king pin with its smooth surface, a substantial thrust washer, and a small metal cap that appears to be part of a grease fitting assembly.

Figura 2.4: Packaging detail for the King Pin Kit. This image shows a close-up of the product packaging, specifically the "MRK KING PIN KIT MADE IN JAPAN" label, confirming the origin and type of the kit. The model number "MI-6111" is also visible on the box.
Il-komponenti ewlenin tipikament jinkludu:
- King Pin: The central pivot shaft.
- Boxxli: Cylindrical sleeves that provide a bearing surface for the king pin.
- Thrust Bearings/Washers: Components designed to handle axial loads and reduce friction.
- Lock Pin/Bolt: Secures the king pin in place.
- Shims: Used for proper adjustment and fit.
- Grease Fittings: For lubrication.
3. Setup u Installazzjoni
Installation of a king pin kit requires specialized tools and expertise. It is highly recommended that this procedure be performed by a qualified automotive technician. Improper installation can lead to severe safety hazards and vehicle damage.
3.1 Prekawzjonijiet tas-Sigurtà
- Dejjem ilbes tagħmir protettiv personali (PPE) xieraq, inklużi nuċċalijiet u ingwanti tas-sigurtà.
- Ensure the vehicle is properly supported on jack stands or a lift before beginning work.
- Disconnect the battery to prevent accidental electrical activation.
- Refer to the vehicle manufacturer's service manual for specific torque specifications and procedures.
3.2 Passi Ġenerali tal-Installazzjoni (Ikkonsulta l-Manwal tas-Servizz tal-Vettura għad-Dettalji)
- Safely lift and support the vehicle, then remove the wheel and tire assembly.
- Disassemble the brake components and steering linkage as necessary to access the king pin.
- Remove the old king pin, bushings, and related components. This may require specialized pressing tools.
- Clean the steering knuckle and axle beam bores thoroughly.
- Install new bushings into the steering knuckle. Ream or hone the bushings to the correct size for the new king pin, ensuring a precise fit and smooth operation.
- Install the new king pin, thrust bearings/washers, and lock pin according to the vehicle manufacturer's specifications.
- Lubricate all new components with appropriate grease.
- Reassemble brake components and steering linkage.
- Perform a wheel alignment after installation to ensure correct steering geometry.
4. Prinċipji Operattivi
The king pin is a fundamental part of the front axle assembly in many heavy-duty vehicles, including the FRR, FSR, and FTR models. It serves as the pivot point around which the steering knuckle and wheel assembly rotate when the vehicle is steered. The king pin kit ensures smooth and precise steering by providing low-friction bearing surfaces and securely connecting the steering components.
Properly installed and maintained king pins are essential for:
- Accurate steering response.
- Minimizing tire wear.
- Maintaining vehicle stability.
- Reducing play or looseness in the front end.
5. Manutenzjoni
Regular maintenance is crucial for extending the life of your king pin kit and ensuring safe vehicle operation. Neglecting maintenance can lead to premature wear, steering issues, and potential safety hazards.
5.1 Lubrikazzjoni
King pins require regular lubrication. Consult your vehicle's service manual for the recommended lubrication schedule and type of grease. Typically, king pins should be greased at every oil change or as specified by the vehicle manufacturer. Use a high-quality chassis grease.
5.2 Spezzjoni
Periodically inspect the king pin assembly for signs of wear, looseness, or damage. This includes checking for:
- Excessive play in the steering knuckle.
- Cracks or damage to the axle beam or steering knuckle.
- Leaking grease fittings or seals.
- Unusual noises during steering or driving.
Any signs of significant wear or damage should be addressed immediately by a qualified technician.
6. Issolvi l-problemi ta' Kwistjonijiet Komuni
While the king pin kit itself is a passive component, issues related to its wear or improper installation can manifest as various vehicle problems. If you experience any of the following, consult a qualified technician for diagnosis and repair:
- Excessive Play in Steering: A loose or worn king pin can cause noticeable play in the steering wheel, making the vehicle feel unresponsive or difficult to control.
- Ilbies irregolari tat-tajers: Worn king pins can lead to improper wheel alignment and camber issues, resulting in uneven and premature tire wear.
- Steering Wander or Shimmy: The vehicle may tend to wander on the road or experience a shimmying sensation in the front end, especially at certain speeds.
- Difficulty Steering: While less common for worn king pins (more common for lack of lubrication), stiff steering can indicate issues.
- Clunking or Popping Noises: Worn king pins or bushings can produce metallic noises when turning or going over bumps.
Do not attempt to drive a vehicle with suspected severe king pin issues, as it can compromise steering control and safety.
7. Speċifikazzjonijiet
This King Pin Kit is manufactured by OEM and is designed for specific applications. Key specifications are as follows:
| Speċifikazzjoni | Dettall |
|---|---|
| Manifattur | OEM |
| Brand | OEM |
| Numru tal-Parti tal-Manifattur | 1-87830-716-0 |
| Pajjiż/Reġjun tal-Manifattura | Ġappun |
| Mudelli Applikabbli | FRR, FSR, FTR (1987-1996) |
| Engine Compatibility (Example) | Diesel 6BD1 5.8L (ENCAVA 1983-2000), Diesel 6HE1 7.1L (FRR 1995-1998) |
Note: Always cross-reference the part number with your vehicle's specific requirements before purchase and installation.
8. Garanzija u Appoġġ
For information regarding warranty coverage, terms, and conditions for the OEM 1-87830-716-0 King Pin Kit, please refer to the original purchase documentation or contact the seller directly. Warranty details are typically provided at the point of sale or by the manufacturer.
For technical support or further inquiries, please contact the OEM manufacturer or your authorized parts distributor.


