Introduzzjoni
This manual provides detailed instructions for the installation, operation, and maintenance of your MICTUNING 13Amp 125V AC Port Plug. Please read this manual thoroughly before installation and use to ensure proper function and safety.
Karatteristiċi tal-Prodott
- Powerful AC Port Plug: Utilizes 3x12AWG (3.0mm2) heavy-duty wires, rated for 13 amps and 125 volts, ensuring optimal performance and power delivery.
- Disinn imtejjeb: Features a re-designed power cord outlet centrally located at the back, making it suitable for various applications including battery chargers, engine block heaters, and home appliances. This design allows for mounting on thicker panels (1"-3") without obstruction.
- Kostruzzjoni reżistenti għat-temp: Equipped with a snap-fit watertight cap that protects the plug from snow, ice, freezing rain, and other environmental elements.
- Konnessjoni Flessibbli: Includes a 16-inch integrated extension cord, providing flexibility for direct connection to an existing power source.
- Installazzjoni faċli: Designed for simple flush mounting with four screws, requiring only a 2-inch drilling hole. No additional hand wiring or cable modification is necessary for a clean, OEM-like appearance.
Kontenut tal-Pakkett
- 1x AC Power Port Plug
- 4x Viti tal-Immuntar
Istruzzjonijiet għall-installazzjoni
Follow these steps for proper installation of your AC Port Plug:
- Agħżel il-Post tal-Immuntar: Choose a flat, stable surface for installation. Ensure there is sufficient clearance behind the mounting surface for the plug's integrated cord.
- Drill Toqba: Using a 2-inch hole saw, carefully drill a circular hole at the selected mounting location.
- Insert Port Plug: Insert the AC Port Plug into the drilled hole. Ensure the plug is oriented correctly.
- Sikura bil-viti: Use the four provided screws to secure the port plug firmly to the mounting surface.
- Qabbad mas-Sors tal-Enerġija: Connect the integrated 16-inch extension cord to your existing power source.

Figura 1: Dijagramma tal-Passi tal-Installazzjoni

Figure 2: Securing the Port Plug
Video 1: Installation of RV AC Port Plug. This video demonstrates the process of drilling a hole, inserting the port plug, and securing it, highlighting the ease of installation.
Video 2: Installation of AC Port Plug with Spring-Loaded Cover. This video illustrates the installation of a similar AC port plug, focusing on the spring-loaded cover mechanism.
Istruzzjonijiet Operattivi
To use the MICTUNING AC Port Plug:
- Open the protective watertight cap by lifting it. The cap is designed to open up to 150 degrees for easy access.
- Insert a standard 125V AC plug from your device or extension cord into the port.
- Kun żgur li l-konnessjoni hija sigura.
- When not in use, remove the plug and close the watertight cap firmly to protect the port from environmental elements. The cap features a pressure release valve for easier plugging and unplugging.
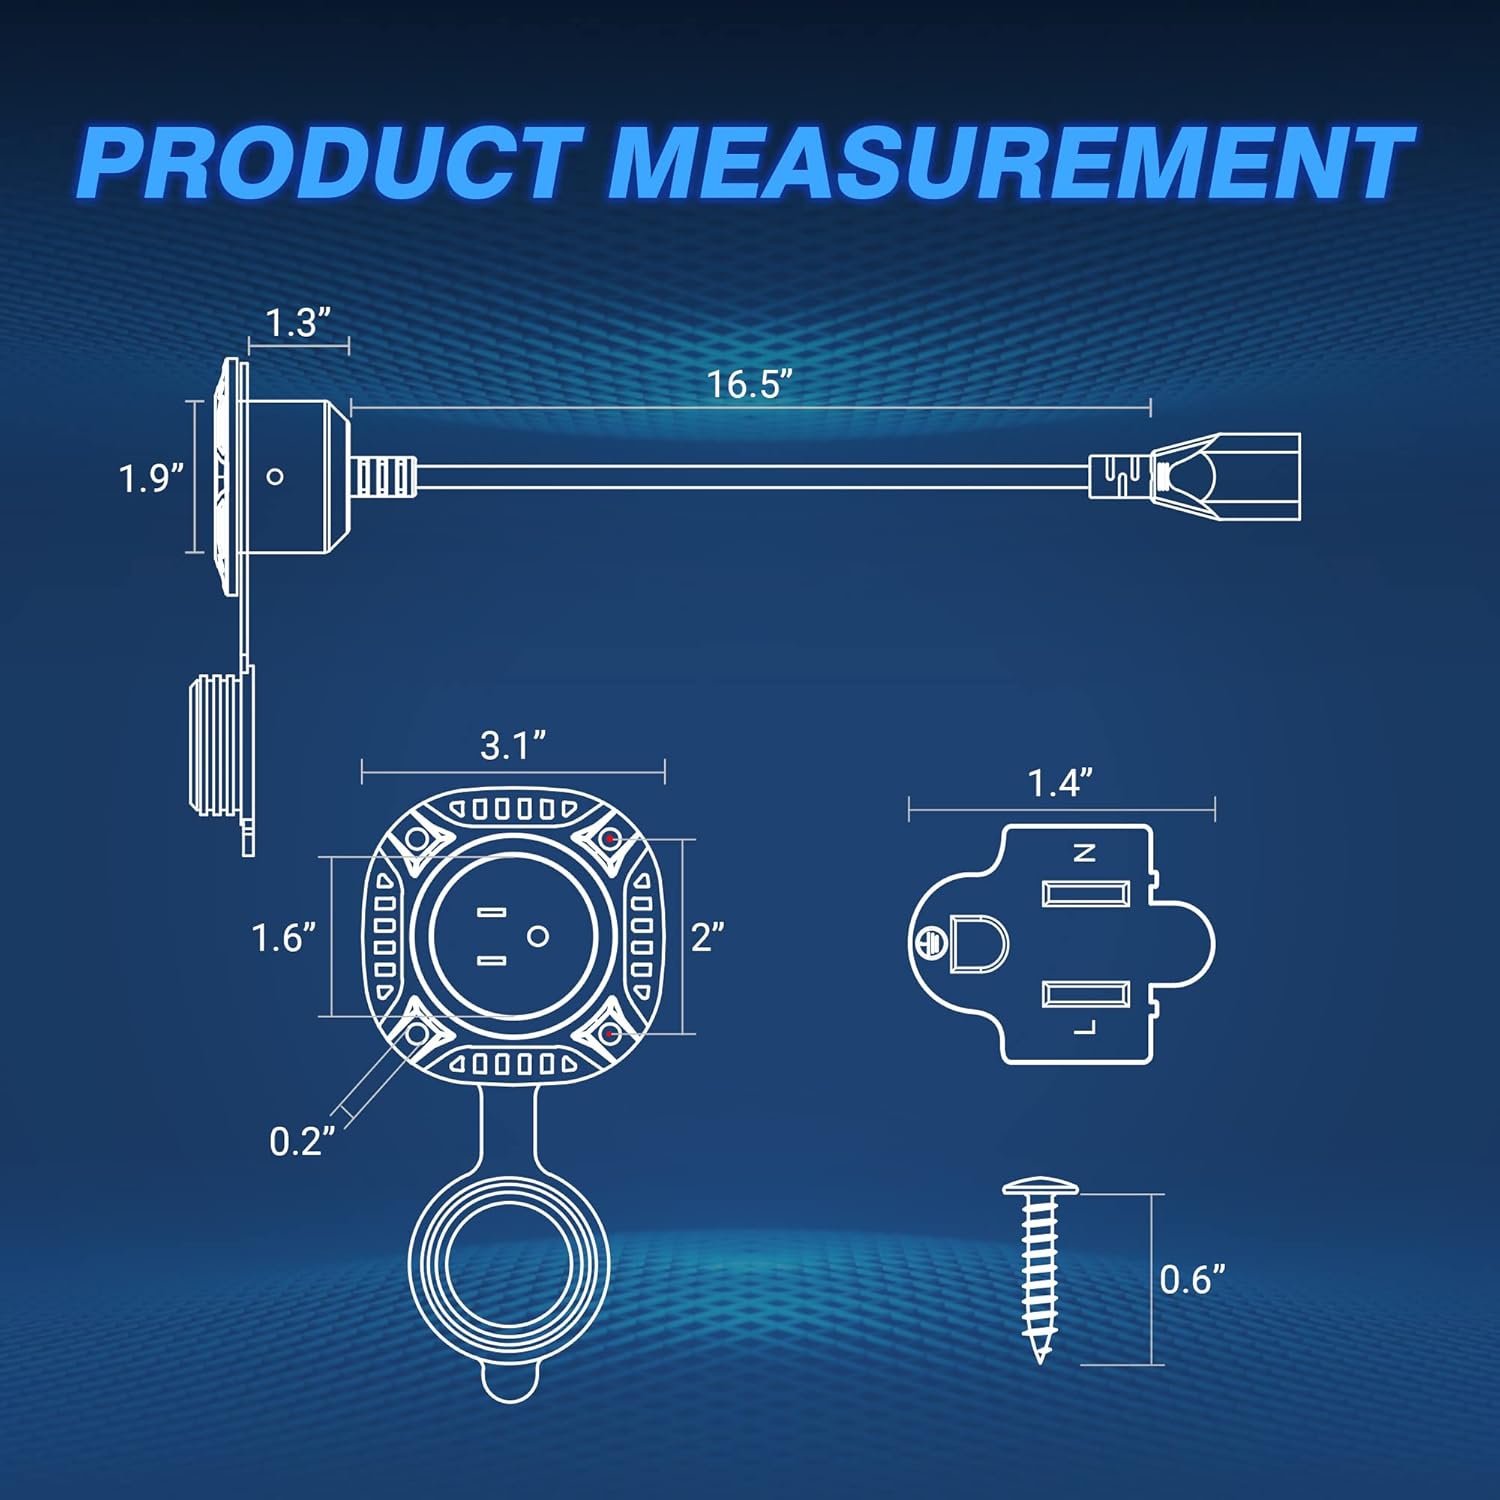
Figure 3: Plugged-in AC Port Plug
Video 3: MICTUNING 13Amp AC Port Plug with 16" Flexible Cord. This video provides a general overview of the product and its functionality, including opening and closing the cover.
Manutenzjoni
The MICTUNING AC Port Plug requires minimal maintenance. Regularly inspect the plug and cord for any signs of wear, damage, or corrosion. Ensure the watertight cap is always closed when the plug is not in use to prevent moisture and dust ingress. Clean the exterior with a damp drapp kif meħtieġ.
Issolvi l-problemi
If you experience issues with your AC Port Plug, consider the following:
- Ebda Qawwa: Check the power source to ensure it is active. Verify that the plug is fully inserted into the port and the extension cord is securely connected.
- Konnessjoni Laxka: Ensure all connections are tight. The plug is designed for a snug fit to maintain its weatherproof seal.
- Komponenti bil-ħsara: If any part of the plug or cord appears damaged, discontinue use immediately and contact customer support for assistance. Do not attempt to repair damaged electrical components yourself.
Speċifikazzjonijiet
| Brand | MICTUNING |
| Mudell | MIC-EC-140 |
| Piż tal-oġġett | 7.4 uqija |
| Dimensjonijiet tal-Prodott | 6 x 3.7 x 3.7 pulzieri |
| Voltage | 125 Volts |
| Wattage | 1625 watt |
| Konnettur Sess | Raġel għal Mara |
| Ipplaggja Format | Tip B |

Figure 4: Product Measurement Diagram
Informazzjoni dwar is-Sigurtà
Always follow basic safety precautions when using electrical products to reduce the risk of fire, electric shock, and personal injury:
- Tgħaddix il-prodott fl-ilma.
- Kun żgur li s-sors tal-enerġija jaqbel mal-volum tal-prodotttage u ampklassifikazzjonijiet tal-qtugħ.
- Do not use if the product or its cord is damaged.
- Żomm fejn ma jintlaħaqx mit-tfal.
- Always close the protective cap when the port is not in use.
Garanzija u Appoġġ
MICTUNING stands behind its products with a 2-year warranty and lifetime customer service. This includes a 30-day money-back/replacement guarantee and a worry-free 24-month warranty. Expect a friendly response within 4 hours for any inquiries.
For support, please refer to the contact information provided with your purchase or visit the official MICTUNING websit.
Prodott Addizzjonali Views

Prodott Overview

Peak Performance Features

Disinn reżistenti għat-temp


