Introduzzjoni
This manual provides comprehensive instructions for the assembly, use, and maintenance of your SortWise 3-Tier Shoe Rack. Designed for efficient shoe storage, this unit helps organize your entryway, closet, or other living spaces.

Image: The SortWise 3-Tier Shoe Rack, showcasing its capacity to organize multiple pairs of shoes across three levels.
Informazzjoni dwar is-Sigurtà
Jekk jogħġbok aqra u ifhem l-istruzzjonijiet kollha tas-sigurtà qabel l-assemblaġġ u l-użu. Jekk ma ssegwix dawn il-linji gwida, il-prodott jista' jikkawża korriment jew ħsara.
- Limitu tal-Piż: Do not exceed the recommended weight limit for each shelf or the entire unit. Overloading can cause the rack to collapse.
- Installazzjoni xierqa: Ensure all components are securely connected and the rack is stable before placing items on it. Improper installation can lead to tipping.
- Pjazzament: Place the shoe rack on a flat, stable, and level surface to prevent wobbling or tipping.
- Tfal u Pets: Keep children and pets away from the unit during assembly. Do not allow children to climb on or play with the shoe rack.
- Truf li jaqtgħu: Handle components with care during assembly to avoid cuts or pinches.
Komponenti tal-Prodott
Qabel tibda l-assemblaġġ, ivverifika li l-partijiet kollha huma preżenti u mhux imħassra. Jekk xi partijiet huma neqsin jew imħassra, jekk jogħġbok ikkuntattja l-appoġġ għall-klijenti.

Image: Key components of the shoe rack, including the high-quality plastic connectors and thickened plastic tubes, which form the frame and shelves.
| Komponent | Deskrizzjoni | Kwantità |
|---|---|---|
| Thickened Iron Tubes | Used for horizontal shelves and vertical supports. All short poles are of the same length for simplified assembly. | Tvarja (madwar 18-24) |
| High Quality Plastic Connectors | Corner and T-shaped connectors to join tubes. | Tvarja (madwar 12-16) |
| Arch Handles (Optional) | Top handles for aesthetic finish. | 2 |
Istruzzjonijiet ta' Armar
No tools are required for the assembly of this shoe rack. Follow these steps carefully for quick and easy setup.

Image: Visual guide illustrating the six simple steps to assemble the SortWise 3-Tier Shoe Rack.
- Step 1: Connect Crossbars. Connect four horizontal tubes (crossbars) using two T-shaped plastic joints. This forms one side of a shelf.
- Step 2: Complete First Tier. Repeat Step 1 to create the other side of the shelf. Then, connect these two sides with additional horizontal tubes to complete the first tier. Ensure all connections are firm.
- Step 3: Install Upright Poles. Insert the upright poles into the plastic connectors of the completed first tier. These poles will connect the upper and lower frames.
- Step 4: Repeat for Additional Tiers. Repeat Steps 1 and 2 to assemble the second tier. Then, place it onto the upright poles installed in Step 3. Repeat for the third tier. Ensure all connections are secure as you build upwards.
- Step 5: Install Arch Handles (Optional). If desired, install the arch handles onto the top upright poles for a finished look.
- Pass 6: Verifika Finali. Once all tiers are assembled, gently shake the rack to ensure stability. Adjust any loose connections. The shoe rack is now complete.
Tħaddim u Użu
The SortWise 3-Tier Shoe Rack is designed for versatile shoe storage. Here are guidelines for optimal use:
- Kapaċità: The rack can store up to 18 pairs of heels or 12 pairs of athletic shoes/men's shoes. Distribute weight evenly across the shelves.
- Shoe Types:
- The tier distance of 6 5/16" (16 cm) is suitable for regular shoes such as sneakers, flats, and low heels.
- For boots, jackboots, or high-top shoes, utilize the top shelf where there is no upper tier to restrict height.
- Pjazzament: Ideal for entryways, closets, wardrobes, cabinets, garages, or other storage areas.

Image: The shoe rack displaying its capacity to hold numerous pairs of shoes, including heels and flats, across its three tiers.
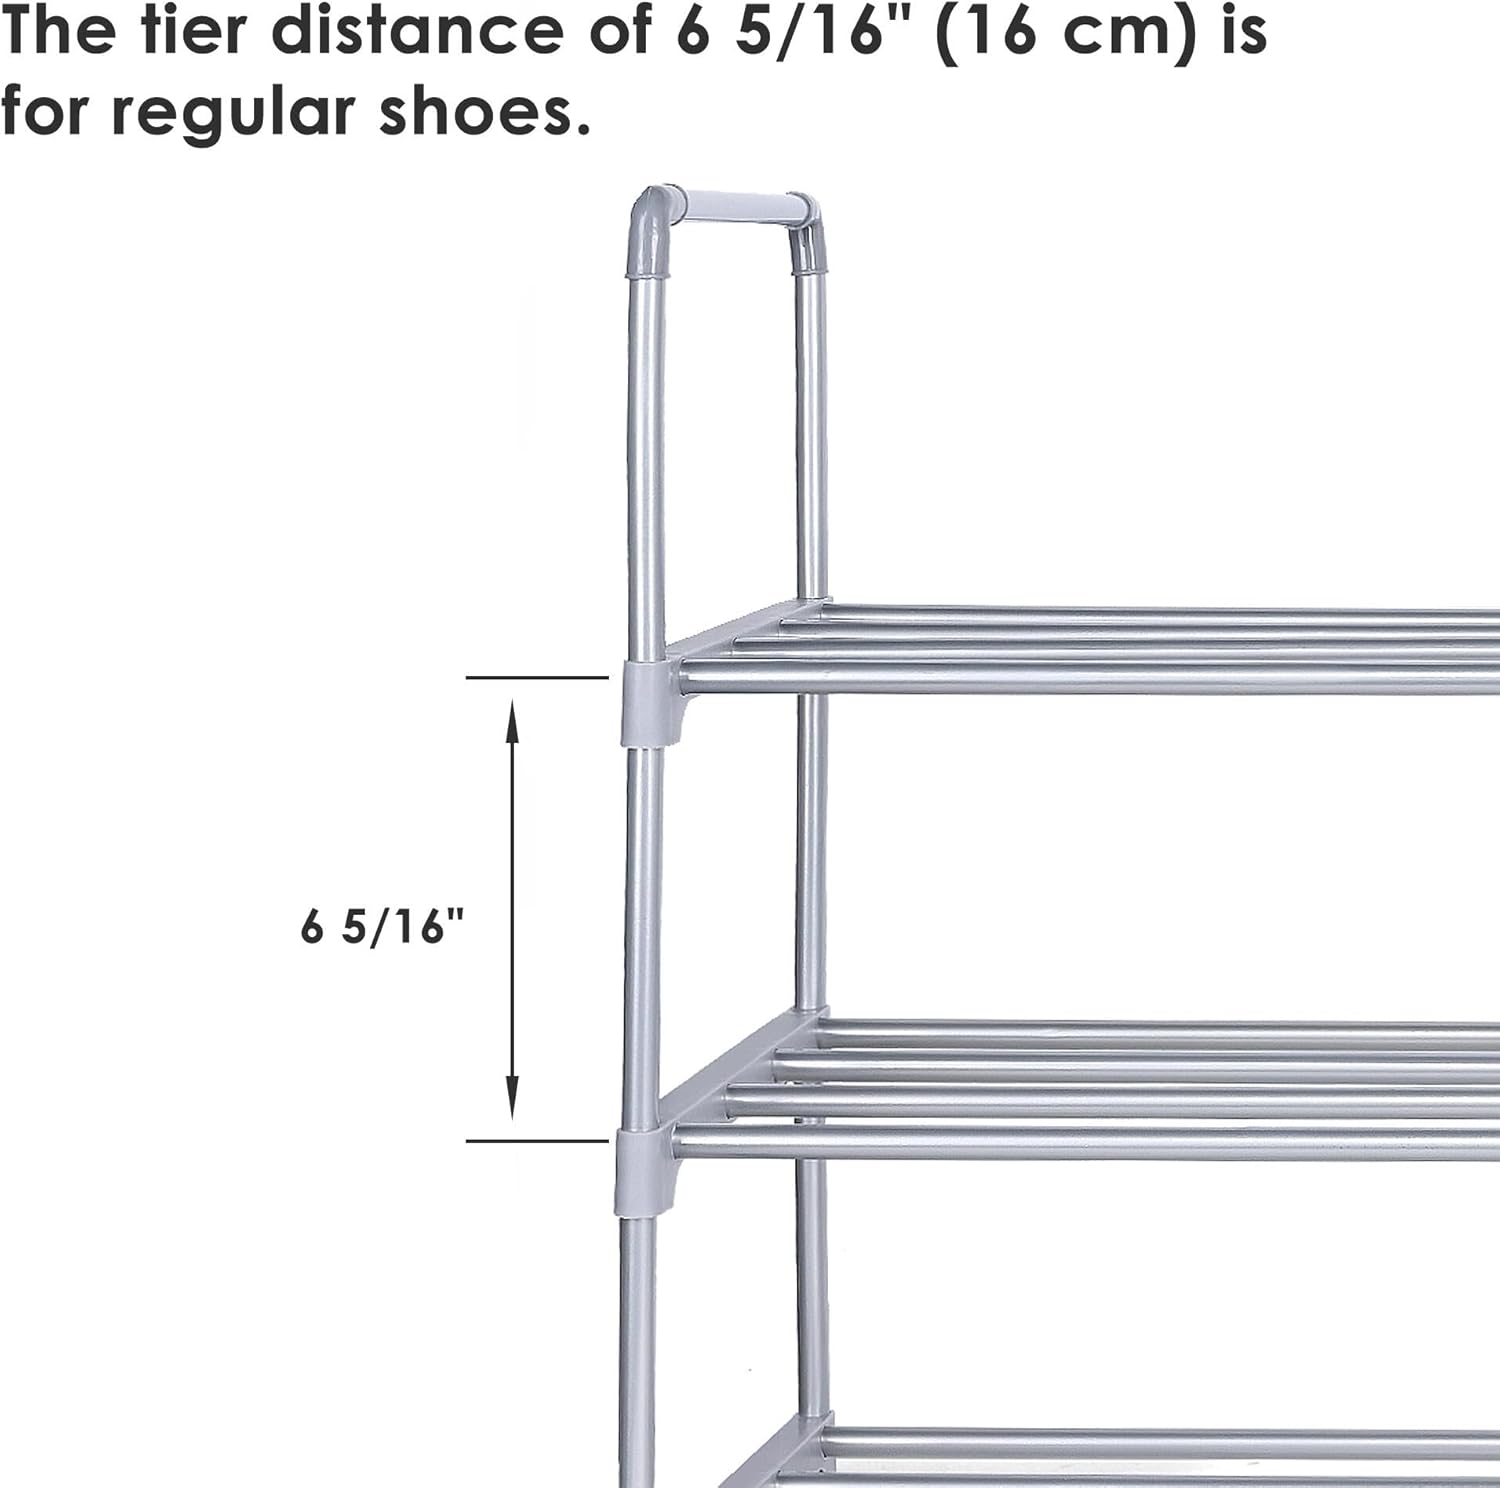
Image: A diagram highlighting the 6 5/16 inch (16 cm) vertical clearance between shelves, suitable for most standard shoe types.
Manutenzjoni
To ensure the longevity and appearance of your SortWise Shoe Rack, follow these simple maintenance tips:
- Tindif: Wipe down the tubes and plastic connectors with a soft, damp drapp. Evita prodotti tat-tindif li joborxu jew kimiċi ħarxa li jistgħu jagħmlu ħsara lill-finitura.
- It-tfarfir: Regularly dust the shelves to prevent accumulation, especially if storing shoes directly on them.
- Kontroll tal-Istabbiltà: Periodically check all connections to ensure they remain tight and secure. Re-tighten if necessary to maintain stability.
- Evita Umdità Eċċessiva: While the materials are durable, prolonged exposure to excessive moisture is not recommended.
Issolvi l-problemi
If you encounter issues with your shoe rack, refer to the following common problems and solutions:
| Problema | Kawża Possibbli | Soluzzjoni |
|---|---|---|
| L-ixkaffa qed titħarrek jew mhix stabbli. | Loose connections; uneven surface; overloaded shelves. | Ensure all tubes are fully inserted into connectors. Place on a flat, level surface. Redistribute or reduce weight on shelves. |
| Tubes or connectors detach easily. | Incomplete insertion during assembly; excessive force or movement. | Disassemble and reassemble, ensuring each tube is firmly pushed into its connector until it clicks or feels secure. Avoid dragging the rack when moving; lift it. |
| Spazju għall-ħażna insuffiċjenti. | Exceeding stated capacity; inefficient shoe placement. | Review the stated capacity (18 heels / 12 athletic shoes). Consider stacking smaller shoes or placing one shoe per slot for maximum density. Utilize the top shelf for taller items. |
Speċifikazzjonijiet
| Karatteristika | Dettall |
|---|---|
| Isem tal-Prodott | SortWise 3-Tier Shoe Rack |
| Numru tal-Mudell | B079FD6Q38 |
| Dimensjonijiet (L x W x H) | 35" L x 11 5/8" W x 20 7/8" H (89 x 29.5 x 53 cm) |
| Materjal | Thickened Iron Tubes, High Quality Plastic Connectors |
| Kapaċità | Up to 18 pairs of heels OR 12 pairs of athletic/men's shoes |
| Tier Distance | 6 5/16" (16 cm) for regular shoes |
| Assemblea Meħtieġa | Yes, tool-free assembly |
| Piż tal-oġġett | 1.18 kg |

Image: A detailed diagram illustrating the overall dimensions of the shoe rack: 35 inches long, 11 5/8 inches wide, and 20 7/8 inches high.
Garanzija u Appoġġ
For warranty information, product support, or to inquire about replacement parts, please contact SortWise customer service. Refer to your purchase documentation for specific warranty terms and contact details.
Manifattur: SortWise
Post tan-Negozju: Lachine, Quebec H8T 2Y3, CA
For further assistance, visit the official SortWise store on Amazon: SortWise Store