1. Introduzzjoni
This manual provides essential information for the safe and efficient operation of your Casio XJ-F10X LED XGA Projector. Please read this manual thoroughly before using the projector and retain it for future reference. Understanding the instructions will ensure optimal performance and extend the lifespan of your device.
2. Istruzzjonijiet Importanti dwar is-Sigurtà
Osserva l-prekawzjonijiet ta' sigurtà li ġejjin biex tevita ħsara lill-proġettur u tiżgura s-sigurtà tal-utent:
- Timblokkax il-fetħiet tal-ventilazzjoni. Kun żgur li jkun hemm biżżejjed spazju madwar il-proġettazzjoni għal fluss tal-arja xieraq.
- Tesponix il-proġettazzjoni għax-xita jew għall-umdità biex tnaqqas ir-riskju ta’ nar jew xokk elettriku.
- Uża biss il-korda tal-enerġija pprovduta mal-proġettazzjoni jew waħda ta’ sostituzzjoni approvata.
- Avoid looking directly into the projector lens when the light source is active, as it can cause eye damage.
- Tippruvax isservi dan il-prodott int stess. Irreferi l-manutenzjoni kollha lil persunal tas-servizz kwalifikat.
- Poġġi l-proġettur fuq wiċċ stabbli u livellat biex tevita li jaqa'.
3. Kontenut tal-Pakkett
Ivverifika li l-oġġetti kollha huma preżenti fil-pakkett:
- Casio XJ-F10X Projector
- Korda tal-Enerġija
- Kontroll mill-bogħod (bil-batteriji)
- Kejbil VGA
- Manwal għall-Utent (dan id-dokument)
4. Prodott Aktarview
Familiarize yourself with the various parts and controls of your Casio XJ-F10X projector.
4.1 Panel ta 'Quddiem

The front panel features the projection lens, which emits the image. Ventilation grilles are located on the side to ensure proper cooling during operation. A small infrared receiver for the remote control may also be present.
4.2 Il-Pannell ta' Wara u l-Konnessjonijiet

The rear panel houses all the necessary input and output ports for connecting external devices. These include:
- HDMI Type A x 2: For digital video and audio input (HDCP support).
- VGA (D-Sub 15-pin): Għal input analogu tal-kompjuter.
- Vidjo S: Għal input tal-vidjow analogu.
- Vidjo Kompost (RCA): Għal input ta' vidjow b'definizzjoni standard.
- Audio In (RCA L/R, 3.5mm mini jack): Għal input awdjo analogu.
- Audio Out (3.5mm mini jack): Għall-konnessjoni ta' sistemi awdjo esterni.
- RS-232: Għall-kontroll tal-proġettazzjoni permezz ta' kompjuter jew sistema ta' kontroll.
- USB (Type A, Type B): Għal aġġornamenti ta' servizz jew firmware.
- Daħla tal-Qawwa: Għall-konnessjoni tal-korda tal-enerġija AC.
4.3 Kontrolli tal-Panel ta' Fuq
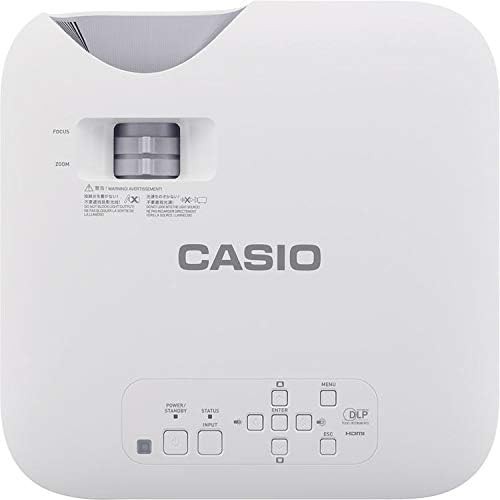
The top panel provides direct access to essential projector functions:
- Buttuna tal-Qawwa: Ixgħel jew jitfi l-proġekter.
- Buttuna tal-Input: Selects the input source (HDMI, VGA, etc.).
- Buttuna tal-menu: Opens the on-screen display (OSD) menu.
- Buttuni tan-Navigazzjoni ('il fuq/'l isfel/'il fuq/'il fuq/'il fuq): Użat biex tinnaviga fl-għażliet tal-menù.
- Daħħal Button: Jikkonferma l-għażliet fil-menù.
- Buttuna ESC: Exits the current menu or returns to the previous screen.
- Lieva taż-Żum: Jaġġusta d-daqs tal-immaġini.
- Ċirku tal-Fokus: Sharpens the projected image.
5. Gwida ta' Setup
5.1 Pożizzjonament tal-Proġettur
Proper placement is crucial for optimal image quality.
- Distanza: Position the projector at an appropriate distance from the screen to achieve the desired image size. Refer to the specifications for throw ratio details.
- Angolu: Ensure the projector is perpendicular to the screen for a rectangular image. Use the keystone correction function if the image appears trapezoidal.
- Ventilazzjoni: Maintain clear space around the projector's ventilation openings to prevent overheating.
5.2 Apparat li jgħaqqad
Follow these steps to connect your source devices:
- Ensure the projector and all source devices are powered off before making connections.
- Connect the appropriate video cable (HDMI, VGA, S-Video, or Composite) from your source device to the corresponding input port on the projector's rear panel.
- If using an analog video input (VGA, S-Video, Composite), connect an audio cable from your source device's audio output to the projector's Audio In port. HDMI carries both video and audio.
- Connect the power cord to the projector's power inlet and then to a grounded electrical outlet.
6. Istruzzjonijiet Operattivi
6.1 Tixgħel u Mitfi
- Qawwa Mixgħul: Press the Power button on the projector's top panel or the remote control. The projector will reach full brightness in approximately 5 seconds due to its Direct On/Off function.
- Itfi: Press the Power button again. The projector will shut down immediately without a cool-down period.
6.2 Basic Projection
- Turn on the projector and your source device.
- Agħfas il- Input button on the projector or remote control repeatedly to select the correct input source (e.g., HDMI 1, VGA).
- Aġġusta l- Zoom lever to achieve the desired image size on the screen.
- Aġġusta l- Iffoka ring until the image appears sharp and clear.
- If the image is distorted (trapezoidal), use the keystone correction feature in the OSD menu to correct it.
7. Manutenzjoni
7.1 Tindif tal-Proġettur
- Lenti: Gently wipe the lens with a soft, lint-free cloth specifically designed for optical surfaces. Do not use abrasive cleaners.
- Casing: Imsaħ il-proġettazzjoni casinb'ċarruta ratba u niexfa. Għal ħmieġ iebes, nixxef ftitampLaħlaħ id-drapp bl-ilma u deterġent ħafif, imbagħad imsaħ niexef.
- Ventilazzjoni: Periodically check and clean the ventilation grilles to ensure they are free from dust and debris. Use a soft brush or compressed air.
7.2 Lonġevità tas-Sors tad-Dawl
The Casio XJ-F10X utilizes a mercury-free LED hybrid light source, offering exceptional durability and a long operational life of up to 20,000 hours without requiring lamp replacement. This significantly reduces maintenance needs and costs.
8 Issolvi l-problemi
Jekk tiltaqa' ma' problemi bil-proġettur tiegħek, irreferi għall-problemi u s-soluzzjonijiet komuni li ġejjin:
- Ebda Immaġni:
- Kun żgur li l-proġettazzjoni tkun mixgħula u li l-korda tal-enerġija tkun imqabbda sew.
- Ivverifika li s-sors tad-dħul korrett huwa magħżul.
- Iċċekkja l-kejbil tal-konnessjoni bejn il-proġettazzjoni u l-apparat tas-sors.
- Kun żgur li l-apparat tas-sors ikun mixgħul u qed joħroġ sinjal.
- Immaġni Mċajpra:
- Check the projector's brightness settings in the OSD menu.
- Ensure the room is sufficiently dark for projection.
- Ebda Ħsejjes:
- If using an analog video input, ensure the audio cable is connected.
- Iċċekkja s-settings tal-volum kemm fuq il-proġettazzjoni kif ukoll fuq l-apparat tas-sors.
- Ensure the correct audio input is selected if applicable.
- L-immaġni hija mċajpra:
- Aġġusta ċ-ċirku tal-fokus fuq il-lenti tal-proġekter.
- Ensure the projector is placed at an appropriate distance from the screen.
- L-Immaġni hija Trapeżojdali:
- Use the keystone correction function in the OSD menu to adjust the image shape.
- Try to position the projector as perpendicular to the screen as possible.
9. Speċifikazzjonijiet Tekniċi
| Karatteristika | Speċifikazzjoni |
|---|---|
| Numru tal-Mudell | XJ-F10X |
| Riżoluzzjoni Nattiva | XGA (1024 x 768) |
| Luminożità | 3,300 Lumens |
| Proporzjon ta' Kuntrast | 20,000:1 |
| Ċippa tal-Wiri | 0.65" DLP Chip |
| Sors tad-Dawl | LED ibridu |
| Ħajja Sors tad-Dawl | Sa 20,000 sigħat |
| Tip ta' Lenti | 1.5x Manual Zoom & Focus |
| Proporzjon ta' l-aspett | 4:3 Indiġeni |
| Inputs | HDMI Type A x 2, S-Video, VGA, RS-232, Composite Video, RCA Audio In |
| Dimensjonijiet tal-Prodott | 11.8 x 11.8 x 3.8 pulzieri |
| Piż tal-oġġett | 10.78 liri |
10. Garanzija u Appoġġ għall-Klijent
The Casio XJ-F10X Projector is covered by a 3-year parts and labor warranty. The LED hybrid light source is covered by a 5-year or 10,000-hour warranty, whichever comes first. For technical support, service, or warranty claims, please contact Casio customer support through their official webis-sit jew l-informazzjoni ta' kuntatt ipprovduta mad-dokumentazzjoni tax-xiri tiegħek.
Please have your model number (XJ-F10X) and purchase date available when contacting support.


