1. Prodott Aktarview
Il-Maxview Is-Sokit Uniku ta' Barra B2013 li Jirreżisti t-Temp b'Konnessjoni RJ45 huwa ddisinjat biex jipprovdi punt tad-dħul estern sigur u reżistenti għat-temp għal konnessjonijiet tan-netwerk/Ethernet f'vetturi mobbli. Din l-unità hija ideali biex tgħaddi antenni esterni tal-Wi-Fi jew kejbils tan-netwerk, u tiżgura aċċess affidabbli għall-internet waqt li tkun miexi.
Id-disinn robust tiegħu jinkludi għatu li jagħlaq sewwa u jaħbi l-kejbils waqt l-użu, u jipproteġi l-konnessjonijiet interni minn elementi ambjentali bħax-xita, ir-riħ u l-borra. Siġill tal-fowm EPDM li jwaħħal waħdu jiżgura protezzjoni mid-dħul tal-ilma bejn is-sokit u l-vettura.
Karatteristiċi ewlenin:
- Iddisinjat apposta biex jipprovdi punt tad-dħul tal-kejbil pulit u estern reżistenti għat-temp fi kwalunkwe vettura.
- Jinkludi konnessjoni RJ45 għal kejbils tan-netwerk/Ethernet.
- Jinkludi kejbil ta' 3 metri għal installazzjoni flessibbli.
- Ideali għal diversi sistemi satellitari portabbli u antenni tat-turing.
- Mgħammar b'siġill tal-fowm EPDM li ma jgħaddix ilma minnu u li jwaħħal waħdu għal protezzjoni mtejba.
2. Informazzjoni dwar is-Sigurtà
Jekk jogħġbok aqra l-istruzzjonijiet kollha tas-sigurtà bir-reqqa qabel l-installazzjoni u l-użu. Jekk ma ssegwix dawn l-istruzzjonijiet, dan jista' jirriżulta fi ħsara lill-prodott, lill-proprjetà, jew fi korriment personali.
- Kun żgur li l-wiċċ tal-installazzjoni jkun nadif, niexef, u ħieles minn debris qabel ma tapplika s-siġill.
- Tippruvax timmodifika l-prodott. Kwalunkwe modifika tannulla l-garanzija u tista' tikkomprometti s-sigurtà.
- Żomm fejn ma jintlaħaqx mit-tfal.
- Meta tkun qed tħaffer, oqgħod attent għal kwalunkwe wajers jew pajpijiet eżistenti wara l-wiċċ tal-installazzjoni.
- Dejjem uża għodda xierqa u tagħmir protettiv personali waqt l-installazzjoni.
3. Kontenut tal-Pakkett
Iċċekkja li l-komponenti kollha huma preżenti qabel tibda l-installazzjoni:
- 1 x Maxview B2013 Sokit Uniku ta' Barra li ma jgħaddix ilma minnu b'Konnessjoni RJ45
- 1 x Siġill tal-fowm EPDM li jwaħħal waħdu
- Viti tal-immuntar
- Kejbil RJ45 ta' 3 metri
4. Gwida għall-Installazzjoni
Segwi dawn il-passi għall-installazzjoni xierqa tal-Max tiegħekview Sokit reżistenti għat-temp B2013:
- Agħżel Post: Agħżel wiċċ ċatt, nadif u aċċessibbli fuq il-vettura tiegħek għall-immuntar. Kun żgur li hemm biżżejjed spazju għall-unità u biex il-kejbils jiġu mgħoddija internament.
- Ipprepara wiċċ: Naddaf iż-żona tal-immuntar sewwa biex tneħħi kwalunkwe ħmieġ, grass, jew umdità. Dan jiżgura adeżjoni xierqa tas-siġill tal-fowm EPDM.
- Immarka l-Punti tat-Tħaffir: Poġġi s-sokit mal-wiċċ magħżul u immarka l-pożizzjonijiet għall-viti tal-immuntar. Immarka wkoll il-punt ċentrali għat-toqba tad-dħul tal-kejbil.
- Drill toqob: Ħaffer bir-reqqa toqob pilota għall-viti tal-immuntar u toqba akbar għad-dħul tal-kejbil, filwaqt li tiżgura li ma ssirx ħsara lil xi wajers jew strutturi interni.
- Applika Siġill: Applika s-siġill tal-fowm EPDM li jwaħħal waħdu fuq wara tas-sokit, billi tallinjah mat-truf biex toħloq barriera li ma tidħolx ilma minnha.
- Kejbil tar-Rotta: Għaddi l-kejbil RJ45 mit-toqba tad-dħul tal-kejbil imtaqqba minn ġewwa l-vettura għal barra. Qabbad it-tarf tal-RJ45 mal-konnettur intern tas-sokit.
- Sokit tal-Immuntar: Poġġi s-sokit fuq it-toqob imtaqqbin, waqt li tiżgura li l-kejbil ikun imdaħħal u konness sew. Waħħal is-sokit mal-vettura billi tuża l-viti tal-immuntar provduti. Issikka sew iżda tissikkax iżżejjed.
- Agħlaq l-għatu: Kun żgur li l-għatu jkun magħluq sew meta s-sokit ma jkunx qed jintuża jew meta l-kejbils ikunu konnessi, biex tinżamm l-integrità tiegħu reżistenti għat-temp.

Figura 4.1: Massimuview Sokit B2013 b'kejbil RJ45 imqabbad, li juri l-funzjoni primarja tiegħu.
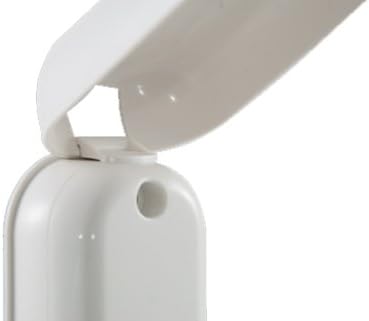
Figura 4.2: Dettall tal-mekkaniżmu robust taċ-ċappetta għall-għatu reżistenti għat-temp.
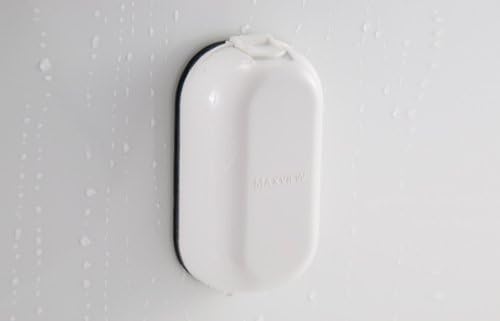
Figura 4.3: Il-Massimuview Sokit B2013 bl-għatu magħluq, li juri l-kapaċità tiegħu li jiflaħ għat-temp kontra l-ilma.
5. Istruzzjonijiet Operattivi
L-użu tal-Maxview Is-sokit B2013 huwa sempliċi:
- Miftuħa għatu: Erfa' bil-mod l-għatu li ma jgħaddix ilma minnu biex tikxef il-port RJ45.
- Qabbad Kejbil: Daħħal il-kejbil tan-netwerk RJ45 estern tiegħek fil-port sakemm tikklikkja sew f'postu.
- Kejbil tar-Rotta: Kun żgur li l-kejbil ikun imqiegħed sew u ma jostakolax il-mekkaniżmu tal-għeluq tal-għatu. Id-disinn jippermetti li l-għatu jingħalaq madwar il-kejbil.
- Agħlaq l-għatu: Ladarba l-kejbil ikun imqabbad, agħlaq l-għatu bir-reqqa. L-għatu huwa ddisinjat biex jipprovdi siġill sewwa madwar il-kejbil imqabbad, u jżomm l-integrità reżistenti għat-temp.
- Skonnettja l-Kejbil: Biex tiskonnettja, iftaħ l-għatu, agħfas it-tab tar-rilaxx fuq il-konnettur RJ45, u iġbed il-kejbil bil-mod 'il barra.
- Għatu Sikur: Dejjem kun żgur li l-għatu jkun magħluq għalkollox meta ma jkun hemm l-ebda kejbil imqabbad biex tipproteġi l-port mill-esponiment ambjentali.
6. Manutenzjoni
Biex tiżgura l-lonġevità u l-prestazzjoni ottimali tal-Max tiegħekview Sokit B2013, segwi dawn il-linji gwida għall-manutenzjoni:
- Tindif: Naddaf il-barra tas-sokit perjodikament b'ċarruta ratba u damp drapp. Evita li tuża prodotti tat-tindif jew solventi li joborxu li jistgħu jagħmlu ħsara lill-plastik jew lis-siġill.
- Spezzjoni tas-Siġill: Spezzjona regolarment is-siġill tal-fowm EPDM għal kwalunkwe sinjal ta’ xedd, qsim, jew ħsara. Siġill kompromess jista’ jwassal għal dħul ta’ ilma. Jekk ikun bil-ħsara, ibdel is-siġill minnufih.
- Mekkaniżmu tal-għatu: Iċċekkja l-mekkaniżmu tal-lukkett u ċ-ċappetta tal-għatu biex tiżgura li jaħdem bla xkiel u jagħlaq sew. Illubrika bi sprej ibbażat fuq is-silikon jekk meħtieġ, filwaqt li tevita kuntatt mal-komponenti elettriċi.
- Konnessjoni tal-Cable: Kun żgur li l-konnessjoni interna RJ45 tibqa' ħielsa mill-ħmieġ u l-umdità. Jekk tkun esposta, naddafha bil-mod bl-arja kkompressata.
- Issikkar tal-viti: Iċċekkja l-viti tal-immuntar perjodikament għal issikkar. Il-vibrazzjonijiet waqt il-vjaġġ jistgħu jillaxkawhom maż-żmien.
7 Issolvi l-problemi
Jekk tiltaqa' ma' problemi bil-Max tiegħekview Sokit B2013, irreferi għall-problemi u s-soluzzjonijiet komuni li ġejjin:
| Problema | Kawża Possibbli | Soluzzjoni |
|---|---|---|
| Dħul ta' ilma madwar is-sokit. | Siġill EPDM bil-ħsara jew installat ħażin. Viti tal-immuntar maħlula. | Spezzjona u erġa' applika jew ibdel is-siġill tal-EPDM. Issikka l-viti tal-immuntar. Kun żgur li l-wiċċ kien nadif u niexef waqt l-installazzjoni. |
| Il-kejbil RJ45 mhux konness sew. | Fdalijiet fil-port. Konnettur RJ45 bil-ħsara fuq il-kejbil. | Spezzjona l-port għal ostakli u naddaf b'arja kkompressata. Ipprova kejbil RJ45 differenti biex teskludi problemi bil-kejbil. |
| L-għatu ma jagħlaqx sew. | Ostruzzjoni fil-mekkaniżmu taċ-ċappetta jew tal-lukkett. Allinjament ħażin waqt l-installazzjoni. | Iċċekkja għal debris fiż-żona taċ-ċappetta. Kun żgur li s-sokit ikun immuntat ċatt u mhux mgħawweġ. |
| L-ebda konnessjoni man-netwerk wara li tgħaqqadha. | Problema bil-kejbil intern. Problema bl-apparat estern. | Ivverifika l-konnessjoni interna tal-kejbil RJ45. Ittestja l-apparat tan-netwerk estern u l-kejbil direttament. Ikkonsulta professjonist jekk ikun hemm suspett ta' wajers interni. |
8. Speċifikazzjonijiet
| Karatteristika | Dettall |
|---|---|
| Mudell tal-Prodott | MaxV-B2013 |
| Tip ta' Konnessjoni | RJ45 Uniku |
| Dimensjonijiet tal-Prodott | 4.53 x 2.64 x 4.53 pulzieri (11.5 x 6.7 x 11.5 ċm) |
| Piż tal-oġġett | 15.8 uqija (447.9 gramma) |
| Tul tal-Cable | 3 metri (madwar 9.8 piedi) |
| Manifattur | Maxview |
| L-Ewwel Data Disponibbli | 19 ta’ Novembru, 2019 |
9. Garanzija u Appoġġ
Maxview Il-prodotti huma manifatturati skont standards għoljin u huma ddisinjati għal prestazzjoni affidabbli. Għal informazzjoni speċifika dwar il-garanzija, jekk jogħġbok irreferi għad-dokumentazzjoni inkluża max-xiri tiegħek jew żur is-sit uffiċjali ta' Maxview websit.
Għal appoġġ tekniku, assistenza għas-soluzzjoni ta' problemi, jew biex tistaqsi dwar partijiet ta' sostituzzjoni, jekk jogħġbok ikkuntattja lil Maxview servizz tal-konsumatur. Id-dettalji ta' kuntatt tipikament jistgħu jinstabu fuq il-paġna tal-manifattur webis-sit jew fuq l-imballaġġ tal-prodott.
Jekk jogħġbok żomm il-prova tax-xiri tiegħek għal pretensjonijiet ta' garanzija.


