1. Introduzzjoni
This manual provides detailed instructions for the assembly, safe operation, and proper maintenance of your Arrow EZEE Shed Model EZ10872HVCC. This 10' x 8' steel storage shed is designed for durability and ease of assembly, featuring electro-galvanized steel construction and the Snap-IT Quick Assembly system. Please read all instructions thoroughly before beginning assembly to ensure a successful and safe installation.

Figura 1: Quddiem view of the assembled Arrow EZEE Shed Model EZ10872HVCC.
2. Informazzjoni dwar is-Sigurtà
Prekawzjonijiet ta' Sigurtà Importanti:
- Assemblea ta' Żewġ Persuni: The product is heavy (221 lbs). A minimum of two people are recommended for safe assembly and handling of components.
- Ilbes Tagħmir Protettiv: Always wear appropriate safety equipment, including gloves and eye protection, when handling metal components and during assembly to prevent injury from sharp edges or tools.
- Wiċċ Livell: Ensure the assembly area and final shed location are on a firm, level surface to ensure structural integrity and proper door operation.
- Fondazzjoni Sikura: Anchor the shed securely to the ground or a concrete slab to prevent wind damage.
- Sigurtà tal-Għodda: Use tools correctly and keep them in good working condition. Follow manufacturer's instructions for all tools used.
- Tfal u Pets: Żomm it-tfal u l-annimali domestiċi 'l bogħod miż-żona tal-assemblaġġ biex tevita inċidenti.
3. Komponenti Overview
Before beginning assembly, unpack all components and verify that all parts are present and undamaged. Refer to the packing list provided with your shed for a complete inventory. Key components include:
- Frame Panels (electro-galvanized steel)
- Pannelli tas-saqaf
- Swing Doors (pre-assembled with hinges)
- Ħardwer (viti, boltijiet, woxers, skorfini)
- Handles and Latching Mechanism
- Gradilji tal-Ventilazzjoni
Note: Some parts may have protective film or coatings that should be removed during assembly.
4. Istruzzjonijiet tal-Immuntar (Setup)
The Arrow EZEE Shed features a Snap-IT Quick Assembly system designed to reduce assembly time. The following steps outline the general assembly process. For detailed, step-by-step diagrams, please refer to the official PDF instruction manual linked in Section 9.
4.1 Preparazzjoni tas-Sit
- Select a level, well-drained area for your shed. A concrete slab or a properly prepared gravel base is recommended.
- Naddaf iż-żona minn kwalunkwe debris, blat, jew veġetazzjoni.
- Aċċerta ruħek li jkun hemm spazju biżżejjed madwar il-barrakka għall-assemblaġġ u aċċess fil-futur.
4.2 Assemblaġġ tal-Bażi u l-Qafas
- Assemble the base frame according to the diagrams in the detailed manual. Ensure all corners are square and secure.
- Attach the bottom rails to the base frame.
4.3 Installazzjoni tal-Panel tal-Ħajt
- Begin attaching the wall panels to the base frame. The Snap-IT system allows panels to snap into place, with subsequent panels overlapping every 12 inches for increased strength.
- Secure panels using the provided fasteners, following the sequence in the manual. The design features a reduced number of fasteners for quicker assembly.
- Install the corner panels and ensure all wall sections are plumb and securely fastened.
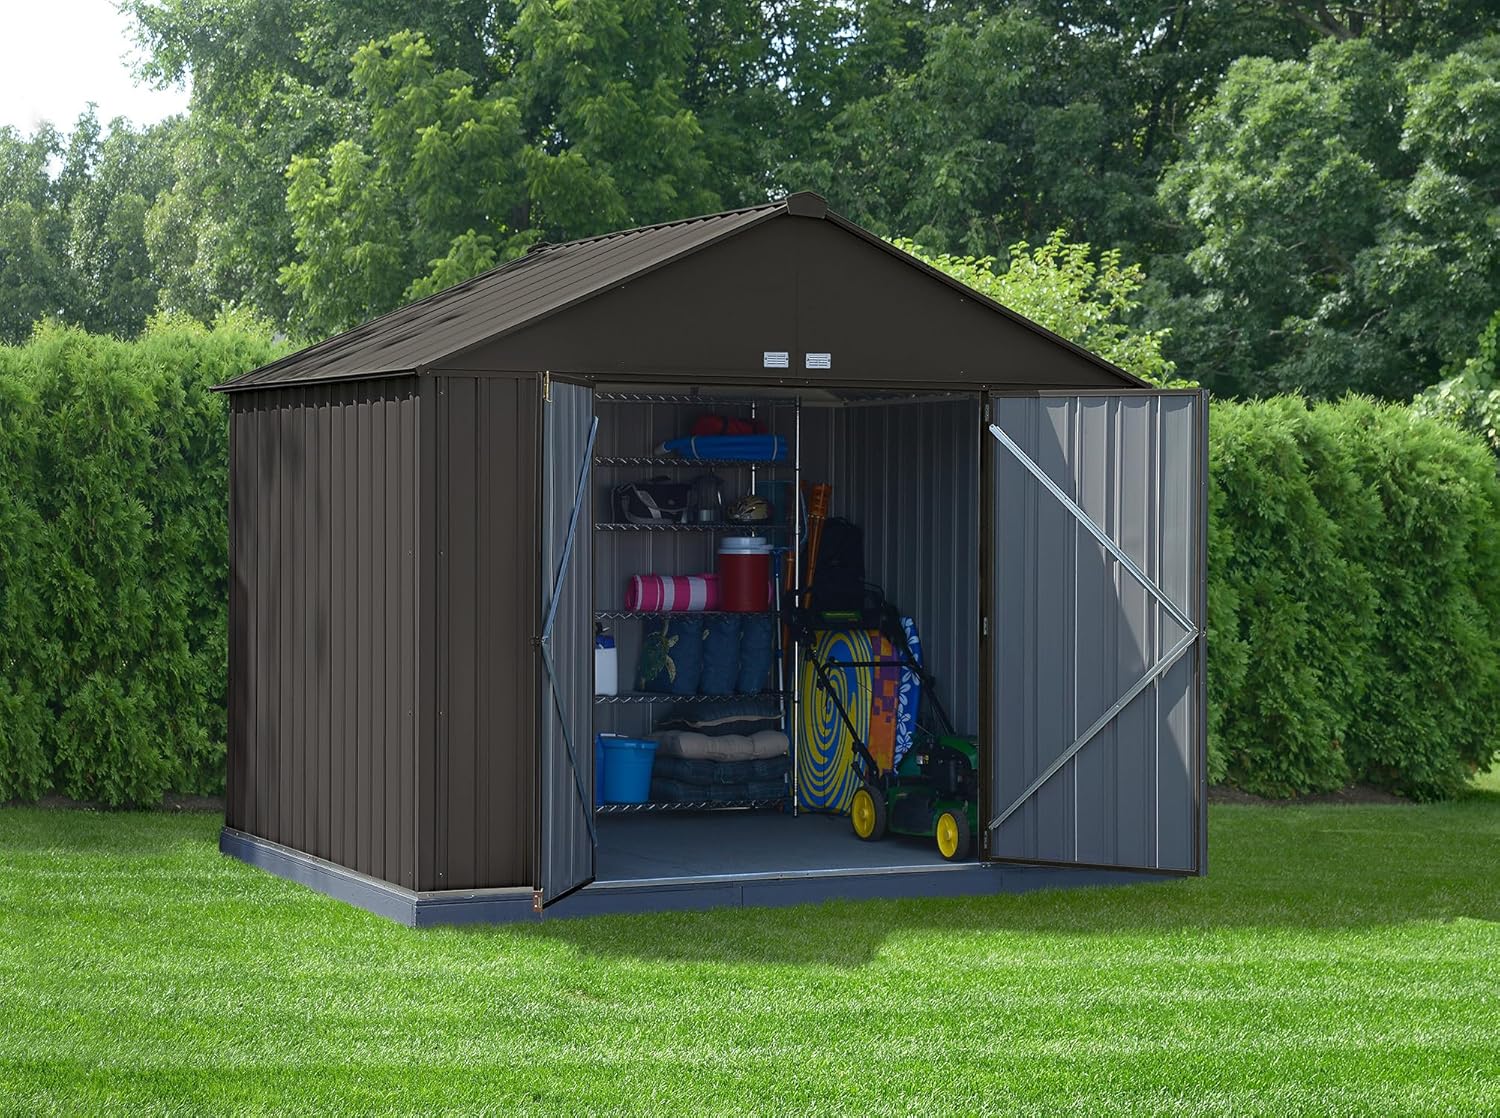
Figura 2: Intern view illustrating the wall panel construction and roof support.
4.4 Assemblaġġ tas-Saqaf
- The improved roof assembly allows for ground assembly. Assemble the roof frame and attach the roof panels on the ground.
- Once assembled, carefully lift and secure the roof structure onto the wall frames. This step requires at least two people.
- Ensure all roof panels are properly aligned and fastened to prevent leaks.

Figure 3: Detail of the shed's interior roof support structure.
4.5 Installazzjoni tal-Bieb
- Install the swing doors into the designated opening. The doors are designed with a heavy-duty frame and set on three hinges for durability.
- Attach the handles and the pad-lockable latching mechanism. (Padlock not included).
- Test door operation to ensure smooth opening and closing. Adjust if necessary.

Figure 4: Detail of the robust swing door frame and internal bracing.
4.6 L-aħħar irtokkijiet
- Install the ventilation grilles near the gable roof to improve air circulation.
- Double-check all fasteners to ensure they are tight and secure.
Figure 5: Ventilation grilles located near the gable roof for improved air flow.
5. Istruzzjonijiet Operattivi
Your Arrow EZEE Shed is designed for straightforward operation.
5.1 Aċċess għall-Maħżen
- To open the swing doors, unlatch the mechanism and pull the doors outwards. The wide door opening (5'3" W x 5'9" H) provides easy access for large items.
- To secure the shed, close both doors and engage the latch. A padlock (not included) can be used for added security.
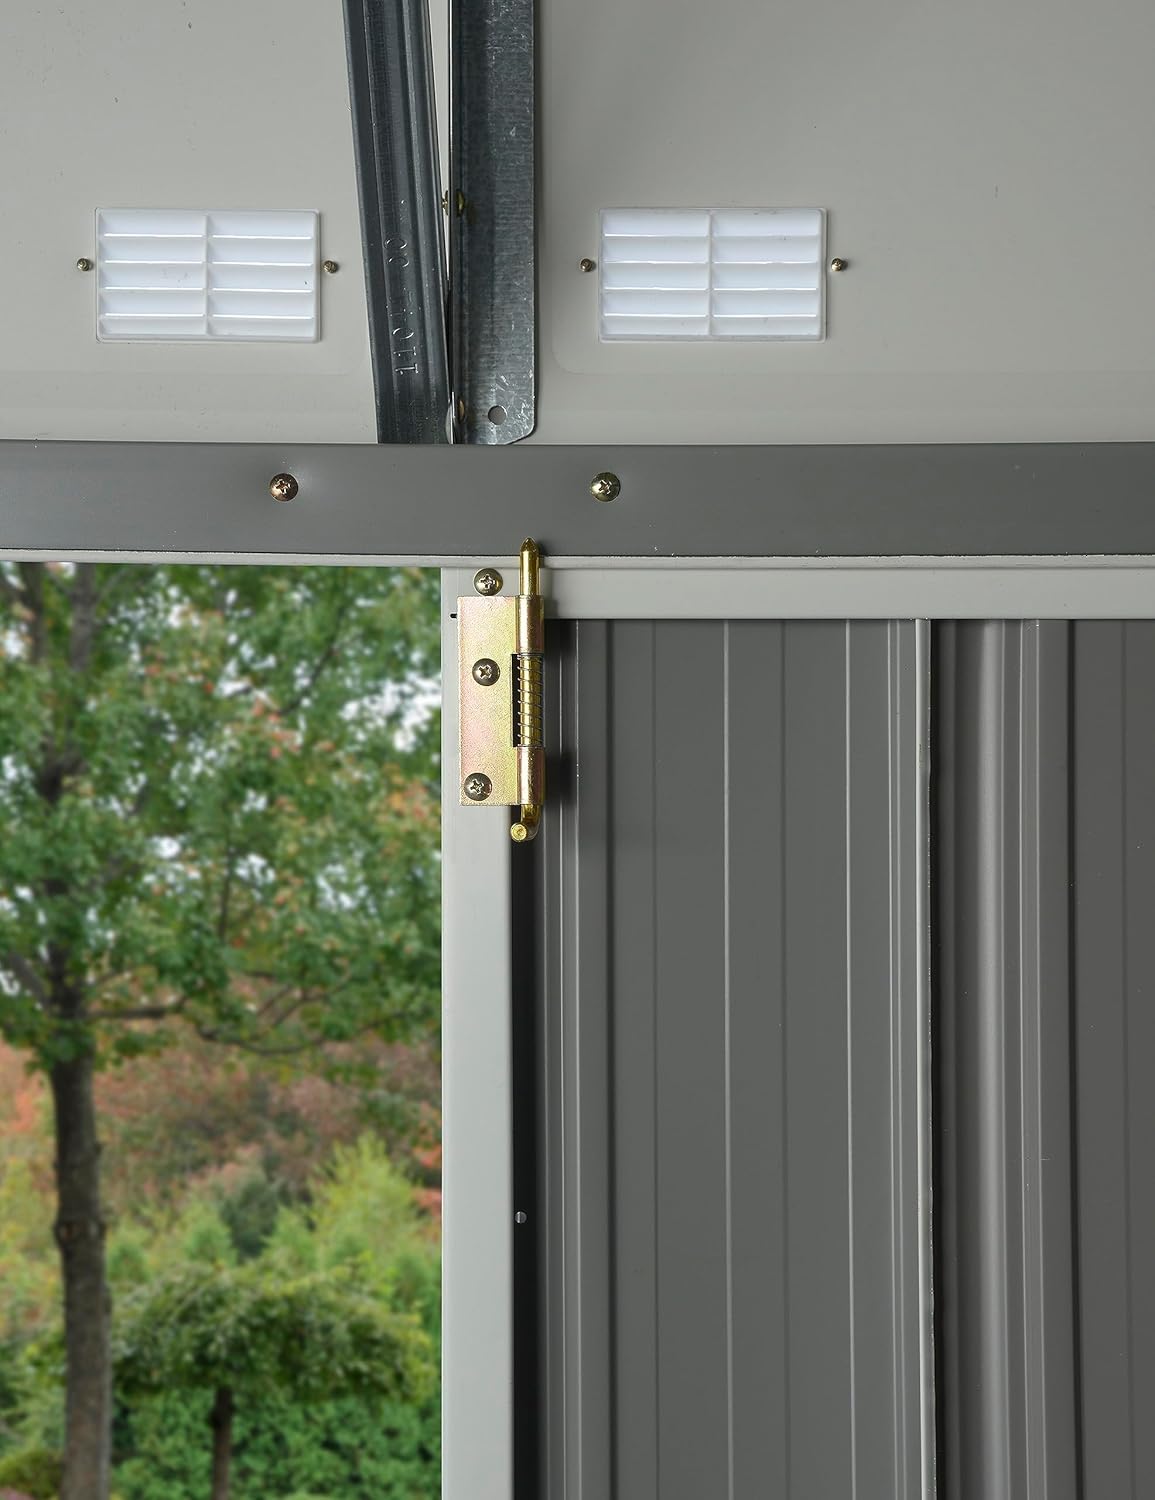
Figure 6: Detail of the pad-lockable door latch for securing contents.
5.2 Ventilazzjoni
- The extra-high gable roof and integrated vents are designed to improve ventilation and air circulation within the unit, helping to reduce condensation and maintain storage conditions.
6. Manutenzjoni
Regular maintenance will extend the life and appearance of your Arrow EZEE Shed.
- Tindif: Periodically clean the exterior with mild soap and water. Avoid abrasive cleaners or harsh chemicals that could damage the finish. Rinse thoroughly.
- Spezzjoni: Annually inspect all fasteners, hinges, and structural components for tightness and signs of wear or damage. Tighten any loose screws or bolts.
- Operazzjoni tal-Bieb: Lubricate door hinges and latch mechanisms as needed with a silicone-based lubricant to ensure smooth operation.
- Tneħħija tas-Silġ: In areas with heavy snowfall, remove accumulated snow from the roof to prevent excessive load.
- Drenaġġ: Ensure that water drains away from the shed's base to prevent moisture buildup and potential corrosion.
7 Issolvi l-problemi
This section addresses common issues you might encounter with your shed.
- Doors do not close smoothly:
- Check if the shed is on a perfectly level surface. Uneven ground can cause door misalignment.
- Inspect hinges for damage or debris. Lubricate if necessary.
- Ensure all frame components are square and securely fastened.
- Tnixxija tal-ilma:
- Verify that all roof and wall panels are properly overlapped and all fasteners are tight.
- Check for any gaps or damaged seals. Apply a suitable outdoor sealant if needed.
- Ensure proper drainage around the shed's base.
- Pannelli sfużi:
- Re-tighten any loose screws or bolts.
- Inspect panels for damage that might prevent proper seating.
If you encounter issues not covered here or require further assistance, please contact Arrow customer support.
8. Speċifikazzjonijiet
| Karatteristika | Dettall |
|---|---|
| Brand | Vleġġa |
| Numru tal-Mudell | EZ10872HVCC |
| Materjal | Electro-galvanized Steel |
| Dimensjonijiet Esterni (T x W x H) | 120"D x 96"W x 96"H (10' x 8' x 8') |
| Dimensjonijiet Interni (T x W x H) | 9'6" x 7'6" x 8' |
| Dimensjonijiet tal-Bieb (W x H) | 63" W x 69" H (5'3" W x 5'9" H) |
| Żona Totali tal-Ħażna | 71 pied kwadru |
| Piż tal-oġġett | 221 lbs |
| Assembly Time (Estimated) | 6 sigħat (ma' 2 persuni) |
| Kulur | Faħam tal-kannol |

Figura 7: Eżample floor plan illustrating potential storage layout within the shed.
9. Garanzija u Appoġġ
Your Arrow EZEE Shed Model EZ10872HVCC is backed by a Garanzija limitata ta 'sena, ensuring confidence in the quality of your purchase.
For warranty claims, missing parts, assembly assistance, or any other inquiries, please contact Arrow customer support:
- Telefon: 1-800-851-1085
- Email: assist@arrowsheds.com
- Manwal Online: For a detailed PDF version of this manual and additional resources, please visit the official Arrow Sheds webis-sit jew irreferi għad-dokument ipprovdut fuq https://manuals.plus/m/75faffa9d884bf3631fb469e7113e32b5e8a913d3cf48dcf1b074f37c469e057.

Figure 8: Cover of the official Owner's Manual & Assembly Guide.


