Introduzzjoni
This manual provides detailed instructions for the installation, operation, and maintenance of your ASRock Z270 EXTREME4 LGA1151 motherboard. Please read this manual thoroughly before beginning installation to ensure proper setup and optimal performance. This motherboard supports 6th and 7th Generation Intel Core i7/i5/i3/Pentium/Celeron processors.
Setup u Installazzjoni
1. Installazzjoni tal-Proċessur
Carefully open the LGA1151 CPU socket lever. Align the notches on your 6th or 7th Generation Intel processor with the socket and gently place the CPU into the socket. Close the lever to secure the processor. Ensure the CPU is correctly seated before applying pressure.
2. Installazzjoni tal-Memorja (RAM)
The ASRock Z270 EXTREME4 features four DDR4 DIMM slots, supporting up to 64GB of RAM in dual-channel configuration. Open the clips on both ends of the DIMM slot. Align the memory module with the slot, ensuring the notch on the module matches the key in the slot. Press down firmly on both ends of the memory module until the clips snap into place.
3. Installazzjoni ta' Apparat tal-Ħażna
This motherboard includes multiple SATA3 ports and two Ultra M.2 slots for high-speed storage. When installing M.2 SSDs, be aware that certain SATA ports may be disabled. Refer to your motherboard's physical manual for specific details on which SATA ports are affected by M.2 usage. Connect SATA drives using SATA data and power cables.
4. Installazzjoni tal-Kard Grafika
Insert your PCI Express graphics card into the primary PCIe x16 slot. Ensure it is fully seated and secure it with the case screw. Connect any necessary PCIe power cables from your power supply to the graphics card.
5. Konnessjonijiet tal-Provvista tal-Enerġija
Connect the 24-pin ATX power connector and the 8-pin CPU power connector from your power supply to the corresponding ports on the motherboard. Ensure all connections are secure.
6. Il-Panel ta' Quddiem u l-Konnessjonijiet Periferali
Connect your case's front panel connectors (power button, reset button, USB ports, audio jacks) to the appropriate headers on the motherboard. Connect any other peripherals such as USB devices, display cables (HDMI, DVI-D, D-Sub), and network cables to the rear I/O panel.

Figura 1: Minn fuq għal isfel view of the ASRock Z270 EXTREME4 motherboard, showing the CPU socket, RAM slots, PCIe slots, and various headers.

Figura 2: Angolat view of the ASRock Z270 EXTREME4 motherboard, highlighting the heatsinks and M.2 slots.
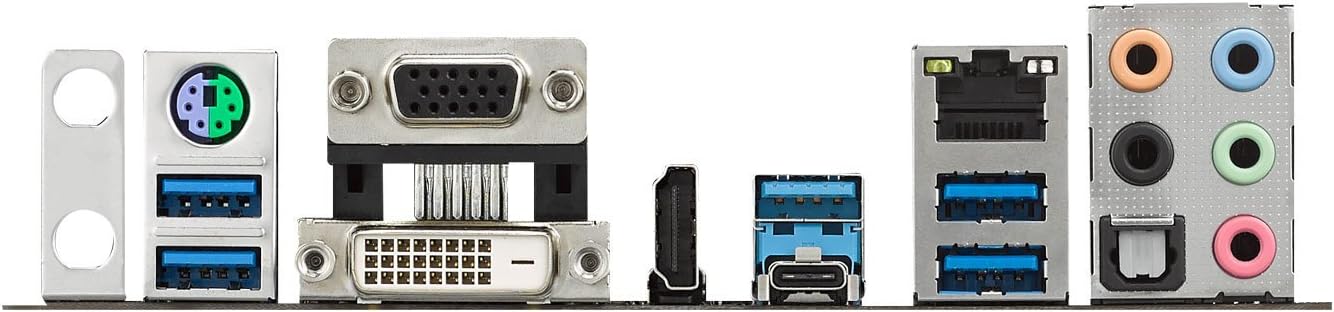
Figura 3: Dettaljat view of the rear I/O panel, featuring USB ports, display outputs (HDMI, DVI-D, D-Sub), Ethernet, and audio jacks.
Istruzzjonijiet Operattivi
1. L-Ibbutjar Inizjali u s-Setup tal-BIOS/UEFI
Upon first power-on, press the 'Delete' or 'F2' key repeatedly during startup to enter the BIOS/UEFI setup utility. The ASRock UEFI offers an 'EZ Mode' for quick configuration of basic settings. For advanced users, the 'Advanced Mode' provides comprehensive control over system parameters, including boot order, fan speeds, and security settings.
2. Installazzjoni tas-sewwieq
After installing your operating system (e.g., Windows 10), install the necessary drivers from the ASRock support website or the included driver CD/USB. Pay particular attention to chipset, graphics, and audio drivers (Realtek). Outdated or missing audio drivers can lead to sound distortion or microphone issues.
3. Overclocking (Mhux obbligatorju)
The Z270 EXTREME4 motherboard provides extensive overclocking options within the UEFI for users with unlocked (K-series) Intel processors. Adjust CPU frequency, voltage, and memory timings carefully. Consult reliable overclocking guides and proceed with caution to avoid system instability or component damage.
4. Kontroll tal-LED RGB
The motherboard features integrated RGB lighting. ASRock provides software to customize the LED effects and colors directly from your operating system. Connect compatible RGB LED strips to the dedicated header for synchronized lighting.
5. Konfigurazzjoni ta' Monitors Multipli
This motherboard supports triple monitor configurations using the onboard HDMI, DVI-D, and D-Sub outputs, provided a compatible Intel processor with integrated graphics is installed. For dedicated graphics cards, connect displays directly to the card's outputs.
Manutenzjoni
1. Tindif tas-Sistema
Regularly clean your computer system to prevent dust buildup, which can lead to overheating and reduced performance. Use compressed air to clear dust from fans, heatsinks, and motherboard components. Ensure the system is powered off and unplugged before cleaning.
2. Aġġornamenti tal-BIOS/UEFI
Iċċekkja l-ASRock perjodikament website for BIOS/UEFI updates. Updates can improve system stability, add new features, or enhance compatibility. Follow the provided instructions carefully when performing a BIOS update to avoid potential issues.
3. Aġġornamenti tas-Sewwieqa
Keep your system drivers, especially for chipset, graphics, and audio, updated to the latest versions. This ensures optimal performance and resolves potential compatibility issues.
Issolvi l-problemi
- System Fails to Boot or Powers Off Immediately:
Check all power connections (24-pin ATX, 8-pin CPU, PCIe for graphics card). Ensure RAM modules are correctly seated. Verify CPU installation and cooler attachment. Test with minimal components (CPU, one RAM stick, graphics card if no integrated graphics).
- Blue Screen Errors (BSOD):
Often caused by driver conflicts, faulty hardware, or unstable overclocking. Update all drivers, especially chipset and graphics. If overclocked, reset BIOS to default settings. Test memory with diagnostic tools.
- M.2 SSD Not Detected / SATA Ports Disabled:
As noted in the setup section, installing M.2 SSDs can disable certain SATA ports. Consult your motherboard's physical manual to identify which SATA ports are shared with M.2 slots. Ensure the M.2 drive is properly seated and secured.
- Audio Issues (Distortion, No Sound, Microphone Problems):
Ensure the latest Realtek audio drivers are installed. Check physical audio connections. Verify audio settings in your operating system and BIOS/UEFI.
- Peripherals Not Working (USB, Keyboard, Mouse):
Check connections to the motherboard headers and rear I/O ports. Ensure USB drivers are installed. Test with different ports or devices.
Speċifikazzjonijiet
| Karatteristika | Dettall |
|---|---|
| Brand | ASRock |
| Isem tal-Mudell | Z270 Extreme4 |
| Socket tas-CPU | LGA 1151 |
| Proċessuri Kompatibbli | Intel Celeron, Intel Pentium, 6th/7th Gen Intel Core i3/i5/i7 |
| Tip ta' Ċipset | Intel Z270 |
| Teknoloġija tal-Memorja RAM | DDR4 SDRAM |
| Veloċità tal-Arloġġ tal-Memorja | 2133 MHz (Jappoġġja frekwenzi ogħla permezz ta' OC) |
| RAM Massima Appoġġjata | 64 GB (4 x DDR4 DIMM slots) |
| Għażliet tal-Output tal-Grafika | HDMI, DVI-D, D-Sub (Supports Triple Monitor) |
| Numru ta 'USB 2.0 Ports | 3 (Internal headers) |
| Interfejsijiet tal-Ħażna | SATA3, 2 x Ultra M.2 (PCIe Gen3 x4 & SATA3) |
| Fattur tal-Formola | ATX |
| Dimensjonijiet tal-Prodott | 12.2 x 13.7 x 3.54 pulzieri |
| Piż tal-oġġett | 3.3 liri |
| Sistema Operattiva | No Operating System (Compatible with Windows 10) |
Informazzjoni dwar Garanzija
ASRock products are covered by a limited warranty. The specific terms and duration of the warranty may vary by region and retailer. Please retain your proof of purchase for warranty claims. For detailed warranty information, refer to the warranty card included with your product or visit the official ASRock websit.
Appoġġ Tekniku
Għal assistenza teknika, downloads ta' sewwieqa, aġġornamenti tal-BIOS, u mistoqsijiet frekwenti, jekk jogħġbok żur is-sit uffiċjali tal-appoġġ tal-ASRock. website. You can typically find support resources by searching for your specific motherboard model (Z270 Extreme4) on their website. Contact information for customer service may also be available on the ASRock support portal.