Introduzzjoni
Welcome to your Vileda Voleo Pro Cleaning Trolley Starter Kit. This manual provides essential information for the safe and efficient assembly, operation, and maintenance of your cleaning trolley. Please read these instructions carefully before use and retain them for future reference.
Informazzjoni dwar is-Sigurtà
Sigurtà Ġenerali:
- Always ensure the trolley is stable before use.
- Do not overload the trolley beyond its intended capacity.
- Keep hands and clothing clear of moving parts, especially during assembly and wringing.
- Use appropriate personal protective equipment (PPE) when handling cleaning chemicals.
- Store the trolley in a safe, dry place when not in use.
- Żomm fejn ma jintlaħaqx mit-tfal.
Kontenut tal-Pakkett
The Vileda Voleo Pro Cleaning Trolley Starter Kit typically includes:
- 1 x Qafas tat-tròli
- 1 x 25 L Capacity Bucket (Grey)
- 1 x 15 L Capacity Bucket (Grey)
- 1 x Vertical Mop Press/Wringer
- Roti/Casters
- Ħardwer tal-Assemblaġġ (viti, skorfini, eċċ.)
Note: Specific components may vary slightly. Please check your packaging for a complete list.
Istruzzjonijiet ta' Armar
Follow these steps to assemble your Vileda Voleo Pro Cleaning Trolley.
Pass 1: Waħħal ir-Roti mal-Bażi
Carefully turn the trolley base upside down. Insert the casters into the designated slots on the base. Secure them firmly using the provided hardware. Ensure all casters are securely attached and can rotate freely.
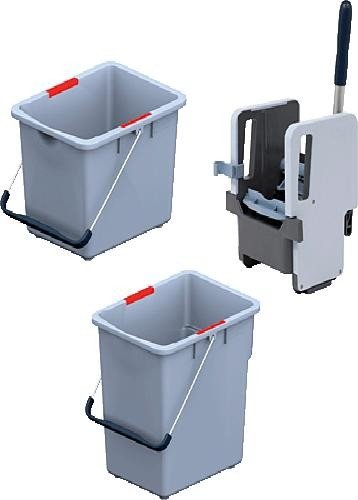
Image description: A general view of the Vileda Voleo Pro Cleaning Trolley, illustrating its overall structure including the base and casters.
Pass 2: Arma l-Qafas
Attach the vertical frame components to the base. Align the holes and secure with screws or clips as per the design. Ensure the frame is rigid and stable.
Step 3: Install Bucket Holders and Handle
Mount the bucket holders onto the frame. These are designed to securely hold the 25 L and 15 L buckets. Attach the handle to the top of the frame, ensuring it is comfortable for pushing and pulling.
Step 4: Place Buckets and Mop Press
Place the 25 L bucket into its designated larger compartment and the 15 L bucket into its smaller compartment. Insert the vertical mop press into the 25 L bucket, ensuring it is stable and ready for use.
Istruzzjonijiet Operattivi
Tħejjija għat-Tindif
Fill the 25 L bucket with your preferred cleaning solution. The 15 L bucket can be used for rinse water or to hold additional cleaning supplies.
Using the Mop Press
After dipping your mop into the cleaning solution, place it into the vertical mop press. Apply downward pressure on the lever to wring out excess liquid from the mop. This helps control moisture levels and improves cleaning efficiency.
Maneuvering the Trolley
Use the handle to push or pull the trolley to your desired cleaning area. The swivel casters allow for easy maneuverability around obstacles.
Manutenzjoni
Cleaning the Trolley
After each use, empty and rinse both buckets thoroughly. Wipe down the mop press and trolley frame with a damp cloth to remove any dirt or chemical residue. Allow all components to air dry completely before storage.
Spezzjoni tal-Komponenti
Regularly check the casters for debris or damage. Ensure all screws and fasteners are tight. Inspect the mop press for wear and tear, especially the wringing mechanism.
Issolvi l-problemi
Trolley is difficult to push/pull
- Check casters for tangled hair, string, or other debris. Clean as necessary.
- Ensure casters are not damaged or seized. Replace if needed.
- Verify that the trolley is not overloaded.
Mop not wringing effectively
- Ensure the mop head is correctly positioned within the press.
- Check the mop press mechanism for any obstructions or damage.
- Verify that the mop head is compatible with the press.
Speċifikazzjonijiet
- Ditta: Vileda
- Numri tal-Mudell: 145236 / 145235
- Kulur: Griż
- Materjal: Plastik
- Dimensjonijiet tal-Prodott: 23.62 x 17.76 x 13.78 pulzieri (60 x 45.1 x 35 ċm)
- Piż tal-oġġett: 12.76 liri (5.8 kg)
- Kapaċità tal-Barmil: 1 x 25 L, 1 x 15 L
- Tip ta' Manku: Teleskopiku
- Karatteristika Speċjali: Spin Mop (referring to the wringer mechanism)
Garanzija u Appoġġ
For warranty information and customer support, please refer to the documentation provided with your purchase or contact Vileda customer service directly. Keep your proof of purchase for any warranty claims.


