1. Introduzzjoni
The Ewent EW7014 USB 3.1 Gen-1 Dual Docking Station provides a convenient solution for connecting and accessing 2.5-inch and 3.5-inch SATA hard drives or Solid State Drives (SSDs). This device supports high-speed data transfer via USB 3.1 Gen-1 and features a standalone cloning function, allowing you to duplicate drives without a computer connection.
1.1. Prodott Aktarview

Image 1.1: Ewent EW7014 Dual Docking Station with two hard drives.
1.2. Kontenut tal-Pakkett
- Ewent EW7014 Dual Docking Station
- USB 3.1 Gen-1 Cable
- Adapter tal-Enerġija

Image 1.2: Contents of the Ewent EW7014 package.
2. Karatteristiċi ewlenin
- Dual Bay Design: Supports two 2.5-inch or 3.5-inch SATA I/II/III HDDs/SSDs simultaneously, up to 12.5 mm thickness.
- USB 3.1 Gen-1 Connectivity: Offers Super Speed data transfer rates up to 5 Gbps (backward compatible with USB 2.0).
- Standalone Cloning Function: Duplicate hard drives without requiring a computer connection.
- Indikaturi LED: Provides status LEDs for power, data activity, and cloning progress.
- Plug and Play: L-ebda installazzjoni ta' sewwieq mhi meħtieġa għall-biċċa l-kbira tas-sistemi operattivi.

Image 2.1: Visual representation of the docking station's backup and cloning capabilities.
3. Istruzzjonijiet ta' Setup
3.1. Tqabbad l-Istazzjon tad-Docking
- Connect the provided power adapter to the 'Power' input port on the rear of the docking station. Plug the other end into a power outlet.
- Connect one end of the supplied USB 3.1 Gen-1 cable to the 'USB 3.1' port on the rear of the docking station.
- Qabbad it-tarf l-ieħor tal-kejbil USB ma 'port USB disponibbli fuq il-kompjuter tiegħek.
- Ensure the 'ON/OFF' switch on the rear of the docking station is in the 'OFF' position before inserting drives.
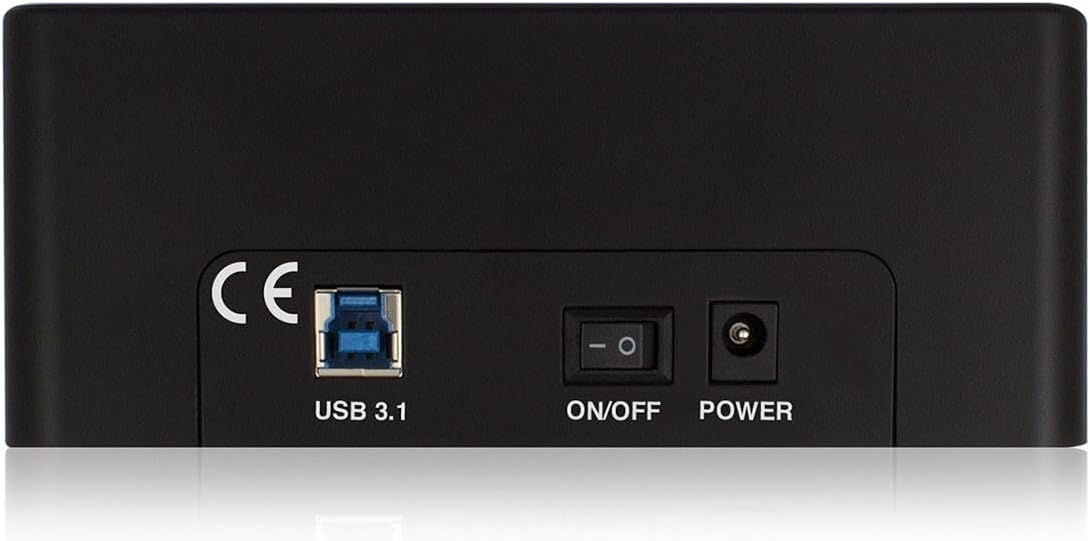
Image 3.1: Rear panel connections of the docking station.
3.2. Inserting Hard Drives / SSDs
- Gently slide your 2.5-inch or 3.5-inch SATA HDD/SSD into an available drive bay (HDD1 or HDD2) until it is firmly seated. Ensure the SATA connector on the drive aligns with the connector in the bay.
- If using 2.5-inch drives, ensure they are securely placed within the bay.
- Once drives are inserted, switch the 'ON/OFF' button to the 'ON' position. The power LED will illuminate.
4. Istruzzjonijiet Operattivi
4.1. Data Transfer Mode (PC Connection)
When connected to a computer via USB, the docking station functions as an external drive enclosure. Inserted drives will appear as removable storage devices in your operating system.
- Ensure the docking station is powered on and connected to your computer.
- Insert your SATA HDD/SSD into either drive bay.
- Your operating system should automatically detect the drive(s). You can then access, copy, or move files as you would with any other external storage device.
- The data activity LEDs (HDD1, HDD2) will flash during read/write operations.
- Always safely eject the drives from your operating system before powering off the docking station or removing the drives.
4.2. Standalone Cloning Function
The cloning function allows you to duplicate the contents of a source drive to a target drive without a computer connection. The target drive must be equal to or larger in capacity than the source drive.

Image 4.1: Top panel with drive bays and LED indicators for cloning progress.
Warning: All data on the target drive will be erased during the cloning process. Ensure you have backed up any important data from the target drive before proceeding.
- Kun żgur li l-istazzjon tad-docking ikun mitfi u skonnettjat mill-kompjuter tiegħek.
- Daħħal il- is-sewqan tas-sors (the drive you want to copy FROM) into the HDD1 bajja.
- Daħħal il- drive fil-mira (the drive you want to copy TO) into the HDD2 bajja.
- Power on the docking station using the 'ON/OFF' switch.
- Press and hold the 'Clone' button (usually located near the drive bays) for approximately 3-5 seconds until the cloning progress LEDs (25%, 50%, 75%, 100%) begin to flash.
- Release the 'Clone' button. The cloning process will begin. The progress LEDs will illuminate sequentially to indicate the completion percentage.
- Ladarba l-LEDs kollha tal-progress ikunu solidi, il-proċess tal-ikklonjar ikun komplut.
- Power off the docking station and safely remove both drives.
5. Speċifikazzjonijiet Tekniċi
| Numru tal-Mudell | EW7014 |
| Drives appoġġjati | 2.5-inch / 3.5-inch SATA I/II/III HDD/SSD |
| Maximum Drive Thickness | 12.5 mm |
| Interface | USB 3.1 Gen-1 (USB 3.0) |
| Rata ta' Trasferiment tad-Data | Up to 5 Gbps (USB 3.1 Gen-1) |
| Numru ta 'Bajjiet | 2 |
| Funzjoni tal-Klonazzjoni | Standalone (PC-less) |
| Dimensjonijiet (L x W x H) | 5.87 x 2.4 x 4.61 pulzieri (14.9 x 6.1 x 11.7 ċm) |
| Piż | 1.41 liri (0.64 kg) |
| Provvista tal-Enerġija | Adapter AC Esterni |
| Sistemi Operattivi Kompatibbli | Windows, macOS, Linux (driver-free) |
6 Issolvi l-problemi
6.1. Drive Not Detected by Computer
- Ensure the docking station is powered on and the power adapter is securely connected.
- Verify the USB cable is firmly connected to both the docking station and your computer. Try a different USB port on your computer.
- Check if the hard drive/SSD is properly seated in the bay. Remove and re-insert it.
- If it's a new drive, it might need to be initialized, partitioned, and formatted in your operating system's Disk Management (Windows) or Disk Utility (macOS).
- Test with a different known-good hard drive/SSD to rule out a drive issue.
6.2. Cloning Process Does Not Start
- Ensure the docking station is disconnected from the computer before initiating cloning.
- Verify that the source drive is in HDD1 and the target drive is in HDD2.
- Ikkonferma li l-kapaċità tad-drajv fil-mira hija ugwali għal jew akbar mill-kapaċità tad-drajv tas-sors.
- Press and hold the 'Clone' button for the required duration (3-5 seconds) until the progress LEDs start flashing.
- Ensure both drives are properly inserted and detected by the docking station (power on, then check if drive LEDs briefly illuminate).
6.3. Slow Data Transfer Speeds
- Ensure you are connected to a USB 3.1 Gen-1 (USB 3.0) port on your computer. Connecting to a USB 2.0 port will result in slower speeds.
- Verify that your computer's USB 3.1 Gen-1 drivers are up to date.
- The actual transfer speed can be limited by the speed of the hard drive/SSD itself.
- Evita li tittrasferixxi ħafna intrapriżi żgħar files simultaneously, as this can reduce overall transfer speed.
7. Manutenzjoni
- Żomm l-istazzjon tad-docking nadif billi timsaħ b'ċarruta ratba u niexfa. Evita li tuża prodotti tat-tindif likwidi jew solventi.
- Kun żgur li l-apparat jinżamm f'ambjent niexef, 'il bogħod mix-xemx diretta u minn temperaturi estremi.
- Do not block the ventilation openings (if any) to prevent overheating.
- Handle hard drives and SSDs with care when inserting or removing them to prevent damage to the connectors.
8. Informazzjoni dwar il-Garanzija u l-Appoġġ
For warranty information and technical support, please refer to the documentation provided with your purchase or visit the official Ewent websit. Żomm il-prova tax-xiri tiegħek għal talbiet ta' garanzija.
Ewent is committed to providing reliable products and customer assistance. If you encounter issues not covered in this manual, please contact Ewent customer support for further assistance.


