1. Introduzzjoni
This manual provides detailed instructions for the installation, operation, and maintenance of your Ecolight 12-inch Battery-Operated LED Tap Bar Light. This product is designed to provide convenient, wire-free illumination for various indoor applications such as under cabinets, workspaces, closets, and recreational areas. Please read this manual thoroughly before use and retain it for future reference.
2. Informazzjoni dwar is-Sigurtà
- This product is intended for indoor use only. Do not expose to moisture or extreme temperatures.
- Do not mix old and new batteries, or different types of batteries (e.g., alkaline and rechargeable).
- Ensure batteries are inserted with correct polarity (+/-). Incorrect insertion can cause damage.
- Remove batteries if the light will not be used for an extended period to prevent leakage.
- Żomm il-batteriji fejn ma jintlaħaqx mit-tfal.
- Do not attempt to disassemble or modify the light bar. This will void the warranty and may cause damage or injury.
- Use only the mounting hardware provided or suitable alternatives for secure installation.
3. X'inhu Inkluż
Iċċekkja li l-komponenti kollha huma preżenti qabel tibda l-installazzjoni:
- 1 x Ecolight 12-inch LED Tap Bar Light
- 6 x Batteriji AA
- 4 x Command™ Picture Hanging Strips
- 2 x Viti tal-Immuntar
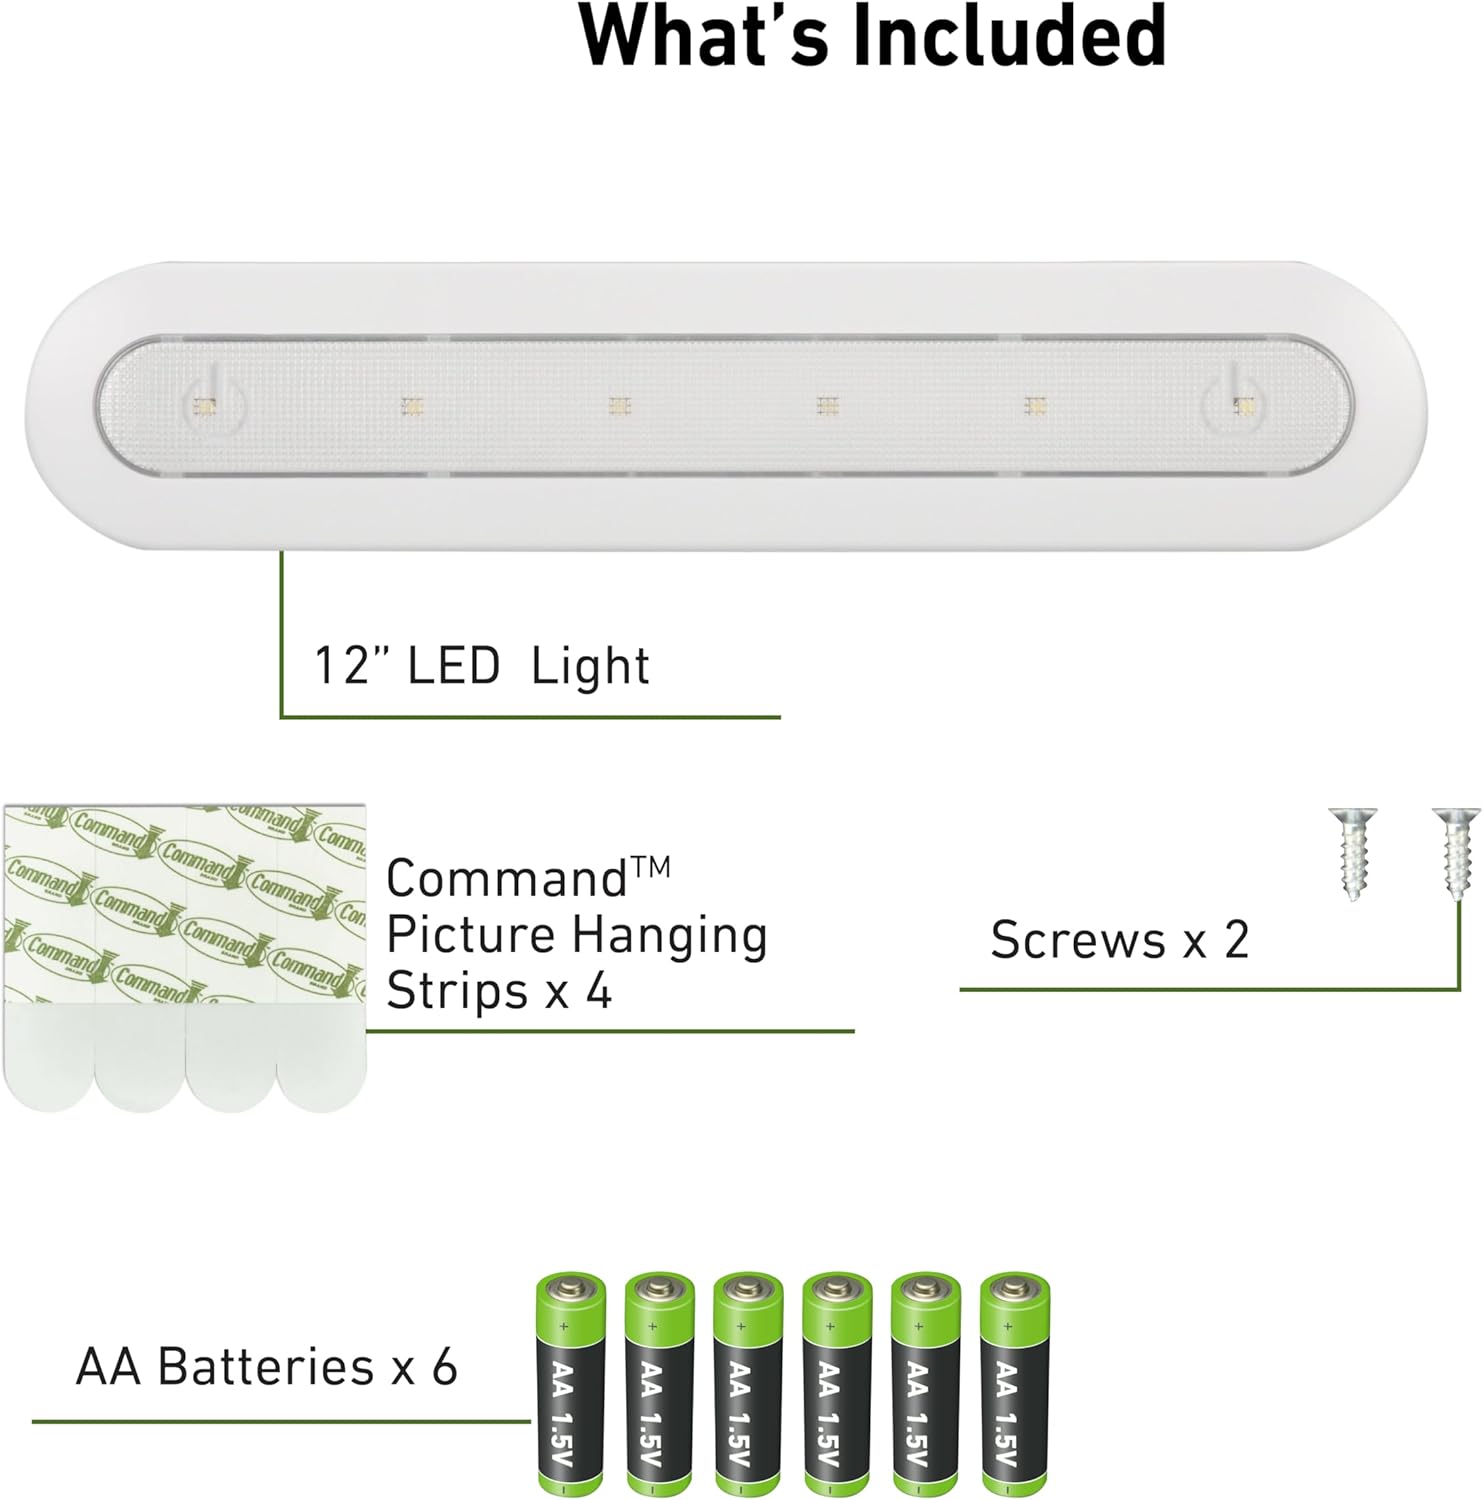
Image 3.1: Contents of the package, including the light bar, batteries, Command strips, and screws.
4. Installazzjoni
4.1 Installazzjoni tal-batterija
- Locate the battery compartment cover on the back of the light bar.
- Żerżaq jew neħħi l-għatu biex tiftaħ il-kompartiment.
- Daħħal 6 batteriji AA, waqt li tiżgura l-polarità korretta (+ u -) kif indikat ġewwa l-kompartiment.
- Ibdel l-għatu tal-kompartiment tal-batterija b'mod sikur.
4.2 Għażliet ta 'Immuntar
The Ecolight LED Tap Bar Light offers two mounting methods:
- Temporary/Damage-Free Mounting: Using Command™ Picture Hanging Strips. Ideal for surfaces where you want to avoid holes.
- Immuntar Permanenti: Using the provided screws. Provides a more secure, long-term installation.
4.2.1 Mounting with Command™ Strips
- Clean the mounting surface with rubbing alcohol and let it dry completely. Do not use household cleaners.
- Separate the Command™ Strips. Press two strips together until they click. Repeat for the other two strips.
- Remove the red liner from one side of each pair of strips and press them firmly onto the back of the light bar.
- Remove the black liner from the other side of each pair of strips.
- Align the light bar with the desired mounting location and press firmly against the surface for 30 seconds.
- To ensure adhesive strength, remove the light bar by pulling it up and away from the strips. Press the strips firmly against the wall for another 30 seconds.
- Wait 1 hour before reattaching the light bar to the strips.
4.2.2 Mounting with Screws
- Identify the two keyhole slots on the back of the light bar.
- Hold the light bar in the desired mounting location and mark the positions for the two screws through the keyhole slots.
- Drill pilot holes at the marked locations if necessary.
- Insert the provided screws into the pilot holes, leaving a small portion of the screw head exposed.
- Align the keyhole slots on the back of the light bar with the exposed screw heads and slide the light bar down to secure it.
- Tighten the screws if the light bar feels loose, but do not overtighten.

Image 4.1: Product dimensions for planning installation space.

Immaġni 4.2: Eż.ample of the light bar installed under a cabinet.
5. Operazzjoni
5.1 Tixgħel/Jitfi
The Ecolight LED Tap Bar Light features a simple tap activation. To turn the light ON or OFF, gently tap the translucent lens on the front of the light bar.

Image 5.1: Tap On/Off activation method.
5.2 Issettjar tat-Tajmer
The light bar includes a built-in auto-off timer to conserve battery life. The timer switch is located on the side of the unit. You can select from the following modes:
- FUQ: The light remains continuously on until manually turned off.
- 1 MIN: The light automatically turns off after 1 minute.
- 5 MIN: The light automatically turns off after 5 minutes.
- 15 MIN: The light automatically turns off after 15 minutes.
To manually turn off the light when a timer setting is active, tap the bar a second time.

Image 5.2: Timer setting switch on the light bar.
6. Manutenzjoni
6.1 Tindif
To clean the light bar, wipe it gently with a soft, dry cloth. Do not use abrasive cleaners, solvents, or sprays, as these may damage the finish or internal components.
6.2 Sostituzzjoni tal-batterija
When the light output diminishes, it is time to replace the batteries. Follow the battery installation steps (Section 4.1) to replace all 6 AA batteries with new ones. Always replace all batteries at the same time and use the same type of battery.
7 Issolvi l-problemi
| Problema | Kawża Possibbli | Soluzzjoni |
|---|---|---|
| Id-dawl ma jixgħelx. | Il-batteriji huma mejta jew installati ħażin. | Ibdel il-batteriji, waqt li tiżgura l-polarità korretta. |
| Id-dawl huwa dgħajjef. | Il-batteriji huma baxxi. | Ibdel il-batteriji kollha b'oħrajn ġodda. |
| Id-dawl jintefa malajr wisq. | Timer is set to a short duration. | Adjust the timer switch to a longer duration or 'ON' mode. |
| Light does not respond to tap. | Sensor obstruction or internal issue. | Ensure the lens is clean. If problem persists after battery replacement, contact customer support. |
8. Speċifikazzjonijiet
| Numru tal-Mudell | BO1063-WHG-12LF6-E |
| Dimensjonijiet (L x W x H) | 12" x 2.5" x 1.1" (30.5 ċm x 6.35 ċm x 2.8 ċm) |
| Sors tad-Dawl | LED |
| Luminożità | 80 Lumens |
| Temperatura tal-Kulur | 4000K (abjad kiesaħ) |
| Sors tal-Enerġija | 6 x Batteriji AA (inklużi) |
| Ħajja tal-batterija | Up to 44 hours (at full charge) |
| Lamp Ħajja | 30,000 sigħat |
| Metodu ta' Kontroll | Tap On/Off, Timer Switch |
| Tip ta 'Immuntar | Surface Mount (Screws or Command™ Strips) |
| Materjal | Plastik |
| Użu fuq ġewwa/barra | Ġewwa Biss |
9. Garanzija u Appoġġ
9.1 Informazzjoni dwar Garanzija
This Ecolight product is covered by a Garanzija limitata ta 'sena mid-data tax-xiri. Din il-garanzija tkopri difetti fil-materjali u l-abbilità taħt użu normali. Ma tkoprix ħsara li tirriżulta minn użu ħażin, aċċident, modifika, jew tiswija mhux awtorizzata. Jekk jogħġbok żomm il-prova tax-xiri tiegħek għal talbiet ta' garanzija.
9.2 Appoġġ għall-Klijent
If you have any questions, require assistance, or encounter issues not covered in this manual, please contact Ecolight customer support. Refer to the product packaging or the official Ecolight websit għal informazzjoni ta' kuntatt attwali.


