1. Prodott Aktarview
This manual provides instructions for the installation, operation, and maintenance of the Electrodepot 50 Amp 4 Pole Programmable Timer and Contactor. This industrial-grade device is designed for precise control of electrical circuits, offering up to 16 programmable ON/OFF schedules over a 7-day, 24-hour cycle.
Il-karatteristiċi ewlenin jinkludu:
- Programmable Timer mode: MAN-AUTO-OFF for flexible control.
- 3-year backup memory for program and clock settings.
- Up to 16 separate ON/OFF programmable settings.
- Operation with control voltage 220VAC or 240VAC.
- Contactor with 4 poles, rated for 50 Amp AC-1 (Resistive Load) and 30 Amp AC-3 (Inductive Load).
- Integrated battery backup for program and clock retention.
2. Informazzjoni dwar is-Sigurtà
WARNING: Risk of Electric Shock. Installation and servicing should only be performed by qualified personnel.
- Always disconnect power at the main circuit breaker before installing or servicing this device.
- Kun żgur li l-konnessjonijiet kollha tal-wajers huma sikuri u jikkonformaw mal-kodiċijiet elettriċi lokali u nazzjonali.
- Taqbiżx il-vol speċifikattage u l-klassifikazzjonijiet attwali tal-apparat.
- This device is designed for indoor use in a dry environment. Avoid exposure to moisture or extreme temperatures.
3. Product Components and Dimensions
The Electrodepot Programmable Timer and Contactor consists of two main units: the digital time switch and the 4-pole contactor. These units are designed for DIN rail mounting.
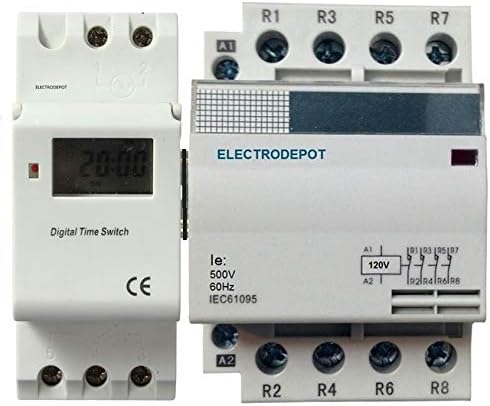
Figure 1: Electrodepot 50 Amp 4 Pole Programmable Timer and Contactor. This image displays the digital time switch on the left and the 4-pole contactor on the right, both designed for DIN rail mounting.

Figure 2: Dimensions of the Electrodepot Programmable Timer and Contactor. The overall width is approximately 200 mm, depth is 75 mm, and the height of the timer unit is 100 mm. These measurements are crucial for proper installation planning.
4. Installazzjoni u Setup
4.1 Immuntar
The timer and contactor units are designed for standard DIN rail mounting. Snap the units onto a 35mm DIN rail securely in an appropriate electrical enclosure.
4.2 Wajers
Refer to the wiring diagram on the contactor unit for precise connections. Ensure the control voltage (A1, A2) is 220VAC or 240VAC. The main power connections for the load should be connected to the R1, R3, R5, R7 (input) and R2, R4, R6, R8 (output) terminals of the contactor. The timer unit will control the coil of the contactor.
- Connect the control power (220/240VAC) to the timer unit.
- Connect the output of the timer unit to the A1 and A2 terminals of the contactor coil.
- Connect the main power supply to the input terminals (R1, R3, R5, R7) of the contactor.
- Connect the load to the output terminals (R2, R4, R6, R8) of the contactor.
- Double-check all connections for tightness and correct polarity before applying power.
4.3 Qawwa Inizjali
After wiring, restore power to the circuit. The timer display should illuminate. If the display does not light up, check the power supply and wiring connections.
5. Istruzzjonijiet Operattivi
5.1 Issettjar tal-Ħin u l-Jum Attwali
Detailed instructions for setting the clock and current day will be found on the timer unit itself or in a separate quick-start guide. Generally, this involves pressing a "Clock" or "Set" button, then using "Hour," "Minute," and "Day" buttons to adjust the settings. Confirm the settings by pressing "Clock" or "Set" again.
5.2 Programming ON/OFF Schedules
The timer supports up to 16 ON/OFF programs. To set a program:
- Press the "P" (Program) button. The display will show "1 ON".
- Use the "Day" button to select the desired day(s) for this program (e.g., Mon-Fri, Sat-Sun, or individual days).
- Use the "Hour" and "Minute" buttons to set the desired ON time.
- Press "P" again. The display will show "1 OFF".
- Use the "Day," "Hour," and "Minute" buttons to set the desired OFF time for the first program.
- Repeat steps 1-5 for additional programs (up to 16).
- After setting all programs, press the "Clock" button to exit programming mode and return to the current time display.
5.3 Manual Override (MAN-AUTO-OFF)
The timer features a manual override function, typically accessed via a "Manual" or "Mode" button. Pressing this button cycles through the following modes:
- AUTO: The timer operates according to the programmed schedules.
- Bniedem FUQ: The output is continuously ON, overriding any programmed OFF times.
- Bniedem mitfi: The output is continuously OFF, overriding any programmed ON times.
Select "AUTO" for normal operation based on your programmed schedules.
6. Manutenzjoni
6.1 Backup tal-Batterija
The device includes an integrated battery backup that retains program and clock settings for up to 3 years in the event of a power outage. No user maintenance is typically required for this internal battery.
6.2 Cleaning and Inspection
Periodically inspect the device for any signs of damage, loose connections, or excessive dust accumulation. Clean the exterior with a dry, soft cloth. Do not use liquid cleaners or solvents.
7 Issolvi l-problemi
- Timer Display is Blank:
- Check if power is supplied to the timer unit (220/240VAC).
- Verify wiring connections.
- Contactor Does Not Switch ON/OFF:
- Ensure the timer is in "AUTO" mode.
- Check if the programmed ON/OFF times are correct.
- Verify the wiring between the timer output and the contactor coil (A1, A2).
- Confirm the control voltage to the contactor coil is present when the timer is programmed to be ON.
- Incorrect Time or Program Execution:
- Re-set the current time and day.
- Review and re-program the ON/OFF schedules carefully.
8. Speċifikazzjonijiet
| Parametru | Valur |
|---|---|
| Brand | Elettrodepot |
| Kontroll Voltage | 220VAC, 240VAC |
| Contactor Poles | 4 Pol |
| Contactor Rating (AC-1 Resistive Load) | 50 Amp |
| Contactor Rating (AC-3 Inductive Load) | 30 Amp |
| Settings programmabbli | Sa 16 programmi ON/OFF |
| Modalità Timer | MAN-AUTO-OFF |
| Memorja Backup | 3 Years (Integrated Battery) |
| Immuntar | Binarji DIN |
| Kulur | Abjad |
| ASIN | B01GXYGYYC |
9. Garanzija u Appoġġ
For warranty information and technical support, please contact your retailer or the manufacturer, Electrodepot, directly. Retain your proof of purchase for any warranty claims.


