1. Introduzzjoni
This instruction manual provides detailed guidance for the assembly, operation, and maintenance of your Trumpeter 004598 Royal Navy Nuclear Submarine HMS Astute 1/350 Scale Model Kit. This kit allows enthusiasts to construct a detailed replica of the HMS Astute, a formidable nuclear submarine. Please read all instructions carefully before beginning assembly to ensure a successful and enjoyable building experience.

Image 1.1: Conceptual rendering of the completed HMS Astute model. This image illustrates the final appearance of the submarine model when fully assembled and painted, depicting it submerged with light filtering through the water.
2. Informazzjoni dwar is-Sigurtà
TWISSIJA: This product is a scale model kit and contains small parts. It is not suitable for children under 14 years of age due to potential choking hazards and the use of sharp tools and adhesives during assembly. Adult supervision is recommended for younger builders (14+). Always use appropriate safety equipment, such as eye protection, when cutting or sanding parts. Ensure adequate ventilation when using paints and glues.
3. Kontenut tal-Pakkett
Before starting assembly, please verify that all components are present and undamaged. The kit typically includes:
- Plastic sprues with model parts
- Folja(i) tad-decal
- Manwal ta' struzzjonijiet (dan id-dokument)
- Photo-etched parts (if applicable, check specific kit details)
Note: Adhesives, paints, and tools are not included and must be purchased separately.
4. Istruzzjonijiet tal-Assemblea
Follow the numbered steps provided in the included printed instruction booklet for detailed assembly. The general process involves:
- Tħejjija tal-Parti: Carefully cut parts from the sprues using a hobby knife or nippers. Clean any excess plastic (flash) with a file jew sandpaper.
- Dry Fitting: Before applying glue, dry-fit parts to ensure proper alignment and fit.
- Inkullar: Use plastic cement for bonding plastic parts. Apply sparingly to avoid damaging details. For photo-etched parts, use super glue.
- Pittura (Mhux obbligatorja): Many modelers choose to paint parts before or during assembly. Refer to the color guide in your instruction booklet for recommended colors.
- Sotto-Assemblea: Assemble smaller sections (e.g., conning tower, propellers) before joining them to the main hull.
- Decals: Once painting is complete and dry, apply decals according to the decal placement guide. Use decal setting solutions for best results.
- Assemblea Finali: Join all sub-assemblies to complete the model.

Image 4.1: Decal sheet for the HMS Astute model kit. This image displays a sheet of various markings, numbers, and insignia designed to be applied to the model after painting, enhancing its realism.

Image 4.2: Additional decal sheet or parts layout. This image shows another set of markings or small components, indicating the level of detail provided for the model's finishing touches.
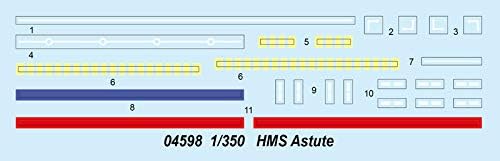
Image 4.3: Third decal sheet or parts layout. This image presents a further collection of decals or small, intricate parts, crucial for adding authentic details to the HMS Astute model.
5. Tħaddim u Wiri
Once assembled, your HMS Astute model is designed for display. Handle the model with care to avoid damaging delicate parts. It is recommended to place the model on a stable surface or a dedicated display stand (not included) to prevent accidental falls. Avoid exposing the model to direct sunlight, extreme temperatures, or high humidity, as these can cause paint fading, warping, or material degradation over time.
6. Manutenzjoni
To keep your model in pristine condition:
- Tindif: Gently dust the model regularly with a soft brush or a lint-free cloth. For stubborn dust, a slightly damp cloth can be used, but avoid excessive moisture, especially on decals.
- Ħażna: If storing the model for an extended period, place it in a sealed container to protect it from dust and environmental factors.
- Tiswijiet: In case of accidental damage, use appropriate model glues and paints for repairs.
7 Issolvi l-problemi
Here are some common issues and their solutions during model assembly:
- Parts don't fit: Ensure you are using the correct parts for the step. Check for excess plastic (flash) that might be obstructing the fit and carefully remove it.
- Glue marks: Use glue sparingly. If excess glue appears, try to remove it immediately with a cotton swab dipped in a small amount of thinner (test on scrap plastic first).
- Decals silvering: This occurs when air is trapped under the decal. Apply decal setting solution to help the decal conform to the surface and eliminate air bubbles.
- Paint issues: Ensure surfaces are clean and primed before painting. Apply paint in thin coats to avoid brush strokes or loss of detail. Allow sufficient drying time between coats.
8. Speċifikazzjonijiet
| Numru tal-Mudell: | TR04598 |
| Ditta: | Trumpeter |
| Skala: | 1:350 |
| Materjal: | Plastik |
| Numru ta' Partijiet: | 22 |
| Età Rakkomandata: | 14 snin 'il fuq |
| Dimensjonijiet tal-Prodott (L x W x H): | 26.7 x 3.2 x 7.6 ċm (10.5 x 1.25 x 3 pulzieri) |
| Valur Edukattiv: | Calculation and literacy (as per product data, likely referring to precision and instruction following) |
| Assemblaġġ Meħtieġa: | Iva |
9. Garanzija u Appoġġ
Trumpeter model kits are manufactured to high standards. For missing or defective parts, please contact the retailer where the kit was purchased or the manufacturer directly. Please retain your proof of purchase. Specific warranty details may vary by region and retailer. Information regarding spare parts availability is not provided by the manufacturer for this product.


