1. Introduzzjoni
This manual provides essential information for the safe and effective operation, maintenance, and troubleshooting of your TOOLCRAFT TC4636 10-inch Miter Saw. Please read this manual thoroughly before operating the tool to ensure proper use and to prevent injury or damage.
2. Istruzzjonijiet Ġenerali dwar is-Sigurtà
Dejjem segwi l-prekawzjonijiet bażiċi ta’ sigurtà biex tnaqqas ir-riskju ta’ nar, xokk elettriku, u korriment personali. Żomm dan il-manwal għal referenza futura.
- Ilbes tagħmir protettiv personali (PPE) xieraq, inklużi nuċċalijiet tas-sigurtà, protezzjoni għas-smigħ, u maskra tat-trab.
- Kun żgur li ż-żona tax-xogħol tkun nadifa, imdawwal sew, u ħielsa minn ostakli.
- Żomm lit-tfal u lil dawk li jkunu fil-qrib 'il bogħod miż-żona tal-operat.
- Tħaddimx għodod elettriċi f'atmosferi splussivi, bħal fil-preżenza ta' likwidi, gassijiet jew trab li jaqbdu.
- Dejjem skonnettja l-plagg tal-enerġija mis-sors tal-enerġija qabel ma tagħmel xi aġġustamenti, tibdel l-aċċessorji, jew taħżen l-għodda.
- Use the correct blade for the material being cut. Ensure the blade is sharp and free from damage.
- Secure the workpiece firmly before cutting. Never hold the workpiece by hand.
- Avoid awkward body positions. Maintain proper footing and balance at all times.
- Do not force the tool. Allow the saw to reach full speed before beginning a cut.
- Spezzjona l-korda tal-enerġija regolarment għal ħsara. Jekk bil-ħsara, ħalliha tissewwa minn tekniku kwalifikat.
3. Komponenti tal-Prodott
Familiarize yourself with the main parts of your miter saw.
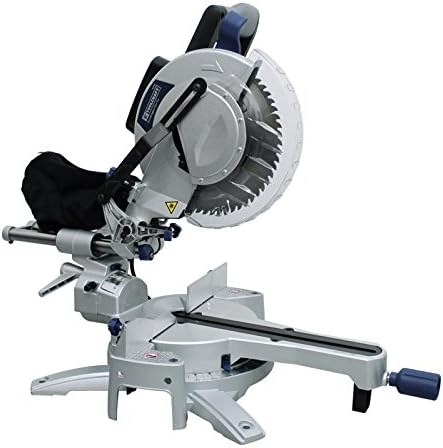
Figura 1: Fuqview of the TOOLCRAFT TC4636 10-inch Miter Saw. This image displays the complete miter saw unit, including the motor housing, blade guard, cutting table, fence, and base. The dust collection bag is visible at the rear of the motor housing.
- Djar tal-Mutur: Contains the motor and drive mechanism.
- Gwardja tax-xafra: Retracts during cutting to expose the blade and covers it when not in use.
- Cutting Table/Base: Provides a stable surface for the workpiece.
- Ċint: Supports the workpiece against the blade.
- Aġġustament tal-Angolu tal-Mitra: Mechanism for setting the horizontal cutting angle.
- Aġġustament tal-Angolu taċ-Ċanfrin: Mechanism for setting the vertical cutting angle.
- Borża tal-Ġbir tat-Trab: Attaches to the dust port to collect sawdust.
- Bars tal-Estensjoni: Provide additional support for longer workpieces.
- Biċċa tax-xogħol Clamp (Istampa): Secures the workpiece during cutting.
- Blade Wrench (Key): Used for changing the saw blade.
4. Speċifikazzjonijiet Tekniċi
| Karatteristika | Speċifikazzjoni |
|---|---|
| Mudell | TC4636 |
| Dijametru tad-Diska | 10 pulzieri (254 mm) |
| Qawwa | 2000 W |
| Voltage | 127 V AC - 60 Hz |
| Kurrenti | 16.6 A |
| Veloċità tal-Mutur | 4500 RPM |
| Cutting Capacity (0°/0°) | 340 x 104 mm |
| Cutting Capacity (45°/0°) | 240 x 104 mm |
| Cutting Capacity (0°/45°) | 340 x 55 mm |
| Cutting Capacity (45°/45°) | 240 x 55 mm |
| Angolu taċ-ċanfrin | 45° Dritt |
| Aċċessorji Inklużi | 60-tooth disc, dust collection bag, 2 extension bars, workpiece clamp, blade wrench |
| Piż tal-oġġett | 26 Kilogrammi |
| Dimensjonijiet tal-Prodott | 91 x 58 x 53 ċm |
5. Setup u Assemblea
Before operating the miter saw, ensure it is properly assembled and secured.
- Spakkjar: Carefully remove all components from the packaging. Verify that all listed accessories are present.
- Immuntar: Secure the miter saw to a stable workbench using bolts through the mounting holes in the base. This prevents movement during operation.
- Installing Extension Bars: Insert the two extension bars into their designated slots on the saw base. Tighten the locking knobs to secure them. These provide additional support for longer workpieces.
- Attaching Dust Collection Bag: Connect the dust collection bag to the dust port located at the rear of the blade housing. Ensure it is securely fastened to minimize dust dispersion.
- Installazzjoni tax-Xafra (jekk mhux installata minn qabel):
- Skonnettja s-serrieq mis-sors tal-enerġija.
- Erfa' l-protezzjoni tax-xafra t'isfel.
- Use the provided blade wrench to loosen the arbor nut while holding the arbor lock button.
- Place the 60-tooth disc onto the arbor, ensuring the teeth are pointing downwards towards the front of the saw.
- Re-tighten the arbor nut securely.
- Biċċa tax-xogħol Clamp (Press) Installation: Waħħal il-biċċa tax-xogħol clamp to the saw table. It can be adjusted to hold various workpiece sizes.
6. Istruzzjonijiet Operattivi
Segwi dawn il-passi għal tħaddim sikur u effettiv tas-serrieq tal-mitra tiegħek.
- Konnessjoni tal-Enerġija: Connect the saw to a 127V AC, 60Hz power outlet. Ensure the circuit can handle the 16.6A current draw.
- Adjusting Miter Angle:
- Loosen the miter lock handle.
- Rotate the turntable to the desired angle (e.g., 0°, 45°). The scale indicates the angle.
- Tighten the miter lock handle to secure the angle.
- Adjusting Bevel Angle:
- Ħoll il-pum tal-qfil taċ-ċanfrin.
- Tilt the saw head to the desired bevel angle (up to 45° right).
- Issikka l-pum tal-qfil taċ-ċanfrin.
- Positioning Workpiece:
- Place the workpiece firmly against the fence and the saw table.
- Use the extension bars for support if the workpiece is long.
- Secure the workpiece with the workpiece clamp to prevent movement during the cut.
- Nagħmlu Qatgħa:
- Ensure the blade is clear of the workpiece before starting the motor.
- Press the power switch to start the saw. Allow the blade to reach full speed (4500 RPM).
- Slowly and steadily lower the saw head through the workpiece. Do not force the cut.
- Once the cut is complete, release the power switch and allow the blade to stop completely before raising the saw head.
- Wait for the blade to stop before removing the workpiece or clearing sawdust.
7. Manutenzjoni
Manutenzjoni regolari tiżgura l-lonġevità u t-tħaddim sikur tas-serrieq tal-mitra tiegħek.
- Tindif: After each use, disconnect the power and clean the saw. Remove sawdust and debris from the motor vents, blade guard, and table using a brush or compressed air.
- Spezzjoni tax-xafra: Spezzjona x-xafra tas-serrieq regolarment għal snien jaqtgħin, xquq, jew snien neqsin. Ibdel ix-xfafar matt jew bil-ħsara immedjatament.
- Lubrikazzjoni: Apply a light coat of machine oil to moving parts and pivot points as needed to ensure smooth operation.
- Pniezel tal-karbonju: Check carbon brushes periodically. If worn down, replace them with genuine TOOLCRAFT replacement parts. Refer to a qualified service technician if unsure.
- Korda tal-Enerġija: Inspect the power cord for any cuts, abrasions, or damage. Do not use the saw if the cord is damaged.
- Ħażna: Store the miter saw in a clean, dry, and secure location, out of reach of children.
8 Issolvi l-problemi
Din it-taqsima tindirizza kwistjonijiet komuni li tista’ tiltaqa’ magħhom.
| Problema | Kawża Possibbli | Soluzzjoni |
|---|---|---|
| Saw ma jibda | No power supply; faulty switch; worn carbon brushes | Check power connection and circuit breaker; test switch; replace carbon brushes |
| Ix-xafra teħel fil-biċċa tax-xogħol | Dull blade; improper workpiece support; forcing the cut | Replace blade; ensure workpiece is securely clamped; reduce feed rate |
| Vibrazzjoni eċċessiva | Loose blade; damaged blade; saw not securely mounted | Tighten blade arbor nut; replace damaged blade; secure saw to workbench |
| Poor cut quality (rough cuts, splintering) | Dull blade; incorrect blade type for material; too fast feed rate | Replace or sharpen blade; use appropriate blade; slow down cutting speed |
9. Garanzija u Appoġġ
For warranty information, technical support, or to order replacement parts, please contact TOOLCRAFT customer service. Keep your purchase receipt as proof of purchase.
Manifattur: GĦODDA
Please refer to the official TOOLCRAFT website or your point of purchase for the most current contact information and warranty details.


