Introduzzjoni
Grazzi tax-xiriasing the Insignia 10-inch Digital Photo Frame. This device allows you to display your favorite digital photos and videos in a high-quality format. This manual provides detailed instructions for setup, operation, maintenance, and troubleshooting to ensure you get the most out of your new digital photo frame.
Kontenut tal-Pakkett
Before you begin, please check that all items are present in the package:
- Insignia 10-inch Digital Photo Frame
- Adapter tal-Enerġija
- Kontroll mill-bogħod
- Manwal għall-Utent (dan id-dokument)
Setup
1. Qawwa tal-Konnessjoni
Connect the included power adapter to the DC IN 9V port on the back of the digital photo frame. Plug the other end of the adapter into a standard wall outlet. The frame will typically power on automatically or can be turned on using the power switch.
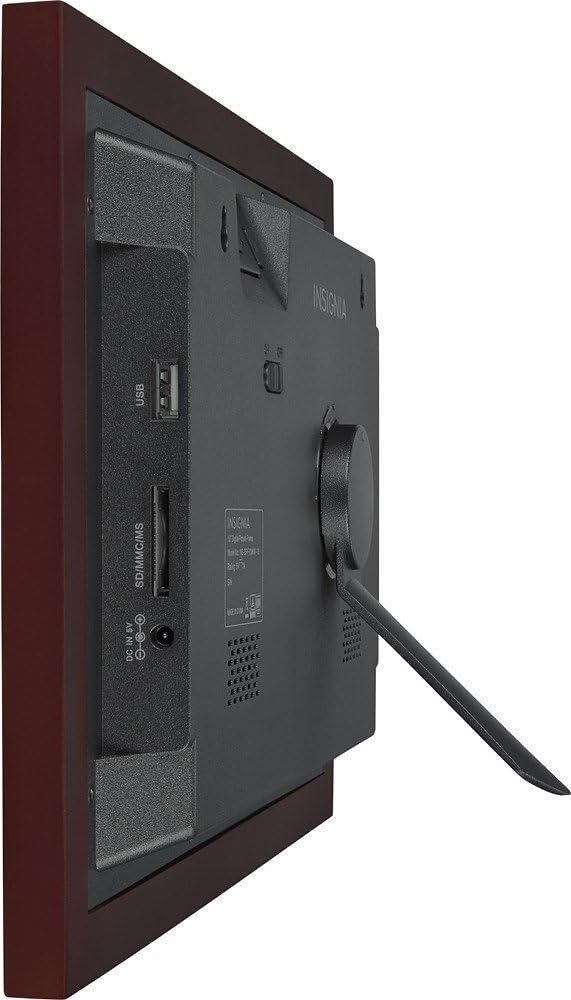
Immaġni: Wara view of the digital photo frame, highlighting the USB port, SD/MMC/MS card slot, and DC IN 9V power input.
2. Daħħal Memory Cards jew USB Drives
The frame supports SD, MMC, and MS memory cards, as well as USB flash drives. Insert your memory card into the appropriate slot or your USB drive into the USB port on the side/back of the frame. Ensure the card or drive is inserted correctly. The frame will automatically detect the storage device.
3. Settings Inizjali
Upon first power-on, you may be prompted to set the language, time, and date. Use the navigation buttons on the frame or the remote control to make your selections and confirm.
Operating the Digital Photo Frame
1. Kontrolli Fuqview
Your digital photo frame can be operated using the buttons on the back of the frame or the included remote control.
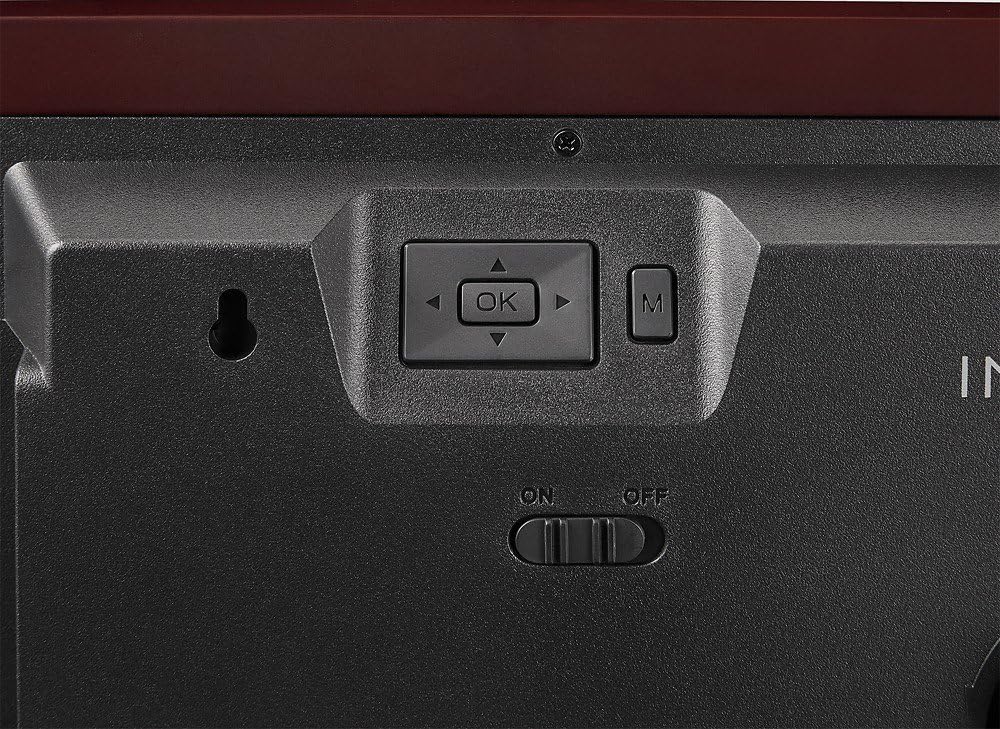
Image: Close-up of the control buttons located on the rear of the digital photo frame. These include directional arrows, an 'OK' button for selection, and an 'M' button for menu access, alongside the power switch.
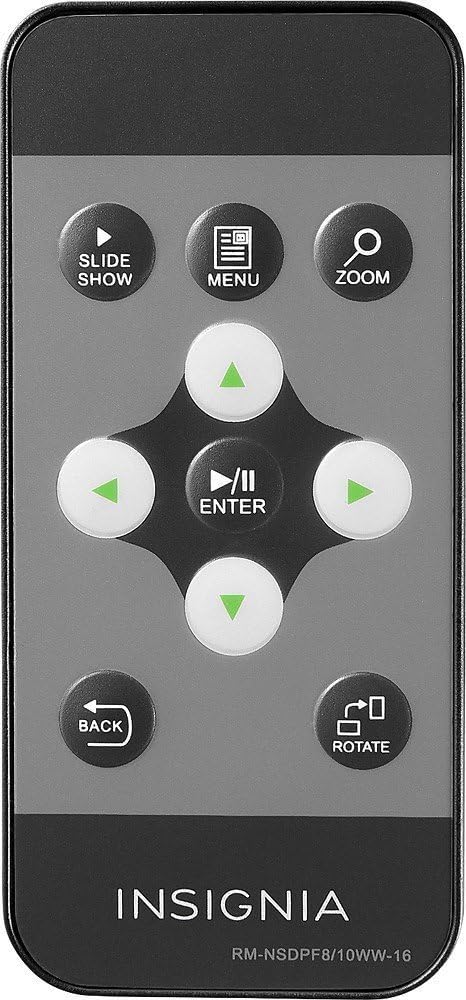
Image: The remote control for the digital photo frame, featuring dedicated buttons for slideshow, menu, zoom, directional navigation, enter, back, and image rotation functions.
2. Navigazzjoni tal-Menùs
Agħfas il- MENU buttuna fuq ir-remote jew il- M button on the frame to access the main menu. Use the directional arrows (▲ ▼ ◀ ▶) to navigate through options and press DĦUL or OK biex tikkonferma l-għażla tiegħek. Agħfas LURA biex terġa' lura għall-iskrin preċedenti jew toħroġ mill-menù.
3. Viewritratti u Vidjows
Once a memory card or USB drive is inserted, the frame will typically start a slideshow automatically. You can manually browse files by selecting the "Photo" or "Video" option from the main menu. Use the navigation buttons to select a file u agħfas DĦUL or OK biex view dan.
4. Issettjar tal-Wirja tal-Islajds
From the main menu, navigate to "Settings" or "Slideshow Settings" to customize your slideshow. Options may include:
- Modalità tal-Wiri: Adjust how photos fit the screen (e.g., original, fit to screen, crop).
- Ħin ta 'Intervall: Set the duration each photo is displayed.
- Effett ta' Transizzjoni: Choose from various transition styles between photos.
- Irrepeti Modalità: Loop the slideshow continuously.
5. Clock and Calendar
Your frame may include a clock and calendar function. Access these features through the main menu. You can set the time and date in the settings menu.
Manutenzjoni
Tindif tal-Qafas
Biex tnaddaf l-iskrin, imsaħ bil-mod b'ċarruta ratba u mingħajr suf. Għal marki persistenti, imsaħ ftit.ampen the cloth with water or a non-abrasive screen cleaner. Avoid using harsh chemicals or abrasive materials, as these can damage the screen and frame finish. Ensure the frame is powered off and unplugged before cleaning.
Ħażna
When not in use for extended periods, store the digital photo frame in a cool, dry place, away from direct sunlight and extreme temperatures. It is recommended to keep the original packaging for storage.
Issolvi l-problemi
| Problema | Soluzzjoni Possibbli |
|---|---|
| Il-qafas ma jixgħelx. |
|
| No photos or videos display. |
|
| Il-kontroll mill-bogħod mhux qed jaħdem. |
|
| Images appear distorted or stretched. |
|
Speċifikazzjonijiet
| Karatteristika | Dettall |
|---|---|
| Numru tal-Mudell | NS-DPF10WW-16 |
| Daqs tal-Iskrin | 10 Pulzier |
| Riżoluzzjoni | WXGA |
| Dimensjonijiet tal-Prodott | 12.6 x 1.5 x 9 pulzieri |
| Piż tal-oġġett | 2 liri |
| Teknoloġija tal-Konnettività | USB |
| Kards tal-Memorja Appoġġjati | SD, MMC, MS (Memory Stick) |
| Manifattur | Insinji |
Garanzija u Appoġġ
For warranty information, please refer to the warranty card included with your product or visit the official Insignia website. If you encounter issues not covered in this troubleshooting section, please contact Insignia customer support for assistance.
Appoġġ onlajn: www.insigniaproducts.com/support


