1. Introduzzjoni
This manual provides detailed instructions for the installation, configuration, and maintenance of your GIGABYTE GA-Z170X-Gaming 7 motherboard. Designed for 6th and 7th Generation Intel Core Processors, this ATX motherboard features DDR4 memory support, dual M.2 slots, advanced audio, and high-speed USB 3.1 connectivity. Please read this manual thoroughly before beginning installation to ensure proper setup and operation.
2. Informazzjoni dwar is-Sigurtà
Dejjem osserva l-prekawzjonijiet ta' sigurtà li ġejjin meta timmaniġġja komponenti tal-kompjuter:
- Skonnettja l-korda tal-enerġija mis-sokit tal-ħajt qabel ma tmiss xi komponenti.
- Ilbes ċinga tal-polz anti-statika jew tmiss ta' spiss oġġett tal-metall ertjat biex teħles mill-elettriku statiku.
- Immaniġġja l-komponenti mit-truf tagħhom biex tevita li tmiss partijiet sensittivi.
- Żomm il-komponenti 'l bogħod mill-umdità u minn temperaturi estremi.
3. Kontenut tal-Pakkett
Ivverifika li l-oġġetti kollha huma preżenti fil-pakkett tal-motherboard tiegħek:
- GIGABYTE GA-Z170X-Gaming 7 Motherboard
- User Manual and Driver CD
- Kejbils SATA
- Tarka I / O
- M.2 Screws
- SLI Bridge (if included)
If any items are missing or damaged, contact your retailer.
4. It-Tqassim u l-Komponenti tal-Motherboard
Familiarize yourself with the key components and connectors on your GA-Z170X-Gaming 7 motherboard.
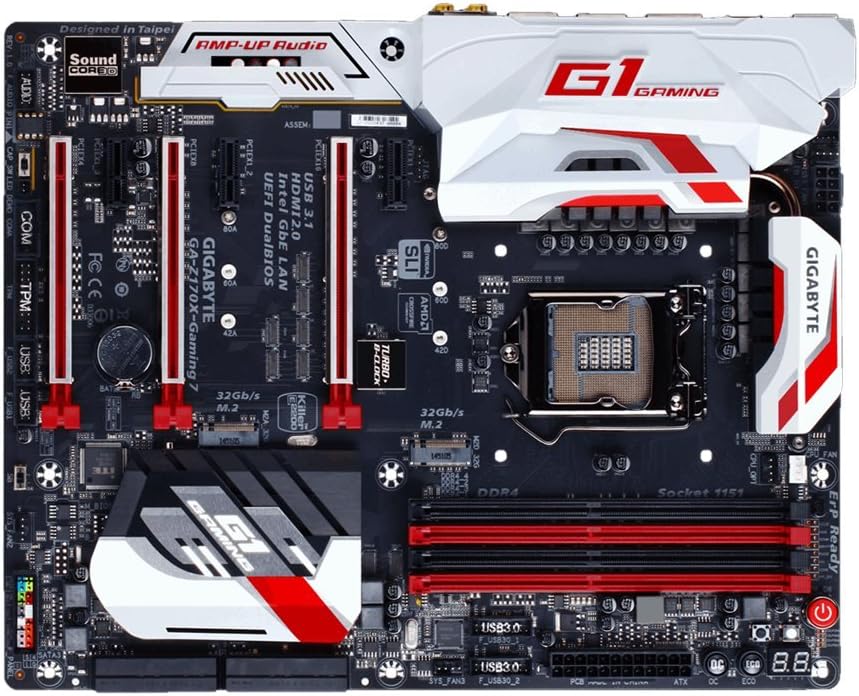
4.1. Sokit tas-CPU (LGA 1151)
The LGA 1151 socket supports 6th and 7th Generation Intel Core Processors. Ensure proper alignment and gentle placement of the CPU to avoid damaging the pins.
4.2. Slots tad-DDR4 DIMM
The motherboard features four DDR4 DIMM slots, supporting up to 64GB of system memory. Install memory modules in matched pairs for optimal dual-channel performance. Refer to the motherboard's QVL (Qualified Vendor List) for compatible memory modules.
4.3. Slots ta' Espansjoni PCIe
Multiple PCI Express slots are available for graphics cards and other expansion cards. The GA-Z170X-Gaming 7 supports NVIDIA SLI and AMD 3-Way CrossFire multi-graphics configurations.
4.4. Konnetturi M.2
Two M.2 connectors are provided for high-speed NVMe SSDs, offering data transfer rates up to 32 Gb/s.
4.5. SATA Ports
The motherboard includes multiple SATA 6Gb/s ports for connecting traditional hard drives and SSDs.
4.6. Il-Panel tal-I/O ta' wara
The rear I/O panel provides various connectivity options, including USB 3.1 Type-C, USB 3.1, USB 3.0, HDMI, DisplayPort, Gigabit Ethernet (Killer E2400 and Intel GbE LAN), and audio jacks (Creative Sound Core3D).
5. Setup u Installazzjoni
5.1. Installazzjoni tas-CPU
- Iftaħ il-lieva tas-sokit tas-CPU.
- Allinja s-CPU bir-reqqa mas-sokit, filwaqt li tiżgura li t-trijangolu tad-deheb fuq is-CPU jaqbel mat-trijangolu fuq is-sokit.
- Poġġi s-CPU bil-mod fis-sokit. Tisforzahx.
- Agħlaq il-lieva tas-sokit tas-CPU biex twaħħal is-CPU.
5.2. Installazzjoni tas-CPU Cooler
Install your CPU cooler according to its manufacturer's instructions. Ensure proper thermal paste application and secure mounting for effective heat dissipation.
5.3. Installazzjoni tal-Memorja (RAM)
Open the clips on the DDR4 DIMM slots. Align the memory module with the slot, ensuring the notch on the module matches the key in the slot. Press down firmly on both ends of the module until the clips snap into place.
5.4. Installazzjoni tal-Kard Grafika
Insert your graphics card into the primary PCIe x16 slot. Ensure it is fully seated and secured with the retention clip and a case screw.
5.5. Installazzjoni ta' Apparat tal-Ħażna
For M.2 SSDs, insert the drive into the M.2 slot and secure it with the provided screw. For SATA drives, connect the SATA data cable to a motherboard SATA port and the power cable from your PSU to the drive.
5.6. Konnessjonijiet tal-Provvista tal-Enerġija
Connect the 24-pin ATX main power connector and the 8-pin ATX 12V CPU power connector from your power supply unit (PSU) to the corresponding ports on the motherboard.
5.7. Konnessjonijiet tal-Panel ta' Quddiem
Connect the front panel headers (power button, reset button, HDD LED, power LED, front USB, front audio) to their respective pins on the motherboard. Refer to the motherboard layout diagram for exact pin locations.
6. Istruzzjonijiet Operattivi
6.1. Initial Boot-Up and BIOS Access
Wara li tiġbor is-sistema tiegħek, ixgħelha. Agħfas il-buttuna DEL key during the boot process to enter the UEFI BIOS Setup. The BIOS allows you to configure system settings, boot order, and enable features like XMP for memory overclocking.
6.2. BIOS Features
- UEFI Dual BIOS: Provides a backup BIOS in case the main BIOS becomes corrupted.
- Q-Flash Plus: Allows you to update the BIOS without installing a CPU, memory, or graphics card.
- Easy Tune: A utility within GIGABYTE APP Center for easy system tuning and overclocking.
6.3. Installazzjoni tas-Sewwieq u s-Softwer
After installing your operating system, install the necessary drivers from the provided CD or GIGABYTE's official website. This includes chipset, audio, LAN, and graphics drivers. Install the GIGABYTE APP Center for access to various utilities.
7. Manutenzjoni
7.1. Tindif
Naddaf l-intern tal-kompjuter tiegħek regolarment biex tevita l-akkumulazzjoni tat-trab, li jista' jwassal għal sħana żejda. Uża arja kkompressata biex tneħħi t-trab mill-fannijiet, is-sinkijiet tas-sħana, u komponenti oħra. Kun żgur li s-sistema tkun mitfija u skonnettjata qabel ma tnaddafha.
7.2. Aġġornamenti tal-BIOS
Periodically check GIGABYTE's website for BIOS updates. BIOS updates can improve system stability, add support for new hardware, or fix bugs. Follow the update instructions carefully to avoid damaging the motherboard.
7.3. Aġġornamenti tas-Sewwieqa
Keep your drivers updated to ensure optimal performance and compatibility with new software and hardware. Drivers can be downloaded from GIGABYTE's and component manufacturers' websiti.
8 Issolvi l-problemi
Din it-taqsima tindirizza kwistjonijiet komuni li tista' tiltaqa' magħhom:
- Ebda Qawwa: Check all power connections (24-pin, 8-pin CPU, GPU). Ensure the PSU is switched on.
- Ebda Display: Verify that the monitor is connected to the graphics card (not the motherboard's integrated graphics ports, unless using integrated graphics). Reseat the graphics card and RAM modules.
- Memory Initialization Error (Code 55): This often indicates an issue with RAM or CPU seating. Reseat RAM modules and ensure the CPU is correctly installed in its socket.
- Instabbiltà/Ħsarat tas-Sistema: Check for overheating (monitor temperatures with software). Ensure drivers are up to date. Test memory modules individually.
- Irrisettjar tal-BIOS: If system becomes unbootable due to incorrect BIOS settings, clear the CMOS by removing the CMOS battery for a few minutes or using the dedicated clear CMOS jumper/button.
9. Speċifikazzjonijiet
| Karatteristika | Speċifikazzjoni |
|---|---|
| Socket tas-CPU | LGA 1151 |
| Proċessuri Kompatibbli | 6th/7th Generation Intel Core Processors |
| Chipset | Intel Z170 |
| Slots tal-Memorja | 4 x sokits DDR4 DIMM |
| Kapaċità Massima tal-Memorja | 64 GB |
| Veloċità tal-Memorja (OC) | Sa 3866 MHz |
| PCIe Slots | Multiple PCIe x16 and x1 slots (SLI/CrossFire support) |
| M.2 Konnetturi | 2 x M.2 (PCIe Gen3 x4, up to 32 Gb/s) |
| Portijiet SATA | 6 x SATA 6Gb/s |
| Portijiet USB (Wara) | USB 3.1 Type-C, USB 3.1, USB 3.0, USB 2.0 |
| LAN | Killer E2400 Gigabit Ethernet + Intel GbE LAN |
| Awdjo | Creative Sound Core3D Quad-Core Audio |
| Fattur tal-Formola | ATX (30.5cm x 24.4cm) |
10. Garanzija u Appoġġ
Il-motherboards GIGABYTE tipikament jiġu b'garanzija tal-manifattur. Jekk jogħġbok irreferi għall-karta tal-garanzija inkluża fl-imballaġġ tal-prodott tiegħek jew żur is-sit uffiċjali ta' GIGABYTE. websit għal termini u kundizzjonijiet speċifiċi tal-garanzija applikabbli għar-reġjun tiegħek.
For technical support, driver downloads, BIOS updates, and product registration, please visit the official GIGABYTE support websit. Tista' ssib ukoll FAQs u gwidi għas-soluzzjoni tal-problemi hemmhekk.