1. Introduzzjoni
Thank you for choosing the Carvin Laser 25" In-Ground Swimming Pool Sand Filter. This manual provides essential information for the safe and efficient installation, operation, and maintenance of your new pool filter. Please read this manual thoroughly before attempting to install or operate the filter to ensure proper function and longevity of the product.
The Carvin Laser Sand Filter is engineered to provide superior water filtration for your swimming pool. Its design ensures even water distribution across the sand bed, leading to higher flow rates, extended filter cycles, and more efficient backwashing. The robust 7-way dial valve offers multiple functions for comprehensive pool management.
2. Informazzjoni dwar is-Sigurtà
TWISSIJA: Jekk ma ssegwix dawn l-istruzzjonijiet, dan jista’ jirriżulta fi korriment serju jew mewt.
- Always disconnect power to the pump before servicing the filter or valve.
- Tħaddimx il-filtru jekk xi parti tkun bil-ħsara jew nieqsa.
- Kun żgur li l-konnessjonijiet kollha huma sikuri u mingħajr tnixxija qabel ma tħaddem.
- Maintain proper water chemistry in your pool.
- Keep children and pets away from the filter area during operation and maintenance.
- Consult a qualified pool professional for any installation or service beyond your capabilities.
- Never attempt to open the filter tank or valve while the system is pressurized.
3. Prodott Aktarview
The Carvin Laser Sand Filter system consists of a durable filter tank and a versatile 7-way dial valve. Understanding its components and functions is key to effective pool maintenance.
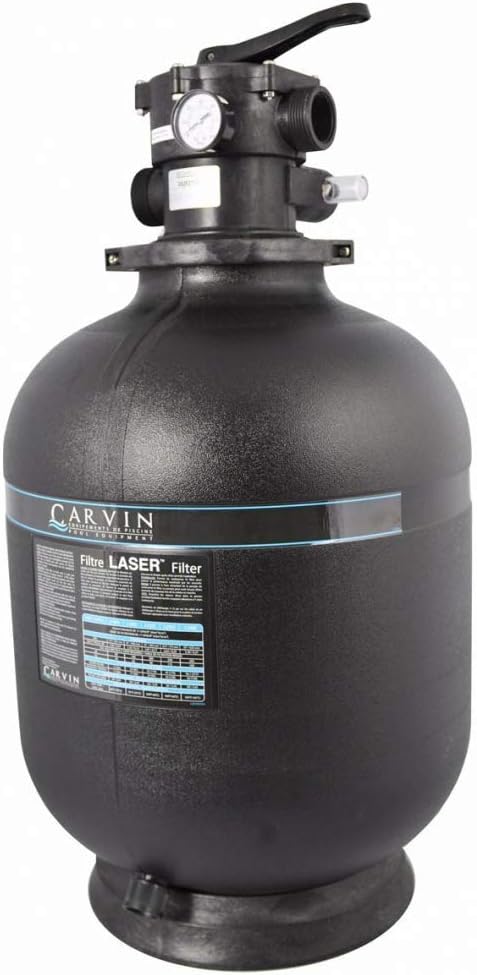
Figure 3.1: Complete Filter Assembly. This image displays the full Carvin Laser 25-inch sand filter unit, including the main filter tank and the top-mounted 7-way dial valve with its pressure gauge. The robust, blow-molded tank is designed for durability and resistance to UV and corrosion.
3.1. 7-Way Dial Valve Functions
The filter's 7-way dial valve allows you to select various operational modes for your pool system. The functions are clearly marked on the valve's top.

Figure 3.2: Valve Function Diagram. This image shows the circular dial of the 7-way valve, illustrating the different operational settings: Filtration, Backwash, Rinse, Whirlpool, Drain, Winterize, and Test. Each setting is clearly labeled for easy selection.
- Filtrazzjoni: Normal filtering mode. Water passes through the sand bed, removing debris.
- Backwash: Cleans the filter by reversing water flow, flushing trapped debris out of the waste port.
- Laħlaħ: Użat wara l-ħasil b'lura biex joqgħod is-sodda tar-ramel u jitlaħlaħ kwalunkwe ilma maħmuġ li jifdal qabel ma jerġa' lura għall-filtrazzjoni.
- Whirlpool (Iċċirkola mill-ġdid): Jevita l-filtru, u jiċċirkola l-ilma direttament lura lejn il-pixxina. Utli għat-taħlit ta' kimiċi mingħajr ma jiffiltra.
- Drain (Waste): Drains water directly from the pool or spa to waste, bypassing the filter. Useful for lowering water level or vacuuming heavy debris directly to waste.
- Ix-xitwa: Position for preparing the filter for winter storage, typically used to drain the filter tank.
- Test: A specific setting for pressure testing or other diagnostic purposes.

Figura 3.3: Fuq View of Valve. Din l-immaġni tipprovdi veduta ċara minn fuq għal isfel view of the 7-way dial valve, showing the handle used to select functions and the overall robust construction of the valve head.
4. Setup u Installazzjoni
Proper installation is crucial for the performance and safety of your Carvin Laser Sand Filter. Follow these general guidelines. Refer to a professional if unsure.
4.1. L-Għażla tas-Sit
- Choose a level, solid surface, preferably concrete, capable of supporting the weight of the filter filled with sand and water.
- Locate the filter as close to the pool as possible to minimize pipe friction loss.
- Ensure adequate clearance around the filter for maintenance and servicing.
- Protect the filter from direct sunlight and harsh weather conditions if possible.
4.2. Imla bil-Medja tal-Filtru (Ramel)
- Remove the 7-way valve and place a sand guard (if provided) or a plastic bag over the standpipe to prevent sand from entering it.
- Fill the tank approximately halfway with water to cushion the sand as it is added.
- Carefully add the correct grade and amount of filter sand (typically #20 silica sand) into the tank. Refer to your filter's specifications for exact sand requirements.
- Remove the sand guard/plastic bag and ensure no sand is in the standpipe opening.
4.3. Valve and Plumbing Connections
- Carefully place the 7-way valve onto the filter tank, ensuring the standpipe aligns correctly with the valve's opening.
- Secure the valve to the tank using the noncorrosive resin clamp. Żgura li l-clamp is tightened evenly and securely.
- Connect the plumbing from your pool pump to the "PUMP" port on the valve.
- Connect the plumbing leading back to your pool returns to the "RETURN" port on the valve.
- Connect a waste line to the "WASTE" port on the valve. This line should lead to an appropriate drainage area, observing local codes.
- Installa l-gauge tal-pressjoni fil-port magħżul fuq il-valv.

Figure 4.1: Plumbing Components. This image displays typical hoses, connectors, and clamps used for connecting the filter to the pool pump and return lines. Ensure all connections are properly sealed to prevent leaks.
5. Istruzzjonijiet Operattivi
Before operating, ensure the pool is filled to the proper level and all plumbing connections are secure. Always turn off the pump before changing the valve position.
5.1. Startup Inizjali
- Ensure the filter tank is filled with sand and water.
- Set the 7-way valve handle to the BACKWASH pożizzjoni.
- Turn on the pool pump. Backwash for 2-3 minutes or until the water in the sight glass (if present) runs clear.
- Itfi l-pompa.
- Set the valve handle to the LAĦLA pożizzjoni.
- Ixgħel il-pompa. Laħlaħ għal 30-60 sekonda.
- Itfi l-pompa.
- Set the valve handle to the FILTRAZZJONI pożizzjoni.
- Turn on the pump. Note the initial pressure gauge reading. This is your clean filter operating pressure.

Figure 5.1: Pressure Gauge Detail. This close-up image shows the pressure gauge mounted on the 7-way valve. Monitoring this gauge is essential for determining when backwashing is required, typically when the pressure rises 8-10 PSI above the clean operating pressure.
5.2. Normal Operation (Filtration)
Keep the valve in the FILTRAZZJONI position for daily pool operation. Monitor the pressure gauge. When the pressure rises 8-10 PSI above your clean operating pressure, it's time to backwash.
5.3. Changing Valve Positions
Always turn off the pool pump before moving the 7-way valve handle to a different position. This prevents damage to the valve's internal components and ensures safe operation.
6. Manutenzjoni
Regular maintenance ensures optimal performance and extends the life of your Carvin Laser Sand Filter.
6.1. Ħasil lura
Backwash your filter when the pressure gauge reads 8-10 PSI above the clean operating pressure, or when the pool water appears cloudy despite adequate filtration time. Follow the steps outlined in Section 5.1 (Initial Startup) for backwashing and rinsing.
6.2. Winterizing
For colder climates, proper winterization is essential to prevent freeze damage.
- Itfi l-pompa u skonnettja l-enerġija.
- Set the 7-way valve to the WINTERIZE pożizzjoni.
- Open the bottom drain plug on the filter tank to completely drain all water.
- Remove the pressure gauge and store it in a warm, dry place.
- Drain all water from the pump, heater, and all plumbing lines.
- Cover the filter to protect it from the elements.
6.3. Sand Replacement
Filter sand typically lasts 3-5 years, depending on usage and water chemistry. Over time, sand particles can become smooth or clumped, reducing filtration efficiency. Replace the sand when you notice persistent cloudy water or significantly reduced flow despite regular backwashing.
7 Issolvi l-problemi
Din it-taqsima tindirizza kwistjonijiet komuni li tista' tiltaqa' magħhom bil-filtru tar-ramel tiegħek.
| Problema | Kawża Possibbli | Soluzzjoni |
|---|---|---|
| Low Water Flow / High Pressure | Clogged filter sand; clogged skimmer/pump basket; closed valve. | Backwash and rinse filter; clean skimmer and pump baskets; ensure all valves are open. |
| Ilma tal-Pixxina Mdardar | Insufficient filtration time; dirty filter sand; improper water chemistry; damaged laterals. | Increase filtration time; backwash/rinse filter; check and adjust water chemistry; inspect laterals for damage (requires sand removal). |
| Tnixxija ta' Ilma mill-Valv | Worn O-rings/gaskets; loose clamp; cracked valve body. | Inspect and replace O-rings/gaskets; tighten clamp; replace valve if cracked. |
| Sand Returning to Pool | Damaged laterals; too much sand; incorrect sand type. | Inspect and replace damaged laterals; ensure correct sand volume and type. |
If you encounter issues not listed here or if the suggested solutions do not resolve the problem, please contact Carvin customer support or a qualified pool technician.
8. Speċifikazzjonijiet
- Manifattur: Carvin
- Mudell: Laser 25 Inch
- ASIN: B00SLQ40AG
- Tip ta' filtru: In-Ground Swimming Pool Sand Filter
- Tip ta 'valv: Valv tad-Dial b'7 Modi
- Materjal tat-Tank: Blow-molded, UV and corrosion-resistant resin
- Funzjonijiet tal-Valv: Filtration, Backwash, Rinse, Whirlpool, Drain, Winterize, Test
9. Garanzija u Appoġġ
Specific warranty details for the Carvin Laser 25" In-Ground Swimming Pool Sand Filter are not provided in this document. For information regarding product warranty, claims, or technical support, please contact Carvin directly or refer to the warranty card included with your product packaging.
You may also visit the official Carvin webis-sit għall-aktar informazzjoni ta' appoġġ u dettalji ta' kuntatt aġġornati.


