1. Introduzzjoni
This manual provides essential instructions for the safe and effective operation of your Mastech MY61 Digital Multimeter. The MY61 is a portable, battery-powered digital multimeter designed for measuring DC and AC voltage, DC and AC current, resistance, capacitance, diode, and transistor (hFE) parameters. It features a 2000-count display, data hold function, and auto power-off for energy conservation. Please read this manual thoroughly before use to ensure proper operation and to prevent potential hazards.

Stampa 1.1: Quddiem view of the Mastech MY61 Digital Multimeter, showing the display, rotary switch, and input jacks.
2. Informazzjoni dwar is-Sigurtà
Biex tiżgura tħaddim u servizz sikur tal-meter, segwi dawn l-istruzzjonijiet. Nuqqas li tosserva dawn it-twissijiet jista 'jirriżulta f'korriment gravi jew mewt.
- Always read the manual: Before using the multimeter, carefully read and understand all safety warnings and operating instructions.
- Periklu ta' Xokk Elettriku: Be extremely cautious when working with voltag'il fuq minn 30V AC RMS, 42V peak, jew 60V DC. Dawn il-volumitages joħolqu periklu ta' xokk.
- Inspect Test Leads: Before each use, inspect the test leads for damaged insulation or exposed metal. Replace damaged leads immediately.
- Do Not Operate if Damaged: Tużax il-miter jekk jidher li hu bil-ħsara jew jekk il-kaxxa tkun miftuħa.
- Correct Input Terminals: Always connect the test leads to the correct input terminals for the measurement function selected.
- Select Correct Function and Range: Ensure the rotary switch is set to the appropriate function and range before making any measurement.
- Protezzjoni ta' tagħbija żejda: The meter is equipped with full function overload protection. However, avoid exceeding the maximum input values specified in the specifications section.
- Sostituzzjoni tal-batterija: To avoid electrical shock, remove all inputs before opening the battery compartment or case. Replace the battery when the low battery indicator appears.
- Ambjent tax-Xogħol: Tħaddimx il-miter f'ambjenti b'gass, fwar jew trab splussiv.

Immaġni 2.1: Wara view of the Mastech MY61 Digital Multimeter, showing the kickstand and a warning label regarding electrical shock and the need to read the manual for safety.
3. Kontenut tal-Pakkett
Upon opening the package, please verify that all items listed below are present and undamaged:
- 1 x Mastech MY61 Digital Multimeter
- 1 x Par ta' Wavel tat-Test (Aħmar u Iswed)
- 1 x Manwal ta 'Istruzzjoni Ingliż

Image 3.1: Contents of the Mastech MY61 package, including the multimeter, test leads, and instruction manual.
4. Prodott Aktarview
The Mastech MY61 Digital Multimeter features a robust design with clear markings for ease of use. Key components include:
- Display LCD: 2000-count digital display for clear readings.
- Swiċċ li jdur: Used to select measurement functions and ranges.
- Buttuni tal-Funzjoni: Includes 'HOLD' for data retention and 'ON/OFF' for power control.
- Ġakkijiet tad-dħul:
- COM Jack: Common terminal for all measurements (black test lead).
- VΩmA Jack: Input għal voltage, resistance, capacitance, diode, hFE, and current measurements up to 200mA (red test lead).
- Ġakk 20A: Input for high current measurements up to 20A (red test lead).
- Sokit tal-hFE: Għall-ittestjar tat-transistors.
- Kickstand: Integrated stand on the back for convenient viewangolu tal-ing.

Immaġni 4.1: Quddiem angolat view of the Mastech MY61, highlighting the display and control layout.

Image 4.2: Close-up of the Mastech MY61's rotary switch, function buttons, and LCD display.

Immaġni 4.3: Ġenb view of the Mastech MY61 with its integrated kickstand extended for desktop use.
5. Setup
5.1 Installazzjoni tal-batterija
The Mastech MY61 requires one 9V (6F22) battery for operation. The battery is not included in the package.
- Ensure the multimeter is powered off and disconnect all test leads from the input jacks.
- Sib l-għatu tal-kompartiment tal-batterija fuq wara tal-miter.
- Use a screwdriver to loosen the screw securing the battery cover, then remove the cover.
- Connect a new 9V battery to the battery clip, observing correct polarity.
- Poġġi l-batterija fil-kompartiment u erġa’ poġġi l-għatu, billi twaħħlu bil-kamin.
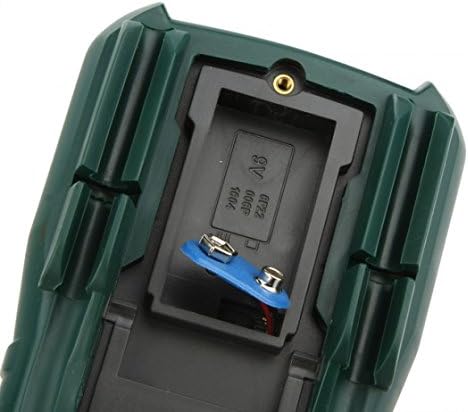
Stampa 5.1: View of the battery compartment on the Mastech MY61, showing where the 9V battery is installed.
5.2 Konnessjoni tal-wajers tat-test
Always connect the black test lead to the COM (Common) jack. The red test lead connection depends on the measurement function:
- Għal Voltage, Resistance, Capacitance, Diode, hFE, and current up to 200mA, connect the red test lead to the VΩmA jack.
- For current measurements between 200mA and 20A, connect the red test lead to the 20A jack.

Image 5.2: Test leads properly connected to the Mastech MY61 Digital Multimeter's input jacks.
6. Istruzzjonijiet Operattivi
6.1 Power ON/OFF and Data Hold
- Qawwa mixgħula: Press the red 'ON/OFF' button to turn the meter on.
- Itfi: Press the red 'ON/OFF' button again to turn the meter off. The meter also features an auto power-off function to conserve battery life.
- Żamma tad-Data: Press the yellow 'HOLD' button to freeze the current reading on the display. Press it again to release the hold function.
6.2 DC Voltage Kejl
- Connect the black test lead to the COM jack and the red test lead to the VΩmA jack.
- Issettja s-swiċċ rotatorju għall-Volum DC mixtieqtage range (V—). If the voltage is unknown, start with the highest range (1000V) and decrease as needed.
- Connect the test probes in parallel to the circuit or component under test.
- Aqra l-voltage valur fuq il-wiri LCD.
6.3 AC Voltage Kejl
- Connect the black test lead to the COM jack and the red test lead to the VΩmA jack.
- Issettja s-swiċċ rotatorju għall-Volum AC mixtieqtage range (V∼). If the voltage is unknown, start with the highest range (750V) and decrease as needed.
- Connect the test probes in parallel to the circuit or component under test.
- Aqra l-voltage valur fuq il-wiri LCD.
6.4 Kejl tal-Kurrent DC
- Importanti: Il-kejl tal-kurrent jeħtieġ li l-miter ikun imqabbad f'serje maċ-ċirkwit. Kun żgur li ċ-ċirkwit ma jkunx enerġizzat qabel ma tqabbad il-miter.
- Connect the black test lead to the COM jack. For currents up to 200mA, connect the red test lead to the VΩmA jack. For currents up to 20A, connect the red test lead to the 20A jack.
- Set the rotary switch to the desired DC Current range (A— or mA—). Start with the highest range if the current is unknown.
- Open the circuit where the current is to be measured and connect the test probes in series.
- Applika l-enerġija liċ-ċirkwit u aqra l-valur tal-kurrent fuq id-displej LCD.
6.5 Kejl tal-Kurrent AC
- Importanti: Il-kejl tal-kurrent jeħtieġ li l-miter ikun imqabbad f'serje maċ-ċirkwit. Kun żgur li ċ-ċirkwit ma jkunx enerġizzat qabel ma tqabbad il-miter.
- Connect the black test lead to the COM jack. For currents up to 200mA, connect the red test lead to the VΩmA jack. For currents up to 20A, connect the red test lead to the 20A jack.
- Set the rotary switch to the desired AC Current range (A∼ or mA∼). Start with the highest range if the current is unknown.
- Open the circuit where the current is to be measured and connect the test probes in series.
- Applika l-enerġija liċ-ċirkwit u aqra l-valur tal-kurrent fuq id-displej LCD.
6.6 Kejl tar-Reżistenza
- Kun żgur li ċ-ċirkwit jew il-komponent ma jkollux l-enerġija qabel ma tkejjel ir-reżistenza.
- Connect the black test lead to the COM jack and the red test lead to the VΩmA jack.
- Set the rotary switch to the desired Resistance range (Ω). Start with a higher range if the resistance is unknown.
- Qabbad il-probi tat-test mal-komponent li għandu jitkejjel.
- Aqra l-valur tar-reżistenza fuq id-displej LCD.
6.7 Kejl tal-Kapaċitanza
- Kun żgur li l-kapaċitatur ikun skarikat kompletament qabel il-kejl biex tevita li ssir ħsara lill-miter.
- Connect the black test lead to the COM jack and the red test lead to the VΩmA jack.
- Set the rotary switch to the desired Capacitance range (F).
- Qabbad is-sondi tat-test madwar il-kapaċitatur.
- Aqra l-valur tal-kapaċità fuq il-wiri LCD.
6.8 Test tad-Diode
- Ensure the diode is disconnected from the circuit.
- Connect the black test lead to the COM jack and the red test lead to the VΩmA jack.
- Set the rotary switch to the Diode Test position (→|).
- Qabbad is-sonda ħamra mal-anodu u s-sonda sewda mal-katodu tad-dijodu. Id-displej se juri l-volum 'il quddiem.tagqatra e.
- Reverse the probes. The display should show 'OL' (Open Loop) for a good diode.
6.9 Test tat-Tranżistor (hFE)
- Issettja l-iswiċċ li jdur fil-pożizzjoni hFE.
- Identifika jekk it-transistor huwiex NPN jew PNP.
- Insert the transistor leads (Emitter, Base, Collector) into the corresponding holes in the hFE socket on the meter, ensuring correct type (NPN/PNP) and pinout.
- Read the hFE value (DC current gain) on the LCD display.
6.10 Test ta' Kontinwità
- Ensure the circuit or component is de-energized.
- Connect the black test lead to the COM jack and the red test lead to the VΩmA jack.
- Set the rotary switch to the Continuity Test position (♫).
- Qabbad il-probi tat-test tul il-komponent jew il-mogħdija taċ-ċirkwit.
- If continuity exists (resistance below approximately 50Ω), the built-in buzzer will sound. The display will show the resistance value.
7. Manutenzjoni
7.1 Tindif
Imsaħ il-miter b'reklamaramp drapp u deterġent ħafif. Tużax abrażivi jew solventi. Kun żgur li l-miter ikun niexef għalkollox qabel l-użu.
7.2 Sostituzzjoni tal-batterija
When the low battery indicator appears on the display, replace the 9V battery as described in Section 5.1. Always use a fresh 9V (6F22) battery.
7.3 Sostituzzjoni tal-Fjus
The MY61 multimeter is equipped with internal fuses to protect against overcurrent. If the current measurement function fails, the fuse may need replacement. Fuse replacement should only be performed by qualified personnel. Refer to the specifications for fuse ratings. To access the fuse, the entire back case of the meter must be opened, which requires removing the battery compartment cover and additional screws. Always disconnect test leads and power before opening the case.
8 Issolvi l-problemi
If your Mastech MY61 Digital Multimeter is not functioning as expected, refer to the following common issues and solutions:
- Ebda Wiri jew Wiri Dgħajjef:
- Check if the meter is powered on.
- Replace the 9V battery if it is low or depleted.
- Qari Skorrett:
- Ensure the rotary switch is set to the correct function and range for the measurement.
- Verify that the test leads are connected to the correct input jacks.
- Check for proper contact between the test probes and the circuit/component.
- Ensure the circuit or component is de-energized for resistance and capacitance measurements.
- Current Measurement Not Working:
- Check if the test leads are connected to the correct current input jack (VΩmA for mA, 20A for A).
- The internal fuse for current measurement may be blown. Refer to Section 7.3 for fuse replacement information.
- 'OL' (Overload) Displayed:
- The measured value exceeds the selected range. Switch to a higher range.
- For resistance, 'OL' can indicate an open circuit.
9. Speċifikazzjonijiet
| Funzjoni | Firxa | Eżattezza |
|---|---|---|
| DC Voltage | 200mV, 2V, 20V, 200V | ±(0.5%+2) |
| 1000V | ±(0.8%+2) | |
| AC Voltage | 200mV | ±(1.2%+3) |
| 2V, 20V, 200V | ±(0.8%+3) | |
| 750V | ±(1.2%+3) | |
| Kurrent DC | 2mA, 20mA, 200mA | ±(1.2%+3) |
| 20A | ±(2.0%+5) | |
| Kurrent AC | 2mA, 20mA, 200mA | ±(1.8%+5) |
| 20A | ±(3.0%+5) | |
| Reżistenza | 200Ω, 2kΩ, 20kΩ, 200kΩ, 2MΩ | ±(0.8%+3) |
| 20MΩ | ±(1.0%+2) | |
| 200MΩ | ±(6.0%+10) | |
| Kapaċità | 20nF, 200nF, 2µF, 20µF | ±(4.0%+3) |
| 200µF | ±(6.0%+10) |
Karatteristiċi Ġenerali:
- Wiri: 2000 Counts LCD
- Żamma tad-Data: Iva
- Mitfi Awtomatiku: Iva
- Test tad-Diode: Iva
- Transistor (hFE) Test: Iva
- Test ta' Kontinwità: Iva
- Protezzjoni ta' tagħbija żejda: Funzjoni sħiħa
- Qawwa: 1 x 9V (6F22) Battery (not included)
- Kulur: Aħdar skur
- Temperatura operattiva: 0°C sa 40°C (32°F sa 104°F)
- Temperatura tal-Ħażna: -10°C sa 50°C (14°F sa 122°F)
- Dimensjonijiet: Approximately 140mm x 70mm x 35mm (5.5in x 2.7in x 1.4in)
- Piż: Approximately 200g (7.05 oz) without battery
10. Garanzija u Appoġġ
For warranty information and technical support, please refer to the warranty card included with your product or contact Mastech customer service through their official websit. Żomm l-irċevuta tax-xiri tiegħek bħala prova tax-xiri għal kwalunkwe talba ta' garanzija.


