1. Introduzzjoni
This manual provides detailed instructions for the safe and effective operation of the Mastech MS8260A Digital Multimeter. The MS8260A is a versatile instrument designed for various electrical measurements, including AC/DC voltage, AC/DC current, resistance, diode check, continuity test, and transistor check. It also features a non-contact voltagFunzjoni ta 'skoperta.
Key features of the MS8260A include:
- Vol mingħajr kuntatttagsejbien e
- Automatic power-off function to conserve battery life
- Indikazzjoni ta 'batterija baxxa
2. Informazzjoni dwar is-Sigurtà
To ensure safe operation and service of the meter, please read all instructions carefully before use. Failure to observe safety warnings can result in electric shock, fire, or damage to the meter.
- Always disconnect test leads from the circuit before changing functions.
- Applikax aktar mill-vol nominalitage, kif immarkat fuq il-meter, bejn terminals jew bejn kwalunkwe terminal u ground ground.
- Oqgħod attent meta taħdem bil-voltag'il fuq minn 30V AC RMS, 42V peak, jew 60V DC. Dawn il-volumitages joħolqu periklu ta' xokk.
- Before measuring current, ensure the meter's fuses are intact and the test leads are connected correctly.
- Ibdel il-batterija immedjatament meta jidher l-indikatur ta' batterija baxxa biex tiżgura qari preċiż.
- Tħaddimx il-miter jekk jidher li għandu l-ħsara jew jekk il-kaxxa tkun miftuħa.
- Aderixxi mal-kodiċijiet tas-sigurtà lokali u nazzjonali.
3. Komponenti tal-Prodott
The Mastech MS8260A Digital Multimeter consists of the main unit and essential accessories.
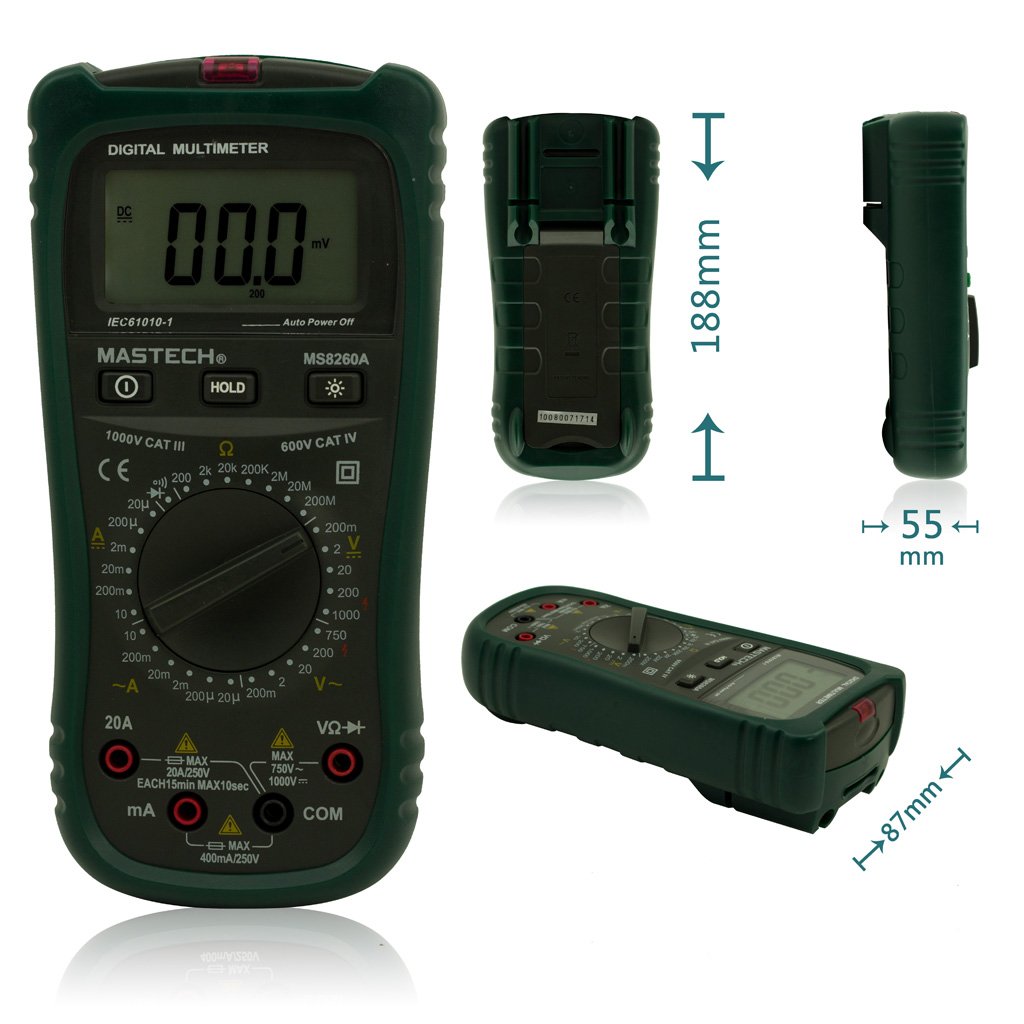
Figura 1: Quddiem View of Mastech MS8260A Digital Multimeter with Dimensions
This image displays the Mastech MS8260A Digital Multimeter from the front, highlighting its LCD screen, rotary function switch, and input terminals. Key dimensions are indicated: 188mm height, 87mm depth, and 55mm width. The display shows '00.0 mV' and 'Auto Power Off' text. The rotary switch is set to 'mV' range. The input jacks are labeled 'VΩHz', 'mA', and 'COM'.
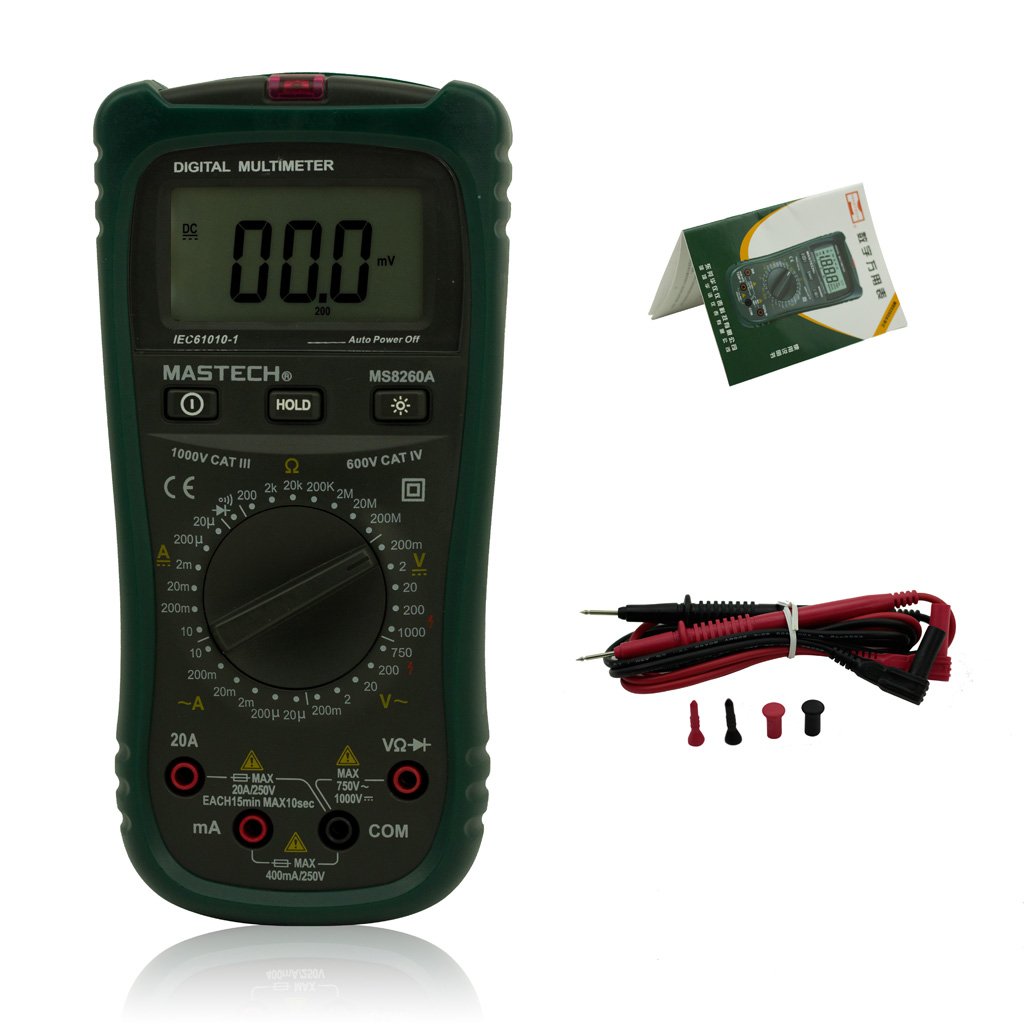
Figure 2: Mastech MS8260A Digital Multimeter and Accessories
This image shows the Mastech MS8260A Digital Multimeter accompanied by its standard accessories. These include a pair of red and black test leads with protective caps, and a printed user manual. The multimeter itself is shown from the front, similar to the main product view.
3.1 Karatteristiċi tal-Unità Prinċipali
- Display LCD: Juri l-qari tal-kejl, l-unitajiet, u l-indikaturi tal-funzjoni.
- Swiċċ li jdur: Jagħżel il-funzjoni u l-firxa tal-kejl mixtieqa.
- Ġakkijiet tad-dħul: Terminals for connecting test leads (VΩHz, mA, COM).
- Buttuna ŻOMM: Jiffriża l-qari attwali tal-wiri.
- Buttuna Backlight: Activates the display backlight for improved visibility in low light.
- Mhux Kuntatt Voltage (NCV) Sensor: Jiskopri AC voltage mingħajr kuntatt dirett.
3.2 Aċċessorji Inklużi
- Wavel tat-Test (Aħmar u Iswed)
- Manwal għall-Utent
4. Setup Inizjali
4.1 Installazzjoni tal-batterija
The Mastech MS8260A Digital Multimeter requires one 9V 6F22 battery for operation. Batteries are not included with the product.
- Ensure the multimeter is turned off and disconnect any test leads.
- Sib l-għatu tal-kompartiment tal-batterija fuq wara tal-unità.
- Use a screwdriver to remove the screw securing the battery cover.
- Neħħi b'attenzjoni l-għatu.
- Connect a new 9V 6F22 battery to the battery clips, observing correct polarity.
- Poġġi l-batterija fil-kompartiment.
- Ibdel l-għatu tal-kompartiment tal-batterija u waħħalha bil-kamin.
5. Istruzzjonijiet Operattivi
Before taking any measurements, ensure the test leads are properly connected to the meter and the circuit under test.
5.1 Konnessjoni tal-wajers tat-test
- Dejjem qabbad il- iswed ċomb tat-test għall- COM jack tad-dħul (komuni).
- Għal voltage, resistance, diode, continuity, and transistor measurements, connect the aħmar ċomb tat-test għall- VΩHz jack tad-dħul.
- For current measurements (mA or 20A), connect the aħmar test lead to the appropriate current input jack (mA or 20A).
5.2 Għażla tal-Funzjoni
Turn the rotary switch to the desired measurement function and range. The meter will display the reading on the LCD.
5.2.1 DC Voltage Measurement (V–)
- Issettja s-swiċċ rotatorju għall-Volum DC mixtieqtage range (e.g., 200mV, 2V, 20V, 200V, 1000V).
- Qabbad il-wajers tat-test b'mod parallel maċ-ċirkwit jew il-komponent li għandu jitkejjel.
- Aqra l-voltagIl-valur fuq il-wiri.
5.2.2 AC Voltage Measurement (V∼)
- Issettja s-swiċċ rotatorju għall-Volum AC mixtieqtage range (e.g., 2V, 20V, 200V, 750V).
- Connect the test leads in parallel to the AC voltagsors e.
- Aqra l-voltagIl-valur fuq il-wiri.
5.2.3 DC Current Measurement (A–)
- Set the rotary switch to the desired DC Current range (e.g., 20µA, 200µA, 2mA, 20mA, 200mA, 20A).
- Importanti: Disconnect power to the circuit. Break the circuit and connect the meter in series with the load.
- Applika l-enerġija għaċ-ċirkwit.
- Aqra l-valur attwali fuq id-displej.
5.2.4 AC Current Measurement (A∼)
- Set the rotary switch to the desired AC Current range (e.g., 20µA, 200µA, 2mA, 20mA, 200mA, 20A).
- Importanti: Disconnect power to the circuit. Break the circuit and connect the meter in series with the load.
- Applika l-enerġija għaċ-ċirkwit.
- Aqra l-valur attwali fuq id-displej.
5.2.5 Kejl tar-Reżistenza (Ω)
- Set the rotary switch to the desired Resistance range (e.g., 200Ω, 2kΩ, 20kΩ, 200kΩ, 2MΩ, 20MΩ).
- Kun żgur li ċ-ċirkwit ma jkollux l-enerġija qabel ma tkejjel ir-reżistenza.
- Qabbad il-wajers tat-test mal-komponent li għandu jitkejjel.
- Aqra l-valur tar-reżistenza fuq il-wiri.
5.2.6 Diode Test (→|)
- Set the rotary switch to the Diode Test position.
- Connect the red test lead to the anode and the black test lead to the cathode of the diode.
- Id-displej se juri l-volum 'il quddiemtage drop. Reverse the leads; the display should show 'OL' (Open Loop) for a good diode.
5.2.7 Continuity Test (♫)
- Set the rotary switch to the Continuity Test position.
- Qabbad il-wajers tat-test madwar iċ-ċirkwit jew il-komponent.
- Jekk ir-reżistenza tkun taħt madwar 50Ω, il-buzzer se jdoqq, u jindika kontinwità.
5.2.8 Test tat-Transistor (hFE)
- Issettja l-iswiċċ li jdur fil-pożizzjoni hFE.
- Insert the transistor's emitter, base, and collector leads into the appropriate sockets on the meter's hFE test socket.
- The display will show the hFE value (DC current gain).
5.2.9 Vol. Mingħajr Kuntatttage (NCV) Sejbien
- Issettja s-swiċċ rotatorju għall-pożizzjoni NCV.
- Move the top front part of the meter (where the NCV sensor is located) close to the conductor suspected of having AC voltage.
- Jekk AC voltage greater than 110V is detected, the meter will emit an audible beep and the NCV indicator light will illuminate.
6. Manutenzjoni
6.1 Tindif
Imsaħ il-każ bl-adamp drapp u deterġent ħafif. Tużax abrażivi jew solventi. Kun żgur li l-miter ikun niexef għalkollox qabel l-użu.
6.2 Sostituzzjoni tal-batterija
When the low battery indicator appears on the display, replace the 9V 6F22 battery as described in Section 4.1. Prompt battery replacement ensures accurate measurements and proper meter function.
6.3 Sostituzzjoni tal-Fjus
If the meter fails to measure current, the fuse may be blown. Refer to the specifications for the correct fuse type and rating. Fuse replacement should only be performed by qualified personnel.
7 Issolvi l-problemi
- L-ebda wiri jew wiri dgħajjef: Iċċekkja l-installazzjoni tal-batterija u ibdel jekk meħtieġ.
- Qari mhux korrett: Ensure test leads are properly connected, the correct function/range is selected, and the battery is not low.
- No current measurement: Check the fuse. Ensure the meter is connected in series with the circuit.
- 'OL' (Overload) displayed: The measured value exceeds the selected range. Select a higher range.
8. Speċifikazzjonijiet
| Speċifikazzjoni | Valur |
|---|---|
| Brand | Mastech |
| Numru tal-Mudell | MS8260A |
| Tip ta' Kejl | Multimetru Diġitali |
| Sors tal-Enerġija | 9V 6F22 Battery |
| Piż tal-oġġett | 454 g |
| Ċertifikazzjoni | CE |
| Batteriji Inklużi | Nru |
9. Informazzjoni dwar Garanzija
Please refer to the warranty card included with your product or contact Mastech customer support for detailed warranty terms and conditions. Warranty coverage typically applies to defects in materials and workmanship under normal use.
10. Appoġġ għall-Klijent
For technical assistance, troubleshooting, or service inquiries, please contact Mastech customer support. Refer to the official Mastech webis-sit jew l-imballaġġ tal-prodott għall-aktar informazzjoni ta' kuntatt aġġornata.
Tista 'żżur il- Mastech Store on Amazon għal aktar informazzjoni dwar il-prodott.


