1. Introduzzjoni
This manual provides detailed instructions for the installation, configuration, and operation of your ASRock H81 PRO BTC Motherboard. Designed for reliable performance, this ATX motherboard supports Intel LGA 1150 processors and DDR3 memory, featuring multiple PCI Express slots suitable for various computing applications, including multi-GPU setups. Please read this manual thoroughly before beginning the installation process to ensure proper setup and to maximize the stability and longevity of your system.
2. Kontenut tal-Pakkett
Ivverifika li l-oġġetti kollha elenkati hawn taħt huma preżenti fil-pakkett tal-motherboard tiegħek. Jekk xi oġġett huwa nieqes jew bil-ħsara, ikkuntattja lill-bejjiegħ tiegħek.
- ASRock H81 PRO BTC Motherboard
- Gwida ta 'Installazzjoni Mgħaġġla
- CD ta' Appoġġ (Sewwieqa u Utilitajiet)
- Tarka I / O
- 2 x Kejbils tad-Data SATA
3. Setup tas-Sistema
3.1. Installazzjoni tas-CPU
The ASRock H81 PRO BTC motherboard uses an LGA 1150 socket. Handle the CPU and socket with extreme care to avoid damaging the pins.
- Locate the CPU socket on the motherboard. Lift the load lever and open the metal load plate.
- Carefully align the CPU with the socket, ensuring the gold triangle on the CPU matches the triangle on the socket. Gently place the CPU into the socket without forcing it.
- Close the load plate and press down the load lever until it locks into place.
- Applika pejst termali mas-CPU u installa l-cooler tas-CPU skont l-istruzzjonijiet tal-manifattur tiegħu.
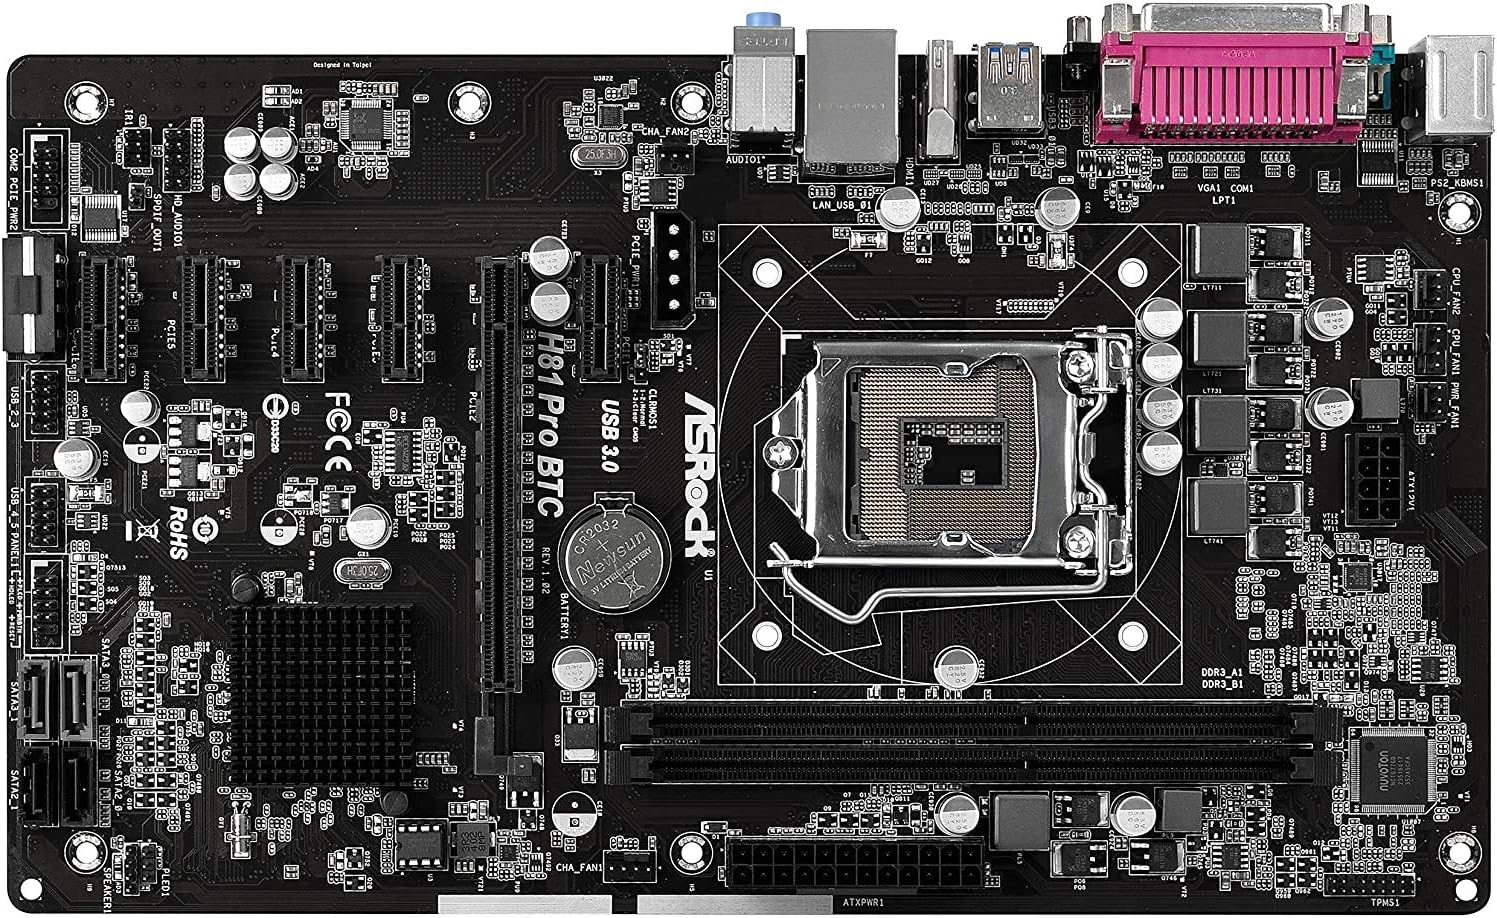
Figura 1: Minn fuq għal isfel view of the ASRock H81 PRO BTC Motherboard. This image displays the LGA 1150 CPU socket at the center, flanked by two DDR3 DIMM slots on the right and multiple PCI Express slots below.
3.2. Installazzjoni tal-Memorja
This motherboard supports DDR3 DIMM modules. Ensure the memory modules are compatible with the motherboard's specifications (DDR3-1600/1333/1066).
- Iftaħ il-klipps fiż-żewġt itruf tas-slott tad-DIMM.
- Allinja l-islott fuq il-modulu tal-memorja DDR3 maċ-ċavetta fl-islott tad-DIMM.
- Daħħal il-modulu tal-memorja sew fl-islott sakemm il-klipps jidħlu f'posthom. Kun żgur li ż-żewġ klipps huma magħluqa għalkollox.
3.3. Installazzjoni tal-Motherboard fix-Chassis
Install the motherboard into a compatible ATX chassis.
- Installa l-ilqugħ tal-I/O fil-ftuħ ta' wara tax-chassis tiegħek.
- Align the motherboard with the standoffs in the chassis.
- Waħħal il-motherboard bil-viti, waqt li tiżgura li tkun imwaħħla sew.
3.4. Konnessjoni tal-Periferali u l-Enerġija
Connect all necessary components and power cables to the motherboard.
- Konnetturi tal-Enerġija: Connect the 24-pin ATX power connector and the 8-pin EPS power connector from your power supply to the motherboard. For multi-GPU configurations, connect the two additional Molex power connectors for PCIe stability.
- Apparati SATA: Connect your storage drives (HDDs/SSDs) to the SATA3 (6Gb/s) or SATA2 (3Gb/s) ports.
- Konnetturi tal-Panew ta' Quddiem: Connect the chassis's front panel cables (power button, reset button, USB ports, audio jacks, LED indicators) to the corresponding headers on the motherboard. Refer to the motherboard diagram for exact locations.
- Apparat USB: Connect USB 2.0 and USB 3.0 devices to the rear I/O ports or internal headers.
- PCI Express Cards: Install graphics cards or other expansion cards into the PCI Express 2.0 x16 slot or the five PCI Express 2.0 x1 slots.
- Output tal-Wiri: Connect your monitor to the VGA or HDMI port on the rear I/O panel if using integrated graphics, or to your dedicated graphics card.

Figura 2: Angolat view of the ASRock H81 PRO BTC Motherboard. This image highlights the various internal connectors such as SATA ports, USB headers, and the arrangement of PCI Express slots.

Figure 3: Side-angled view of the ASRock H81 PRO BTC Motherboard. This perspective shows the main 24-pin ATX power connector, the 8-pin EPS power connector, and the two Molex power connectors designed to provide stable power to multiple PCI Express devices.

Figure 4: Close-up of the ASRock H81 PRO BTC Motherboard's rear I/O panel. This detailed view displays the PS/2 keyboard and mouse ports, a serial port, VGA and HDMI display outputs, two USB 3.0 ports, four USB 2.0 ports, an RJ45 LAN port, and audio input/output jacks.
4. Istruzzjonijiet Operattivi
4.1. L-Ewwel Boot u s-Setup tal-BIOS/UEFI
Wara li tiġbor is-sistema tiegħek, ixgħelha. Agħfas il-buttuna Del or F2 key during startup to enter the BIOS/UEFI setup utility. Here you can configure system settings such as boot order, date/time, and advanced hardware parameters.
- Ordni tal-Ibbutjar: Set your preferred boot device (e.g., USB drive for OS installation, SSD/HDD).
- Informazzjoni tas-Sistema: Verify CPU, memory, and storage device detection.
- Settings Avvanzati: Adjust settings for integrated peripherals, power management, and CPU features as needed.
- Issejvja u Ħruġ: Save your changes and exit the BIOS/UEFI to proceed with operating system installation.
4.2. Installazzjoni tas-sewwieq
After installing your operating system, install the necessary drivers from the provided support CD or download the latest versions from the ASRock official website. This includes chipset drivers, LAN drivers, audio drivers, and any other specific device drivers.
5. Speċifikazzjonijiet
| Chipset | Intel H81 |
| Socket tas-CPU | LGA 1150 |
| Proċessuri Kompatibbli | Intel Core i3/i5/i7 (4th and 5th Gen) |
| Memorja | 2x DDR3 DIMM Slots, Dual Channel, Non-ECC, Buffered, Max 16GB, DDR3-1600/1333/1066 MHz |
| Slots ta 'Espansjoni | 1x PCI-Express 2.0 x16, 5x PCI-Express 2.0 x1 |
| Ħażna | 2x SATA3 (6Gb/s) Ports, 2x SATA2 (3Gb/s) Ports |
| LAN | Realtek RTL8111GR Gigabit Ethernet Controller |
| Portijiet USB | 2x USB 3.0 (rear), 6x USB 2.0 (2 rear, 4 via headers) |
| Portijiet I/O ta' wara | 1x PS/2 Keyboard, 1x PS/2 Mouse, 1x VGA, 1x HDMI, 1x Serial Port, 1x RJ45 LAN, Audio I/O Jacks |
| Konnetturi Interni | 1x Parallel Port Header, 1x Serial Port Header, 2x SLI/Xfire Molex Power Connectors |
| Fattur tal-Formola | ATX |
| Dimensjonijiet | 13.2 x 3 x 10 pulzieri (madwar) |
| Appoġġ tas-Sistema Operattiva | Microsoft Windows 10/8.1/8/7 (32-bit/64-bit) |
6 Issolvi l-problemi
Jekk tiltaqa' ma' problemi, irreferi għall-passi komuni li ġejjin għas-soluzzjoni tal-problemi:
- Ebda Qawwa: Ensure all power cables (24-pin ATX, 8-pin EPS, Molex for PCIe) are securely connected. Check the power supply unit (PSU) and wall outlet.
- Ebda Display: Verify that the monitor is connected to the correct display output (integrated graphics or dedicated GPU). Reseat the graphics card and memory modules.
- System Fails to POST (Power-On Self-Test): Listen for beep codes (if a speaker is connected) which can indicate specific hardware issues. Reseat CPU, memory, and expansion cards. Clear CMOS by removing the CMOS battery for a few minutes or using the clear CMOS jumper.
- Is-Sistema Operattiva Mhux Tibbutja: Check boot order in BIOS/UEFI. Ensure the storage drive with the OS is properly connected and detected.
- Periferali Mhux Rilevat: Ensure the device is properly connected to the correct port/slot. Install or update relevant drivers.
For more advanced troubleshooting, consult the ASRock official webis-sit jew ikkuntattja l-appoġġ tekniku tagħhom.
7. Manutenzjoni
Manutenzjoni regolari tgħin biex tiżgura l-lonġevità u l-prestazzjoni ottimali tal-motherboard tiegħek.
- Tneħħija tat-Trab: Naddaf it-trab mill-motherboard u l-komponenti perjodikament bl-użu ta' arja kkompressata. Kun żgur li s-sistema tkun mitfija u skonnettjata qabel ma tnaddafha.
- Aġġornamenti tal-BIOS/UEFI: Iċċekkja l-ASRock websit għal aġġornamenti tal-BIOS/UEFI. L-aġġornamenti jistgħu jtejbu l-kompatibilità, l-istabbiltà, u l-prestazzjoni. Segwi l-istruzzjonijiet tal-aġġornament bir-reqqa.
- Aġġornamenti tas-sewwieq: Keep your system drivers updated to ensure compatibility and optimal performance with your operating system and peripherals.
8. Garanzija u Appoġġ
This ASRock H81 PRO BTC Motherboard is covered by the manufacturer's warranty. For specific warranty terms and conditions, please refer to the warranty card included in your package or visit the official ASRock websit.
For technical assistance, driver downloads, or further support, please visit the ASRock official support page:


