Prodott Overview
The Bernette Chicago 7 is a versatile and robust sewing and embroidery machine designed for both beginners and experienced users. It combines high-quality construction with a wide range of features to support various creative projects, from basic sewing to intricate embroidery.

Figura 1: Aktarview of the Bernette Chicago 7 Sewing and Embroidery Machine.
Il-karatteristiċi ewlenin jinkludu:
- 200 programmed stitch patterns, including 10 buttonholes and 2 sewing fonts.
- 100 integrated embroidery designs and 1 embroidery font.
- Maximum sewing speed of 800 stitches per minute (spm) and embroidery speed of 600 spm.
- Maximum stitch width of 7 mm and stitch length of 4.5 mm.
- Large embroidery area of 110 x 170 mm.
- LCD display with backlight for easy navigation.
- Automatic needle threader and convenient drop-in bobbin system.
- Free arm capability for sewing sleeves and pant legs.
- Strong fabric transport system, suitable for heavy fabrics like denim.
Setup u Użu Inizjali
Before operating your Bernette Chicago 7, ensure it is properly set up. Follow these steps for initial preparation:
- Spakkjar: Carefully remove the machine and all accessories from the packaging. Retain the original packaging for future transport or storage.
- Pjazzament: Place the machine on a stable, flat surface. Ensure there is adequate space around the machine for comfortable operation.
- Konnessjoni tal-Enerġija: Connect the power cord to the machine and then to a suitable electrical outlet. Use only the power cord supplied with the machine.
- Konnessjoni tal-Pedala tas-Sieq: Connect the foot pedal to the designated port on the machine.
- Attaching the Slide-on Table/Free Arm: The machine comes with a removable slide-on table. For general sewing, attach this table to extend your work surface. To use the free arm for circular sewing (e.g., sleeves, pant legs), simply remove the slide-on table.
- Attaching the Embroidery Module: When performing embroidery, the slide-on table must be removed. The embroidery module can then be easily attached to the machine. Ensure it clicks securely into place.

Figura 2: Quddiem view of the machine, showing the main body and the area for attaching the slide-on table or embroidery module.

Figura 3: Ġenb view illustrating the power and foot pedal connection points.
Istruzzjonijiet Operattivi
Threading il-Magni
Proper threading is crucial for optimal sewing performance. The Bernette Chicago 7 features an automatic needle threader and a convenient drop-in bobbin system.
- Threading ta' fuq: Follow the numbered guides on the machine to thread the upper thread from the spool pin through the tension discs and take-up lever.
- Threader Awtomatiku tal-Labra: Utilize the built-in automatic needle threader for quick and easy threading of the needle eye.
- Tkebbib tal-Bobina: Wind the bobbin according to the instructions provided in the full manual.
- Drop-in Bobbin: Open the bobbin cover plate and insert the wound bobbin into the bobbin case. Ensure the thread is correctly routed through the tension spring. The transparent cover allows for easy monitoring of bobbin thread supply.
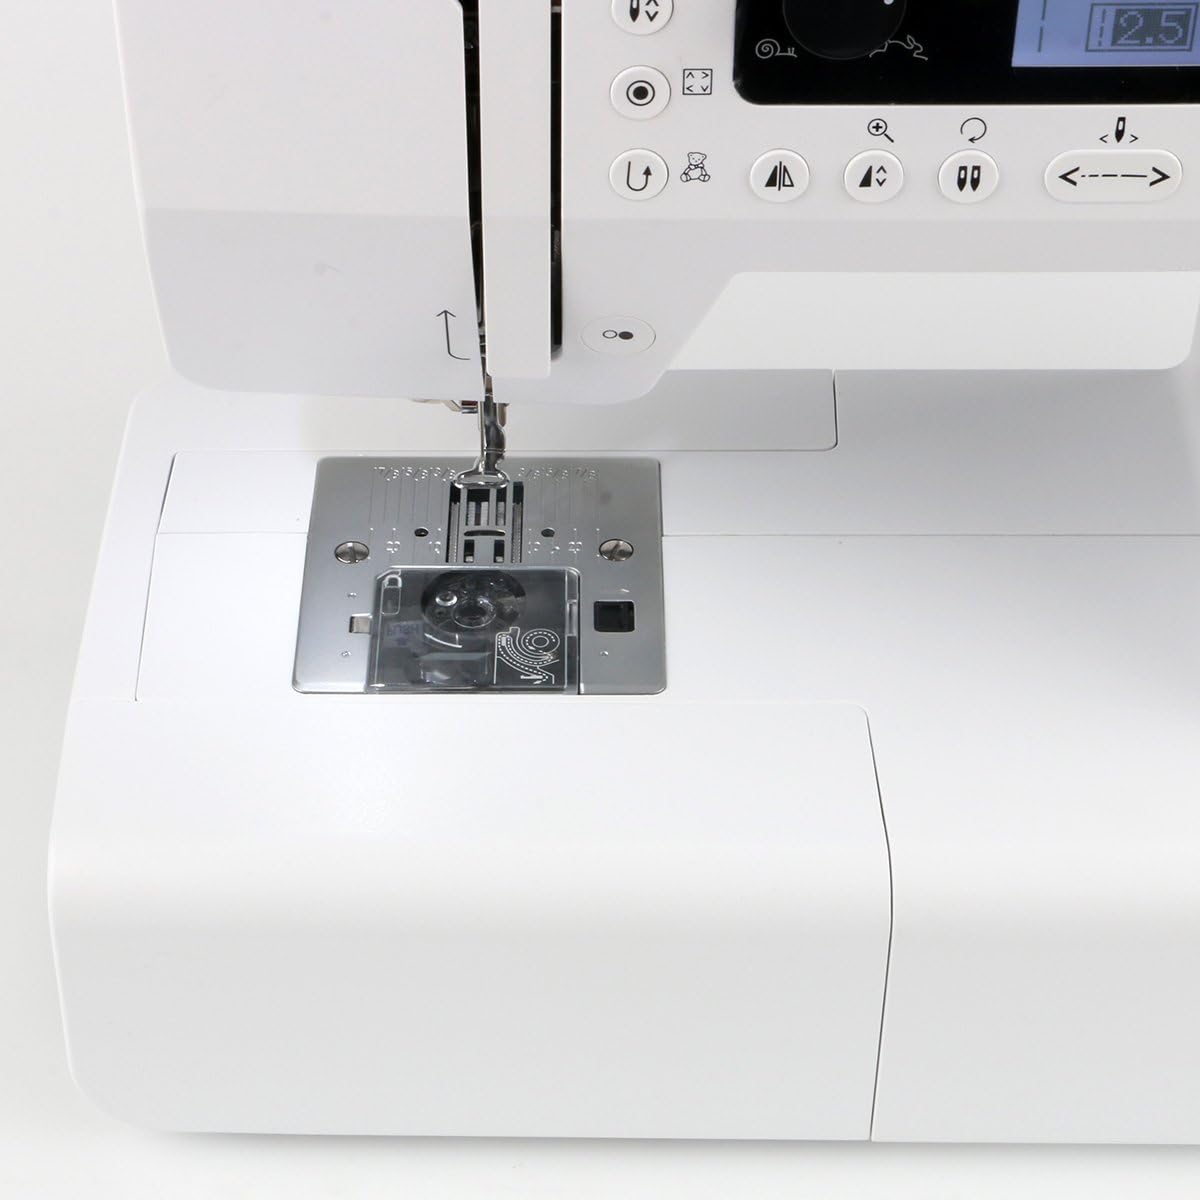
Figura 4: View of the bobbin area with the transparent cover and needle plate, showing the drop-in bobbin system.

Figura 5: Dettaljat view of the needle and presser foot, highlighting the threading path and needle threader.
Selecting Stitches and Settings
The machine's LCD display and control panel allow for easy selection and adjustment of stitches and settings.

Figure 6: The control panel with LCD display for stitch selection and machine settings.
- Direct Stitch Selection: Use the direct selection buttons to quickly choose frequently used stitches.
- Buttuni tan-Navigazzjoni: Use the arrow buttons to navigate through the extensive stitch library displayed on the LCD screen.
- Stitch Width and Length: Adjust stitch width (up to 7mm) and length (up to 4.5mm) using the dedicated buttons or the slider for zigzag width adjustment.
- Kontroll tal-veloċità: The stepless speed adjustment slider allows you to control the sewing speed precisely.
- Pożizzjoni ta' Waqfien tal-Labra: Set the needle to stop in the up or down position using the needle stop button.
- Buttuna Start / Stop: Operate the machine without the foot pedal using the Start/Stop button.
- Ħjata b'lura: Use the reverse button for securing stitches at the beginning and end of seams.
- Funzjoni tal-memorja: Store frequently used stitch combinations in the machine's memory (4 memories, 20 slots).
Embroidery Functionality
The Bernette Chicago 7 transforms into an embroidery machine by attaching the embroidery module.

Figure 7: The machine actively embroidering a design on fabric within the embroidery hoop.
- Embroidery Module Attachment: Ensure the embroidery module is securely attached and the slide-on table is removed.
- Hooping Fabric: Place your fabric, along with appropriate stabilizer, into the embroidery hoop. The maximum embroidery area is 110 x 170 mm.
- Design Selection: Choose from 100 integrated embroidery designs or load designs via USB stick (EXP format supported).
- Editjar tad-Disinn: Utilize functions like mirroring, moving, and 90° rotation to customize your designs.
- Embroidery Speed: The machine operates at a maximum embroidery speed of 600 spm.
- Color Segment Skipping: Skip color segments during embroidery if desired.
Manutenzjoni u Kura
Regular maintenance ensures the longevity and optimal performance of your Bernette Chicago 7.
- Tindif: Regularly clean the bobbin area and feed dog teeth to remove lint and dust. Use the brush provided with your accessories.
- Sostituzzjoni tal-labra: Replace the needle frequently, especially when starting a new project or if the needle shows signs of wear or bending.
- Lubrikazzjoni: Refer to the full instruction manual for specific lubrication points and frequency.
- Ħażna: When not in use, cover the machine with the dust cover to protect it from dust and debris.

Figure 8: The accessory drawer, containing tools useful for maintenance and general operation.

Figura 9: Pjan komprensiv view of all accessories included with the Bernette Chicago 7, including various presser feet, bobbins, and cleaning tools.
Issolvi l-problemi
This section addresses common issues you might encounter during operation. For detailed troubleshooting, consult the comprehensive manual.
| Problema | Kawża Possibbli | Soluzzjoni |
|---|---|---|
| Ponti maqbuża | Incorrect needle, bent needle, improper threading, wrong thread tension. | Ensure correct needle type for fabric, replace bent needle, re-thread machine, adjust tension. |
| It-tkissir tal-ħajt | Incorrect threading, too high tension, poor quality thread, burr on needle plate. | Re-thread machine, reduce upper thread tension, use quality thread, check for burrs. |
| Drapp Mhux Tmigħ | Feed dogs lowered, lint accumulation, presser foot pressure too low. | Raise feed dogs, clean feed dog area, increase presser foot pressure. |
Speċifikazzjonijiet Tekniċi
| Karatteristika | Speċifikazzjoni |
|---|---|
| Numru tal-Mudell | 4260366210536 |
| Dimensjonijiet tal-Prodott (L x W x H) | 44 x 15 x 32 ċm |
| Piż tal-oġġett | 11.6 Kilogrammi |
| Number of Stitch Patterns | 200 (sewing) |
| Number of Embroidery Designs | 100 (integrated) |
| Wisa' Massima tal-Ħjata | 7 mm |
| Tul Massimu tal-Ħjata | 4.5 mm |
| Max. Embroidery Area | 110 x 170 mm |
| Sors tal-Enerġija | Elettriku bil-korda |
| Materjal | Metall |
Garanzija u Appoġġ
The Bernette Chicago 7 comes with a garanzija ta 'sena. For warranty claims, technical support, or service inquiries, please contact Bernette customer service or your authorized dealer.
It is recommended to register your product on the official Bernette website to ensure you receive updates and support information.
For additional resources, including detailed video tutorials and a comprehensive digital manual, please visit the official Bernette support page. Keep your purchase receipt as proof of purchase for warranty purposes.


