Introduzzjoni
The Phanteks Enthoo Primo is a full tower computer case designed for enthusiasts seeking exceptional cooling possibilities and functional design. This manual provides detailed instructions for setting up, operating, maintaining, and troubleshooting your Enthoo Primo case, ensuring optimal performance and longevity.

Figure 1: Phanteks Enthoo Primo Ultimate Full Tower Computer Case (Black/Blue)
Setup u Installazzjoni
Proper installation is crucial for the performance and stability of your system. Follow these steps carefully.
1. Installazzjoni tal-Unità tal-Provvista tal-Enerġija (PSU)
The Enthoo Primo features a unique thermally isolated PSU location at the rear of the case, promoting cooler temperatures and improved cable management.
- Locate the PSU compartment at the bottom rear of the case.
- Slide your PSU into the designated area.
- Waħħal il-PSU bil-viti pprovduti minn wara tal-kaxxa.
Video 1: Animated demonstration of internal case features, including PSU placement, HDD trays, and cable management. This video highlights the thermally isolated PSU location and hidden cable routing.

Figura 2: Wara view of the Enthoo Primo case, showing the PSU mounting area at the bottom.
2. Drive Installation (HDD/SSD)
The case supports up to 6 HDDs with dual repositionable and removable HDD cages, and features Drop-n-Lock double stack SSD brackets.
- Access the hidden HDD trays by removing the side panel.
- Slide your 3.5" HDDs into the trays and secure them.
- For 2.5" SSDs, utilize the removable Drop-n-Lock brackets. These can be installed in three different locations within the case.
- Ensure all drives are securely fastened to prevent vibration.

Figura 3: Intern view of the Enthoo Primo, highlighting the hidden HDD trays and SSD mounting points.
3. Motherboard and Component Installation
The Enthoo Primo supports ATX motherboards and offers ample space for various components.
- Install your ATX motherboard onto the standoffs.
- Install your CPU, RAM, and graphics cards as per their respective manuals.
- Utilize the pre-installed cable management tools behind the motherboard tray to route cables neatly.
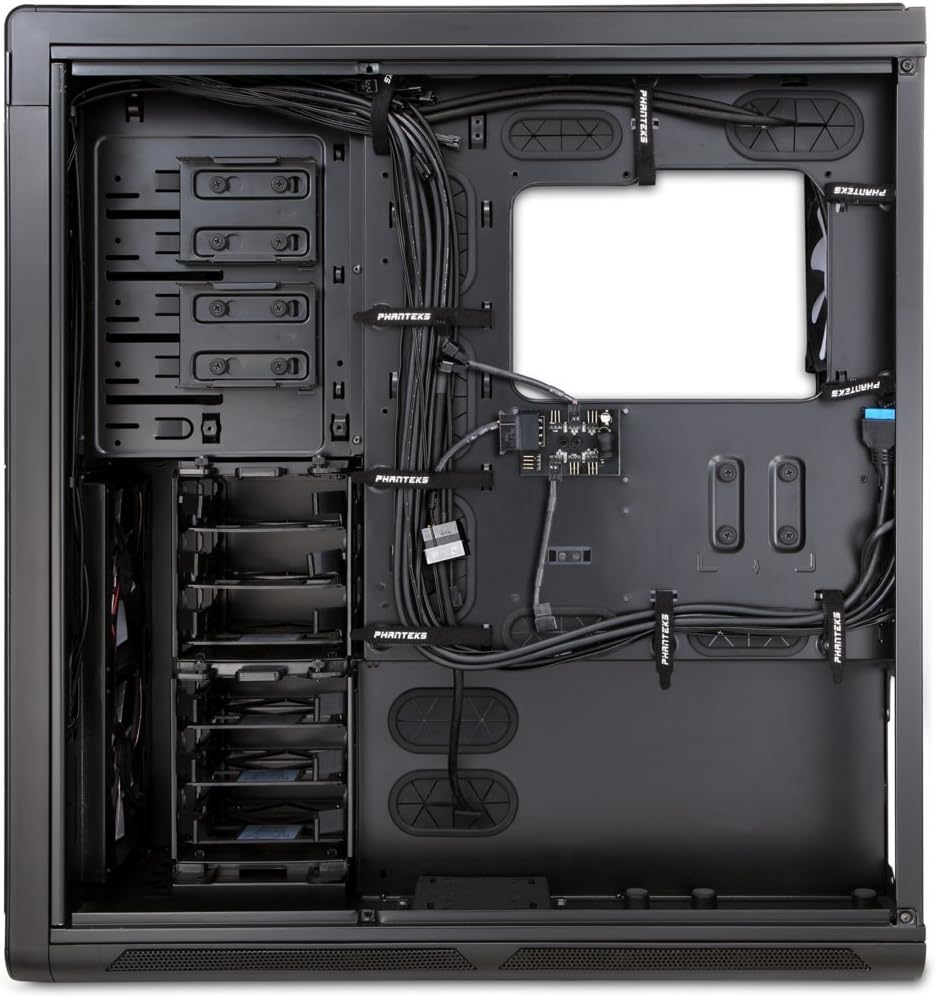
Figura 4: Intern view of the Enthoo Primo, showcasing the cable management features behind the motherboard tray.
Karatteristiċi Operattivi
The Enthoo Primo is designed with user convenience and optimal performance in mind.
Front Panel I / O
The front I/O panel provides easy access to essential ports and controls:
- 2x Portijiet USB 3.0: For high-speed data transfer.
- 2x Portijiet USB 2.0: For standard peripheral connections.
- Mikrofonu Jack: Għal input awdjo.
- Jack Awdjo 3.5mm: Għall-output tal-awdjo.
- Swiċċ LED: Controls the integrated LED lighting (LED strip & Fan LED).

Figure 5: Top angled view of the Enthoo Primo, illustrating the accessible front I/O panel.
Sistema tat-tkessiħ
The Enthoo Primo offers extensive cooling support for both air and liquid cooling configurations.
- Fannijiet installati minn qabel: Includes 1x 140mm fan on top, 2x 140mm LED fans in front, 1x 140mm fan in the rear, and 1x 140mm fan on the bottom. All are Phanteks' PH-F140SP fans.
- Tkessiħ bl-Arja: Supports up to 14x 120mm fans or 11x 140mm fans for comprehensive airflow.
- Tkessiħ bl-Ilma: Provides up to 5 different installation areas for slim and thick radiators (120mm and 140mm form factors), including clearance for push-pull fan configurations. Innovative liquid cooling mounting systems include radiator brackets and a versatile reservoir/pump bracket.

Figura 6: Quddiem view of the Enthoo Primo, showcasing the clean design and intake areas.
Manutenzjoni
Regular maintenance ensures optimal performance and extends the lifespan of your computer case.
- Filtri tat-Trab: The Enthoo Primo features removable dust filters located at the front, top, bottom (2x), and side panel (2x). Regularly remove and clean these filters to maintain optimal airflow and prevent dust buildup inside the case.
- Tindif ta' barra: Uża artab, damp cloth to wipe down the aluminum front and top panels. Avoid abrasive cleaners.
- Tindif ta 'ġewwa: Periodically use compressed air to clear dust from internal components and fan blades. Ensure the system is powered off and unplugged before cleaning.
Issolvi l-problemi
Din it-taqsima tindirizza kwistjonijiet komuni li tista’ tiltaqa’ magħhom.
- Ebda Qawwa:
- Ensure the PSU is properly seated and connected to the motherboard and wall outlet.
- Ivverifika li l-kejbil tas-swiċċ tal-enerġija tal-pannell ta' quddiem huwa konness sew mal-header tal-motherboard.
- Fans Not Spinning / LED Not Lighting:
- Check fan connections to the motherboard or fan hub.
- Ensure the fan hub is powered (SATA connection).
- Verify the LED switch on the front panel is in the 'on' position.
- Portijiet USB Mhux Jaħdmu:
- Confirm that the USB 3.0 and USB 2.0 headers from the front panel are securely connected to the motherboard.
- Storbju Eċċessiv:
- Check if all fans are securely mounted and free from obstructions.
- Ensure drive trays are properly secured to minimize vibration.
- Clean dust filters and fan blades if necessary.
Speċifikazzjonijiet
| Karatteristika | Dettall |
|---|---|
| Isem tal-Mudell | PH-ES813P_BL |
| Tip ta' Każ | Torri sħiħ |
| Kompatibbiltà tal-motherboard | ATX |
| Materjal | Aluminum Faceplates, Steel Chassis |
| Kulur | Iswed/Blu |
| Dimensjonijiet (LxWxH) | 23.62 x 9.84 x 25.59 pulzieri |
| Piż tal-oġġett | 50 liri |
| Portijiet USB 3.0 | 2 |
| Portijiet USB 2.0 | 2 |
| Portijiet Awdjo | 1x Microphone, 1x 3.5mm Audio Jack |
| Slots ta 'Espansjoni | 8 |
| Metodu tat-tkessiħ | Arja / Ilma |
| Fannijiet installati minn qabel | 5x 140mm (1 top, 2 front LED, 1 rear, 1 bottom) |
| Max Fan Support | 14x 120mm or 11x 140mm |
| Appoġġ tar-radjatur | Up to 5 locations (120mm/140mm form factors) |
Garanzija u Appoġġ
For warranty information and technical support, please refer to the official Phanteks webis-sit jew il-manwal sħiħ tal-utent.
You can download the complete user manual in PDF format here: Phanteks Enthoo Primo User Manual (PDF)


