1. Introduzzjoni
This manual provides comprehensive instructions for the installation, operation, and maintenance of the Supermicro X10SLM+-LN4F motherboard. Designed for server applications, this motherboard features an LGA1150 socket, Intel C224 PCH, DDR3 memory support, and multiple Gigabit Ethernet ports. Please read this manual thoroughly before proceeding with installation to ensure proper setup and optimal performance.
2. Prodott Aktarview
The Supermicro X10SLM+-LN4F is a microATX server motherboard built for reliability and performance. Key features include:
- LGA1150 Socket for Intel Xeon E3-1200 v3/v4 and 4th Gen Core i3 processors.
- Intel C224 PCH chipset.
- Four DDR3 DIMM slots supporting up to 64GB ECC/non-ECC UDIMM.
- Multiple SATA3 (6Gbps) ports.
- Integrated quad Gigabit Ethernet ports.
- USB 3.0 and USB 2.0 support.
- VGA output for integrated graphics.
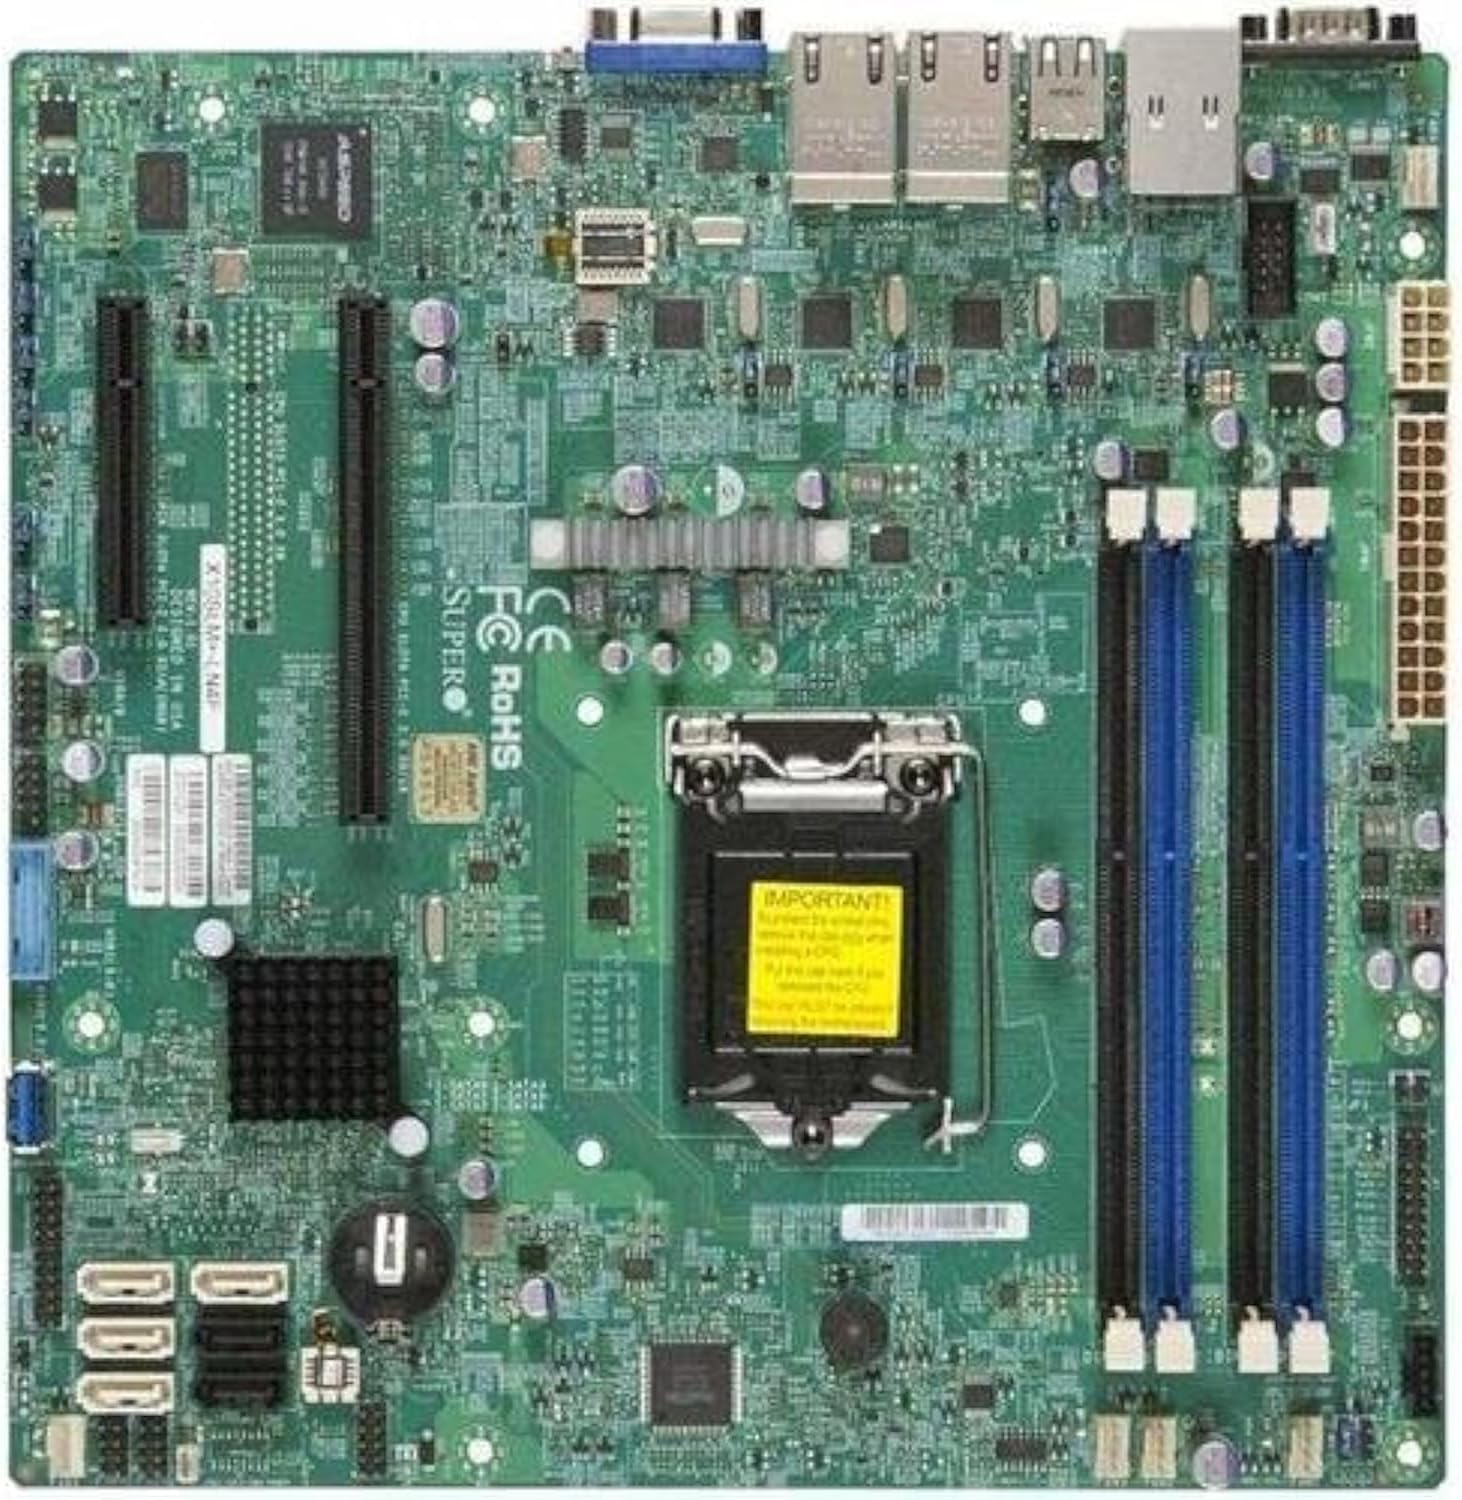
Figura 2.1: Minn fuq għal isfel view of the Supermicro X10SLM+-LN4F motherboard, showing the CPU socket, DIMM slots, PCIe slots, and various connectors.

Figura 2.2: Angolat view of the motherboard, highlighting the layout of components and expansion slots.
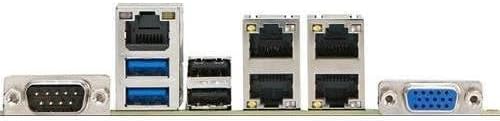
Figura 2.3: Rear I/O panel of the Supermicro X10SLM+-LN4F motherboard, featuring multiple LAN ports, USB ports, and serial ports.
3. Setup u Installazzjoni
Before beginning installation, ensure your system is powered off and disconnected from the power source. Wear an anti-static wrist strap to prevent electrostatic discharge (ESD) damage to components.
3.1. Installazzjoni tas-CPU
- Sib is-sokit tas-CPU LGA1150 fuq il-motherboard.
- Imbotta bil-mod il-lieva tat-tagħbija 'l isfel u iġbdu lejn il-ġenb biex tiftaħ il-qafas taż-żamma tas-sokit tas-CPU.
- Allinja bir-reqqa l-marka trijangulari fuq is-CPU mal-marka korrispondenti fuq is-sokit.
- Place the CPU into the socket without forcing it.
- Close the retention frame and secure it with the load lever.
- Applika saff irqiq u uniformi ta' pejst termali fuq l-ispreader tas-sħana integrat (IHS) tas-CPU.
- Installa l-cooler tas-CPU skont l-istruzzjonijiet tal-manifattur tiegħu.
3.2. Installazzjoni tal-Memorja (RAM)
- Locate the four DDR3 DIMM slots. For optimal performance, refer to the motherboard's specific memory population guidelines, typically starting with slots closest to the CPU or specific colored slots for dual-channel configurations.
- Iftaħ il-klipps taż-żamma fiż-żewġt itruf tas-slott tad-DIMM.
- Allinja l-islott fuq il-modulu tal-memorja DDR3 maċ-ċavetta fl-islott tad-DIMM.
- Daħħal il-modulu tal-memorja sew fl-islott sakemm il-klipps taż-żamma jidħlu f'posthom.
- Ensure both clips are fully closed and the module is seated correctly.
3.3. Installazzjoni ta' Apparat tal-Ħażna
Connect SATA storage devices (HDDs/SSDs) to the SATA ports on the motherboard using SATA data cables. Connect the power cables from your power supply unit (PSU) to the storage devices.
3.4. Installazzjoni tal-Karta tal-Espansjoni
This motherboard features PCI Express (PCIe) slots. To install an expansion card:
- Remove the corresponding slot cover from your chassis.
- Allinja l-kard tal-espansjoni mas-slott tal-PCIe.
- Agħfas 'l isfel sew sakemm il-kard tkun daħlet kompletament fl-islott.
- Secure the card with a screw or retention clip from your chassis.
3.5. Konnessjonijiet tal-Enerġija
- Konnettur tal-Enerġija ATX ta' 24-pin: Connect the main 24-pin power cable from your PSU to the ATX power connector on the motherboard.
- 8-pin EPS/CPU Power Connector: Connect the 8-pin (or 4+4 pin) CPU power cable from your PSU to the EPS connector near the CPU socket.
3.6. Konnessjonijiet tal-I/O tal-Pannell ta' Quddiem u ta' Wara
- Konnetturi tal-Panew ta' Quddiem: Connect the power switch, reset switch, power LED, and HDD activity LED cables from your chassis to the corresponding pins on the motherboard's front panel header. Refer to the motherboard's silkscreen labels for correct orientation.
- Intestaturi USB: Connect front panel USB ports to the onboard USB headers.
- Audio Headers: Connect front panel audio jacks to the onboard audio header.
- Panel I/O ta’ wara: Connect peripherals such as keyboard, mouse, monitor (via VGA), and network cables (to the Gigabit Ethernet ports) to the rear I/O panel.
4. Istruzzjonijiet Operattivi
4.1. Initial Power On and BIOS/UEFI Setup
- After all components are installed and connected, connect the power cord to the PSU and turn on the power switch on the PSU.
- Agħfas il-buttuna tal-qawwa fuq ix-chassis tiegħek.
- Matul it-Test Awtomatiku tal-Power-On (POST), agħfas ripetutament il-buttuna DEL or F2 ċavetta (jew kif indikat fuq l-iskrin) biex tidħol fl-utilità tas-setup tal-BIOS/UEFI.
- In the BIOS/UEFI, configure essential settings such as date and time, boot order, and enable/disable specific features as required for your operating system and hardware.
- Salva l-bidliet u oħroġ mill-BIOS/UEFI. Is-sistema terġa' tibda.
4.2. Installazzjoni tas-Sistema Operattiva
To install an operating system (e.g., Windows, Linux, VMware ESXi):
- Insert the operating system installation media (USB drive or DVD) into the system.
- Boot from the installation media (you may need to adjust the boot order in BIOS/UEFI).
- Follow the on-screen prompts to install the operating system on your chosen storage device.
- After installation, install all necessary drivers for the motherboard components (chipset, LAN, VGA, etc.) from the Supermicro website or the provided driver disc.
5. Manutenzjoni
Manutenzjoni regolari tgħin biex tiżgura l-lonġevità u t-tħaddim stabbli tal-motherboard u s-sistema tiegħek.
5.1. Tindif
- Periodically clean dust from the motherboard and system components using compressed air. Ensure the system is powered off and unplugged before cleaning.
- Evita li tuża prodotti tat-tindif likwidi direttament fuq il-komponenti.
- Ensure proper airflow within the chassis by keeping fan vents clear.
5.2. Firmware and Driver Updates
- Iċċekkja s-Supermicro website periodically for updated BIOS/UEFI firmware and drivers for your motherboard model.
- Follow the provided instructions carefully when updating firmware to avoid system instability.
5.3. Konsiderazzjonijiet Ambjentali
- Operate the motherboard within recommended temperature and humidity ranges to prevent damage.
- Aċċerta ruħek li jkun hemm ventilazzjoni adegwata fix-chassis tas-server.
6 Issolvi l-problemi
Din it-taqsima tipprovdi soluzzjonijiet għal kwistjonijiet komuni li tista’ tiltaqa’ magħhom.
6.1. Ebda Qawwa / Ebda POST (Test Awtomatiku tal-Power-On)
- Verify that the power supply unit (PSU) is connected correctly to the motherboard (24-pin ATX and 8-pin EPS connectors).
- Ensure the PSU is switched on and receiving power from the wall outlet.
- Iċċekkja li l-kejbil tas-swiċċ tal-enerġija tal-pannell ta' quddiem huwa konness sew mal-header tal-motherboard.
- Reseat the CPU, RAM modules, and any expansion cards.
- Try booting with only essential components (CPU, one RAM stick, CPU cooler) to isolate the issue.
- Listen for beep codes from the system speaker, which can indicate specific hardware failures. Refer to the Supermicro website for beep code interpretations.
6.2. Kwistjonijiet tal-Wiri
- Ensure the monitor is properly connected to the motherboard's VGA port.
- Ivverifika li l-monitor ikun mixgħul u ssettjat għas-sors tad-dħul korrett.
- If using a discrete graphics card, ensure it is properly seated and connected to power (if required).
6.3. Is-Sistema Operattiva Mhux Tibbutja
- Check the boot order in the BIOS/UEFI to ensure the correct storage device is prioritized.
- Verify that the operating system is installed correctly on the storage device.
- Ensure SATA data and power cables are securely connected to the storage device and motherboard.
7. Speċifikazzjonijiet
Below are the technical specifications for the Supermicro X10SLM+-LN4F motherboard:
| Karatteristika | Dettall |
|---|---|
| Brand | Supermicro |
| Isem tal-Mudell | X10SLM+-LN4F-B |
| Socket tas-CPU | LGA1150 |
| Tip ta' Ċipset | Intel C224 |
| Teknoloġija tal-Memorja RAM | DDR3 SDRAM |
| Veloċità tal-Memorja | 1600 MHz |
| Kapaċità tal-Ħżin tal-Memorja | Sa 64 GB |
| Numru ta 'USB 2.0 Ports | 2 (I/O ta' wara) |
| Interface tal-Kard Grafika | Integrated, PCI |
| Apparati Kompatibbli | Server |
| Pjattaforma | Windows 10 |
| Piż tal-oġġett | 5.8 liri |
| Dimensjonijiet tal-Prodott (LxWxH) | 10 x 10 x 2 pulzieri |
| Data L-Ewwel Disponibbli | 4 ta’ Ġunju 2013 |
Note: Specifications are subject to change without notice. For the most current information, please refer to the official Supermicro product page.
8. Garanzija u Appoġġ
Għal informazzjoni dettaljata dwar il-garanzija, jekk jogħġbok irreferi għall-karta tal-garanzija inkluża mal-prodott tiegħek jew żur is-sit uffiċjali ta' Supermicro. website. Technical support is available through Supermicro's customer service channels, including their support portal, email, and phone. Please have your product model number (X10SLM+-LN4F) and serial number ready when contacting support.
For the latest drivers, BIOS updates, and additional documentation, please visit: www.supermicro.com


