1. Introduzzjoni
This manual provides detailed instructions for the installation, operation, and maintenance of your Soundstream VL-11A Single DIN Digital Media Receiver. Please read this manual thoroughly before using the product to ensure proper operation and to prevent damage.
The Soundstream VL-11A is designed to provide high-quality audio playback from various digital sources, including USB drives, SD cards, and auxiliary input devices. It features a compact single DIN chassis for easy integration into most vehicle dashboards.
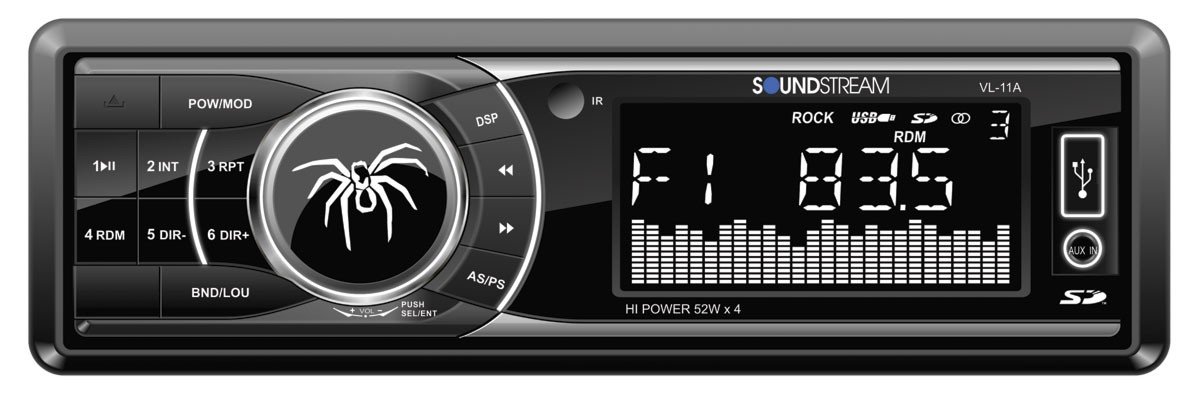
Figura 1.1: Quddiem view of the Soundstream VL-11A Digital Media Receiver. This image displays the main unit with its control buttons and display panel.
2. Informazzjoni dwar is-Sigurtà
Osserva l-prekawzjonijiet ta' sigurtà li ġejjin biex tevita korriment jew ħsara lill-unità:
- Tħaddimx l-unità b'mod li jtelliflek mis-sewqan. Dejjem agħti prijorità lis-sigurtà fit-triq.
- Ensure proper wiring connections. Incorrect wiring can cause fire or damage to the vehicle's electrical system.
- Evita li tesponi l-unità għall-umdità jew temperaturi estremi.
- Tippruvax tiżżarma jew timmodifika l-unità. Irreferi kull servizz lil persunal kwalifikat.
- Żomm il-volum f'livell li jippermettilek tisma' l-ħsejjes tat-traffiku ta' barra.
3. Kontenut tal-Pakkett
Ivverifika li l-oġġetti kollha huma preżenti fil-pakkett:
- Soundstream VL-11A Digital Media Receiver
- Qfil tal-Wajers
- Ħardwer tal-Immuntar (Viti, Kmiem tal-Immuntar)
- Kontroll mill-bogħod
- Manwal għall-Utent (dan id-dokument)
4. Prodott Aktarview
4.1 Kontrolli ta' Front Panel
The front panel provides access to primary functions and media inputs.
Figura 4.1: Illustrative diagram of the VL-11A front panel. This image highlights the display, volume knob, mode button, track controls, USB port, SD card slot, and auxiliary input.
- Buttuna tal-Enerġija / Modalità: Press to turn on/off. Short press to cycle through audio sources (Radio, USB, SD, AUX).
- Buttuna tal-Volum: Dawwar biex taġġusta l-volum. Agħfas biex taċċessa s-settings tal-awdjo (Bass, Treble, Balance, Fader, EQ).
- Wiri: Shows current status, track information, and settings.
- Port USB: Qabbad apparati tal-ħażna USB għad-daqq tal-midja.
- Slot tal-Kard SD: Daħħal karti SD għad-daqq tal-midja.
- Input AUX: Qabbad apparati awdjo esterni permezz ta' jack ta' 3.5mm.
- Buttuni tat-Track/Tune: Navigate tracks or tune radio frequencies.
4.2 Konnessjonijiet ta' wara
The rear of the unit contains the main wiring harness and preamp outputs.
Figura 4.2: Illustrative diagram of the VL-11A rear connections. This image shows the main wiring harness connector and the RCA preamp outputs.
- Ċineg tal-Wajers Prinċipali: Connects to vehicle power, ground, accessory, and speaker wires.
- RCA Preamp Outputs: Two sets of 2V outputs for connecting external ampliifikaturi.
5. Setup
5.1 Installazzjoni
Professional installation is recommended. If installing yourself, ensure the vehicle's battery is disconnected before beginning.
- Immuntar: Insert the metal mounting sleeve into the vehicle's dashboard opening. Bend the tabs to secure it.
- Wiring: Connect the supplied wiring harness to the vehicle's wiring. Match wire colors and functions carefully.
- Konnessjonijiet tal-Ispeaker: Connect the speaker wires from the harness to your vehicle's speakers. Ensure correct polarity.
- Konnessjonijiet tal-Enerġija: Connect the yellow wire (constant 12V), red wire (switched 12V), and black wire (ground) to the appropriate vehicle circuits.
- Antenna: Connect the vehicle's antenna cable to the unit's antenna input.
- Unità Sikura: Slide the VL-11A into the mounting sleeve until it clicks into place.
Warning: Incorrect wiring can cause severe damage to the unit or vehicle. Consult a professional if unsure.
5.2 Qawwa Inizjali
After installation, reconnect the vehicle's battery. Press the power button on the unit or remote control to turn it on. The display should illuminate.
6. Istruzzjonijiet Operattivi
6.1 Kontrolli Bażiċi
- Power On/Off: Agħfas il- PWR/MODE buttuna.
- Aġġustament tal-Volum: Dawwar il- VOLUM pum.
- Għażla tas-Sors: Agħfas qasir il- PWR/MODE button to cycle through Radio, USB, SD, and AUX.
6.2 Settings tal-awdjo
Agħfas il- VOLUM knob to enter the audio menu. Rotate the knob to navigate options and press to select.
- BASS/TREBLE: Adjust bass and treble levels.
- BILANĊ: Adjust audio balance between left and right speakers.
- FADER: Adjust audio balance between front and rear speakers.
- EQ (Ekwalizzatur): Select from preset EQ curves (e.g., Pop, Rock, Classic) or a custom setting.
6.3 Daqq tal-USB/SD
Insert a USB drive into the USB port or an SD card into the SD card slot. The unit will automatically switch to the respective source and begin playback.
- Play/Pawsa: Agħfas il- DĦABBA/PAWŻA buttuna.
- Track Li jmiss / Preċedenti: Agħfas il- LI JMISS / PREV buttuni.
- Navigazzjoni tal-Fowlder: Uża l- FOLDER 'IL FUQ/'L ISFEL buttons (if available on remote or unit).
6.4 Input Awżiljarju (AUX)
Connect an external audio device (e.g., smartphone, MP3 player) to the 3.5mm AUX input on the front panel using an audio cable. Select AUX as the source using the MODALITÀ buttuna.
6.5 Radio Tuner
Select Radio as the source. The unit supports AM/FM bands.
- Għażla tal-Banda: Agħfas il- BANDA button to switch between FM1, FM2, FM3, and AM.
- Irfinar Manwali: Agħfas qasir il- TUNE UP/DOWN buttons to adjust frequency step-by-step.
- Fittex l-Irfinar: Agħfas fit-tul il- TUNE UP/DOWN buttuni biex tfittex awtomatikament l-istazzjon qawwi li jmiss.
- Stazzjonijiet issettjati minn qabel: Press and hold a numbered preset button (1-6) to save the current station. Short press to recall a saved station.
6.6 Kontroll mill-Bogħod
The included remote control provides convenient access to most functions. Point the remote control towards the unit's front panel sensor.
Figura 6.1: Illustrative diagram of the VL-11A remote control. This image shows the various buttons for power, mode, volume, track control, and numeric presets.
7. Manutenzjoni
7.1 Tindif tal-Unità
- Use a soft, dry cloth to wipe the front panel and display.
- Tużax prodotti tat-tindif li joborxu, xama', jew solventi.
- Avoid spraying cleaning solutions directly onto the unit.
7.2 Kura Ġenerali
- Żgura ventilazzjoni xierqa madwar l-unità biex tevita sħana żejda.
- Evita li tpoġġi oġġetti tqal fuq l-unità.
- If the unit is exposed to extreme cold, allow it to warm up before operation to prevent condensation.
8 Issolvi l-problemi
If you encounter issues, refer to the following table before contacting support:
| Problema | Kawża Possibbli | Soluzzjoni |
|---|---|---|
| Ebda qawwa | Blown fuse; Incorrect wiring; Disconnected battery. | Check vehicle fuses and unit fuse. Verify wiring connections. Ensure battery is connected. |
| L-ebda ħoss | Volum baxx wisq; Mute attivat; Wajers tal-ispiker mhux korretti; Sors mhux magħżul. | Increase volume. Deactivate mute. Check speaker connections and polarity. Select correct audio source. |
| Il-USB/SD mhux qed jilgħab | Mhux appoġġjat file format; Corrupt media; Incorrectly inserted device. | Kun żgur li l-midja fiha awdjo appoġġjat files (e.g., WMA). Try a different USB/SD. Reinsert device. |
| Riċeviment tar-radju fqir | Antenna mhux konnessa; Żona b'sinjal dgħajjef. | Iċċekkja l-konnessjoni tal-antenna. Ipprova sintonizza għal stazzjon aktar b'saħħtu. |
| Il-kontroll mill-bogħod ma jaħdimx | Dead battery; Obstruction; Not pointing at sensor. | Replace remote battery. Remove obstructions. Ensure direct line of sight to unit's IR sensor. |
9. Speċifikazzjonijiet
Technical specifications for the Soundstream VL-11A Digital Media Receiver:
- Mudell: VL-11A
- Ditta: Soundstream
- Manifattur: Soundstream
- Dimensjonijiet tal-Prodott: 22.35 x 20.32 x 9.65 ċm
- Piż tal-oġġett: 771.11 g (1.7 Liri)
- Awdjo Wattage: 52 Watt (Mass)
- Numru ta' kanali: 4
- Preamp Outputs: 2 Sets of 2V
- Format tal-Midja: WMA (and other common digital audio formats)
- Karatteristiċi Speċjali: SD Card Input, USB Input, Auxiliary Input
- Tip ta' Konnettur: Awżiljarju, USB, Jack ta' 3.5mm
- Apparati Kompatibbli: Speaker
- Metodu ta' Kontroll: Remote
10. Garanzija u Appoġġ
Soundstream products are designed and manufactured to the highest quality standards. For specific warranty information, please refer to the warranty card included with your product or visit the official Soundstream websit.
For technical support or service inquiries, please contact Soundstream customer service through their official channels. Keep your purchase receipt and product model number (VL-11A) handy when contacting support.


