Introduzzjoni
This manual provides detailed instructions for the safe and proper installation, operation, and maintenance of your Progress Lighting Inspire Collection 9-Light Off-White Linen Shade Traditional Chandelier in Brushed Nickel. Please read all instructions carefully before beginning installation and retain this manual for future reference.
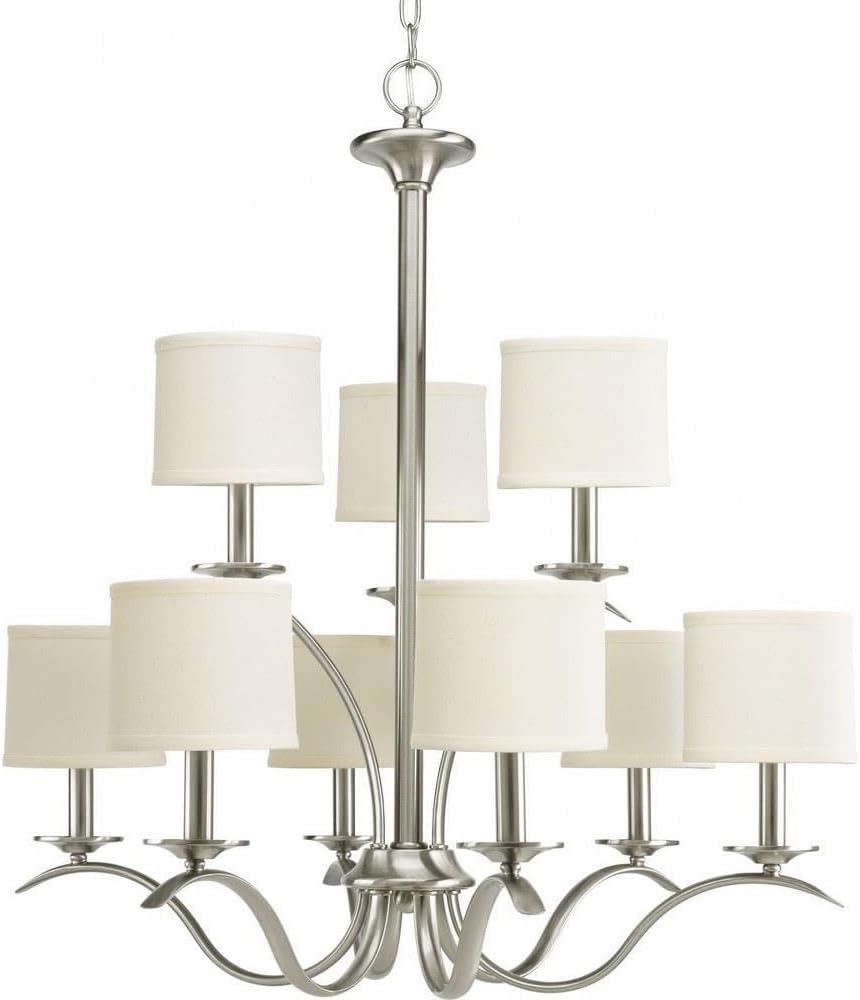
Image: The Inspire Collection 9-Light Chandelier featuring a brushed nickel finish and off-white linen shades.
Informazzjoni dwar is-Sigurtà
TWISSIJA: To reduce the risk of fire, electric shock, or personal injury, always turn off the main power supply at the circuit breaker before installation, removal, or servicing. This product requires professional installation. Always consult a qualified electrician if you are unsure about the installation process.
Propożizzjoni 65 Twissija: Dan il-prodott jista' jkun fih kimiċi magħrufa mill-Istat ta' Kalifornja li jikkawżaw kanċer u difetti fit-twelid jew ħsara riproduttiva oħra. Aħsel idejk wara l-immaniġġjar.
- Ensure all electrical connections are in accordance with local codes and ordinances.
- Uża biss it-tip ta' bozza u wat speċifikatitage biex tevita sħana żejda.
- Do not hang anything from the fixture.
Kontenut tal-Pakkett
Iċċekkja li l-komponenti kollha huma preżenti qabel tibda l-installazzjoni:
- Chandelier fixture assembly
- 9 Off-white linen shades
- Ceiling chain (6 feet of 9 gauge chain supplied)
- Wiring elettriku
- Mounting hardware (may require additional screws not included)
- Folja ta 'Installazzjoni
Setup u Installazzjoni
Professional installation is recommended for this chandelier. Follow these general steps, referring to the included installation sheet for specific details.
1. Ipprepara għall-Installazzjoni
- Itfi l-enerġija fis-circuit breaker.
- Carefully unpack the fixture and components.
- Determine the desired hanging height. For an 8-foot ceiling, the bottom of the chandelier should be 30-36 inches above a dining table. For higher ceilings, divide the vertical space into thirds and position the chandelier two-thirds of the distance from the floor, ensuring at least 7 feet of clearance from the floor in areas where people walk underneath.
2. Mount the Fixture
- Waħħal il-bracket tal-immuntar mal-kaxxa tal-junction fis-saqaf.
- Adjust the chain length as needed. The supplied chain is 6 feet long.
- Thread the electrical wires through the chain and canopy.
3. Konnessjonijiet elettriċi
- Connect the fixture's ground wire to the ground wire from the junction box.
- Connect the fixture's 'white or identified' wire (often with ridges) to the white (neutral) wire from the junction box.
- Connect the fixture's 'plain or black' wire to the black (hot) wire from the junction box.
- Sikura l-konnessjonijiet kollha bil-ġewż tal-wajer u tejp elettriku.
4. Assemblea Finali
- Secure the canopy to the ceiling.
- Install 9 candelabra-shaped bulbs (E26 base, maximum 60 watts each). Note: Only candelabra-shaped bulbs can be used with the shades.
- Attach the off-white linen shades to each light socket.
- Irrestawra l-enerġija fis-circuit breaker.
Gwida tal-Installazzjoni Viżwali
Vidjo: Deskrizzjoni komprensivaview of chandelier installation by Progress Lighting, demonstrating key steps and considerations for proper setup.
Dimensjonijiet tal-Prodott

Image: Dimensional drawing of the chandelier, indicating a width of 29.38 inches and a height of 31 inches.
Istruzzjonijiet Operattivi
Once properly installed, your chandelier can be operated using a standard wall switch. If your electrical setup includes a dimmer switch, ensure it is compatible with incandescent bulbs for optimal performance.
The fixture's switch type is listed as 'Pull Chain' in some specifications, however, the primary control is typically via a wall switch for chandeliers of this design. Please refer to your specific home wiring and switch setup.
Manutenzjoni
Tindif
- Dejjem itfi l-elettriku qabel ma tnaddaf.
- Imsaħ l-apparat b'ċarruta ratba u niexfa.
- Tużax prodotti tat-tindif jew solventi li joborxu għax jistgħu jagħmlu ħsara lill-finitura.
- The linen shades can be gently dusted or spot cleaned with a damp drapp jekk meħtieġ.
Sostituzzjoni tal-Bozza
- Ensure power is off and bulbs have cooled before replacing.
- Unscrew old bulbs and screw in new E26 candelabra-shaped bulbs.
- Taqbiżx il-wat massimutage ta '60 watts kull bozza.
Issolvi l-problemi
If your chandelier is not functioning correctly, refer to the following common issues:
- Ebda Dawl: Check the circuit breaker, ensure bulbs are securely screwed in, and verify all electrical connections are tight.
- Dwal li jteptep: Ensure bulbs are fully tightened. If using a dimmer, confirm it is compatible with the bulb type and that the bulbs are dimmable.
- Loose Fixture: Re-check mounting hardware and ensure it is securely fastened to the ceiling junction box.
Jekk il-problemi jippersistu, ikkonsulta elettriċista kwalifikat.
Speċifikazzjonijiet
| Brand | Progress Progress |
| Isem tal-Mudell | Ispira |
| Numru tal-Parti | P4638-09 |
| Kulur | Nikil brushed |
| Materjal | Azzar Liga |
| Materjal tad-dell | Għażel |
| Stil | Transizzjonali |
| Formola ta' Tagħmir tad-Dawl | Chandelier |
| Dimensjonijiet tal-Prodott | 29.38"T x 29.38"W x 31"Għ |
| Piż tal-oġġett | 15 Liri |
| Numru ta' Sorsi tad-Dawl | 9 |
| Bażi tal-Bozza | E26 |
| Wattage | 60 watts (għal kull bozza) |
| Voltage | 120 Volts |
| Użu fuq ġewwa/barra | Ġewwa |
| Karatteristika Speċjali | Elenkat UL |
Informazzjoni dwar Garanzija
Dan il-prodott ta' Progress Lighting huwa kopert minn Garanzija Limitata ta' sena. This warranty guarantees your complete satisfaction with your purchase and includes professional after-sales customer service support. Please retain your proof of purchase for warranty claims.
Appoġġ għall-Klijent
For further assistance, technical support, or warranty inquiries, please visit the official Progress Lighting website or contact their customer service department. Refer to the packaging or the Progress Lighting websit għal informazzjoni ta' kuntatt attwali.


