1. Introduzzjoni
The Velleman DVM810 is a compact and economical 3 1/2 digit digital multimeter designed for measuring DC and AC voltages, DC currents, resistance, and for performing diode and transistor (hFE) tests. It features overload protection and automatic polarity indication, making it suitable for hobbyists, field use, and workshops. This manual provides essential information for the safe and effective operation of your DVM810 multimeter.
2. Karatteristiċi tal-prodott
- Automatic polarity indication
- Voltage measurements: AC 500V and DC 500V maximum
- Current measurements: DC 10A maximum (0.2A fused, 10A unfused)
- Resistance measurements: Up to 2MΩ
- Diode and transistor (hFE) test functions
- Protezzjoni ta 'tagħbija żejda
- Compact design with 3 1/2 digit LCD display
3. Kontenut tal-Pakkett
Jekk jogħġbok iċċekkja l-kontenut tal-pakkett biex tiżgura li l-oġġetti kollha huma preżenti:
- Velleman DVM810 Multimetru Diġitali
- Wavel tat-Test (wieħed aħmar, wieħed iswed)
- Manwal ta' Istruzzjoni
4. Informazzjoni Importanti dwar is-Sigurtà
Read all safety warnings and instructions carefully before using this product. Failure to follow these instructions may result in electric shock, fire, or serious injury.
- Dejjem kun żgur li l-multimetru huwa ssettjat għall-funzjoni u l-firxa korretti qabel ma tieħu xi kejl.
- Never exceed the maximum input limits for any range. The maximum voltage for AC/DC is 500V.
- Do not attempt to measure current on circuits with voltages jaqbeż it-250V.
- Inspect test leads for damaged insulation or exposed metal before each use. Replace damaged leads immediately.
- Tużax il-multimetru jekk jidher li huwa bil-ħsara jew jekk il-kaxxa tkun miftuħa.
- Exercise extreme caution when working with live circuits. Use appropriate personal protective equipment.
- Always disconnect power to the circuit and discharge high-voltage capacitors before measuring resistance or performing diode/transistor tests.
- Replace the battery when the low battery indicator appears on the display to ensure accurate readings.
5. Prodott Aktarview
Familiarize yourself with the components of your Velleman DVM810 multimeter:
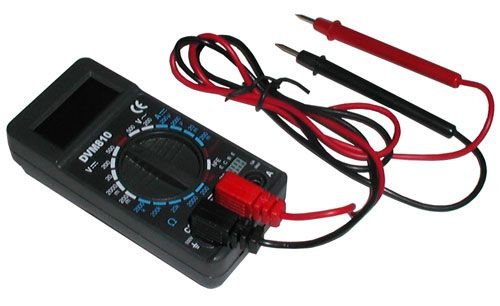
Figure 1: Velleman DVM810 Digital Multimeter. This image displays the front view of the compact multimeter, highlighting its liquid crystal display (LCD), the central rotary function switch, and the input jacks for test leads at the bottom.
- Display LCD: Shows measurement readings, units, and polarity.
- Swiċċ li jdur: Użat biex jagħżel il-funzjoni u l-firxa tal-kejl mixtieqa.
- Ġakkijiet tad-dħul:
- COM Jack: Common (negative) input for all measurements. Connect the black test lead here.
- Ġakk VΩmA: Input pożittiv għall-volumtage, resistance, and current measurements up to 200mA. Connect the red test lead here.
- Ġakk 10A: Positive input for high current measurements (up to 10A). Connect the red test lead here for 10A measurements.
- Test Leads: Red and black leads used to connect the multimeter to the circuit under test.
6. Setup
6.1 Installazzjoni tal-batterija
The DVM810 multimeter requires a 9V battery (not always included). To install or replace the battery:
- Ensure the multimeter is turned OFF (rotary switch set to OFF).
- Sib l-għatu tal-kompartiment tal-batterija fuq wara tal-unità.
- Neħħi l-vit(i) li jassiguraw l-għatu u erfagħh bir-reqqa.
- Qabbad batterija ġdida ta' 9V mal-klipp tal-batterija, filwaqt li tosserva l-polarità korretta.
- Poġġi l-batterija fil-kompartiment u erġa’ poġġi l-għatu, billi twaħħlu bil-vit(i).
6.2 Konnessjoni tal-wajers tat-test
Always connect the test leads correctly for accurate and safe measurements:
- Daħħal iċ-ċomb iswed tat-test fil- COM ġakk (komuni).
- Għal ħafna kejl (voltage, resistance, diode, hFE, and current up to 200mA), insert the red test lead into the VΩmA jack.
- Għal kejl ta' kurrent għoli (sa 10A), daħħal il-wajer tat-test aħmar fil- 10A jack.
7. Istruzzjonijiet Operattivi
Before making any measurement, ensure the test leads are correctly connected and the rotary switch is set to the appropriate function and range.
7.1 Kejl DC Voltage (V=)
- Daħħal iċ-ċomb aħmar fil- VΩmA jack and the black lead into the COM jack.
- Issettja s-swiċċ rotatorju għall-Volum DC mixtieqtage (V=) range. Start with the highest range if the voltage mhux magħruf.
- Connect the test leads across the component or circuit to be measured (in parallel).
- Aqra l-voltage value on the LCD display. The display will show the correct polarity.
7.2 Kejl AC Voltage (V~)
- Daħħal iċ-ċomb aħmar fil- VΩmA jack and the black lead into the COM jack.
- Issettja s-swiċċ rotatorju għall-Volum AC mixtieqtage (V~) range. Start with the highest range if the voltage mhux magħruf.
- Connect the test leads across the component or circuit to be measured (in parallel).
- Aqra l-voltage valur fuq il-wiri LCD.
7.3 Measuring DC Current (A=)
Caution: Never connect the multimeter in parallel with a voltagsors elettroniku meta tkejjel il-kurrent, għax dan jista' jaħraq il-fjus jew jagħmel ħsara lill-miter.
- Determine the expected current. For currents up to 200mA, insert the red lead into the VΩmA jack. For currents up to 10A, insert the red lead into the 10A jack. Always insert the black lead into the COM jack.
- Set the rotary switch to the appropriate DC Current (A=) range. Start with the highest range if the current is unknown.
- Turn off power to the circuit. Open the circuit where the current is to be measured.
- Qabbad il-multimetru f'serje maċ-ċirkwit.
- Restore power to the circuit and read the current value on the LCD display.
7.4 Kejl tar-Reżistenza (Ω)
Caution: Ensure the circuit is completely de-energized and all capacitors are discharged before measuring resistance.
- Daħħal iċ-ċomb aħmar fil- VΩmA jack and the black lead into the COM jack.
- Set the rotary switch to the desired Resistance (Ω) range. Start with a higher range if the resistance is unknown.
- Qabbad il-wajers tat-test mal-komponent li għandu jitkejjel.
- Aqra l-valur tar-reżistenza fuq id-displej LCD.
7.5 Test tad-Diode
Caution: Ensure the diode is disconnected from the circuit or the circuit is de-energized before testing.
- Daħħal iċ-ċomb aħmar fil- VΩmA jack and the black lead into the COM jack.
- Set the rotary switch to the Diode symbol (→|).
- Qabbad il-wajer aħmar mal-anodu u l-wajer iswed mal-katodu tad-dijodu. Id-displej se juri l-volum 'il quddiem.tagtnaqqis fl-e (tipikament 0.5V sa 0.8V għal dijodi tas-silikon).
- Reverse the leads. The display should show 'OL' (Overload) for a good diode. If it shows a reading in both directions or 'OL' in both directions, the diode may be faulty.
7.6 Test tat-Tranżistor (hFE)
Caution: Ensure the transistor is disconnected from the circuit before testing.
- Daħħal iċ-ċomb aħmar fil- VΩmA jack and the black lead into the COM jack.
- Issettja l-iswiċċ li jdur fil-pożizzjoni hFE.
- Identify if the transistor is NPN or PNP. Insert the transistor's emitter, base, and collector leads into the corresponding holes in the hFE socket on the multimeter.
- Read the hFE (DC current gain) value on the LCD display.
8. Speċifikazzjonijiet
| Parametru | Valur |
|---|---|
| Brand | Velleman |
| Numru tal-Mudell | DVM810 |
| Tip ta' Kejl | Multimetru |
| DC Voltage Firxa | Sa 500V |
| AC Voltage Firxa | Sa 500V |
| Medda tal-Kurrent DC | Up to 10A (0.2A fused, 10A unfused) |
| Firxa tar-reżistenza | Sa 2MΩ |
| Test tad-Diode | Iva |
| Test tat-Tranżistor (hFE) | Iva |
| Wiri | 3 1/2 Digit LCD |
| Sors tal-Enerġija | Batterija ta' 9V (mhux inkluża) |
| Dimensjonijiet | Madwar 3.70" x 1.81" x 1.03" |
| Piż tal-oġġett | Madwar 3.2 uqija (0.2 lbs) |
| UPC | 836479002272 |
9. Manutenzjoni
9.1 Sostituzzjoni tal-batterija
When the low battery indicator appears on the LCD, replace the 9V battery as described in Section 6.1. A weak battery can lead to inaccurate readings.
9.2 Tindif
Biex tnaddaf il-multimetru, imsaħ il-kaxxa b'adamp cloth and a mild detergent. Do not use abrasives or solvents. Ensure the unit is completely dry before use.
9.3 Spezzjoni tal-wajer tat-test
Regularly inspect the test leads for any signs of damage, such as cracked insulation, exposed wires, or loose connections. Replace damaged leads immediately to prevent electric shock hazards.
10 Issolvi l-problemi
- L-ebda wiri jew wiri dgħajjef: Iċċekkja l-batterija. Ibdelha jekk meħtieġ.
- Qari mhux korrett:
- Ensure the rotary switch is set to the correct function and range.
- Iċċekkja l-volum tal-batterijatage; replace if low.
- Kun żgur li l-wajers tat-test huma konnessi sew u mhux bil-ħsara.
- Għall-kejl tar-reżistenza, kun żgur li ċ-ċirkwit ma jkunx enerġizzat.
- 'OL' (Tagħbija żejda) murija: The measured value exceeds the selected range. Select a higher range or ensure the circuit is within the meter's capabilities.
- Fuse blown (during current measurement): If the meter stops measuring current, the internal fuse may have blown. Refer to a qualified technician for fuse replacement.
11. Garanzija u Appoġġ
Warranty information for the Velleman DVM810 Digital Multimeter is typically provided with your purchase documentation or can be found on the official Velleman website. For technical support, service, or further inquiries, please refer to the contact information provided by your retailer or the manufacturer's official support channels.


