1. Introduzzjoni
This manual provides detailed instructions for the installation, operation, and maintenance of your AZZA Solano 1000R CSAZ-1000R Full Tower Computer Case. Please read this manual thoroughly before beginning installation to ensure proper setup and to maximize the performance and longevity of your system components.
2. Karatteristiċi tal-prodott
- Ġestjoni Termali Ottimizzata: Features multiple fans for superior cooling, including a 230mm top fan, a 230mm side fan, two 140mm front fans, and a 120mm rear fan.
- Bottom-Mounted Power Supply: Designed for improved thermal separation and stability, allowing installation facing up or down.
- Ġestjoni Avvanzata tal-Kejbils: Pre-drilled motherboard tray and ample space behind for organized cable routing, enhancing airflow and aesthetics.
- Tool-Less Design: Thumb screws for easy installation of optical drives and hard disk drives.
- I/O Konvenjenti minn Quddiem: USB and audio ports, along with an eSATA port, located on the top panel for easy access.
- Intern Spazjuż: Full tower design accommodates large components, including extended graphics cards and tall CPU coolers.
- Disinn Estetiku: Black exterior with a vibrant red painted interior and red LED fans.
3. Kontenut tal-Pakkett
Jekk jogħġbok ivverifika li l-oġġetti kollha huma preżenti fil-pakkett tiegħek:
- AZZA Solano 1000R CSAZ-1000R Full Tower Case
- Kaxxa tal-Aċċessorji (li fiha viti, standoffs, rabtiet tal-kejbil, eċċ.)
- Manwal għall-Utent (dan id-dokument)
4. Komponent Aktarview
4.1 Esterni Views
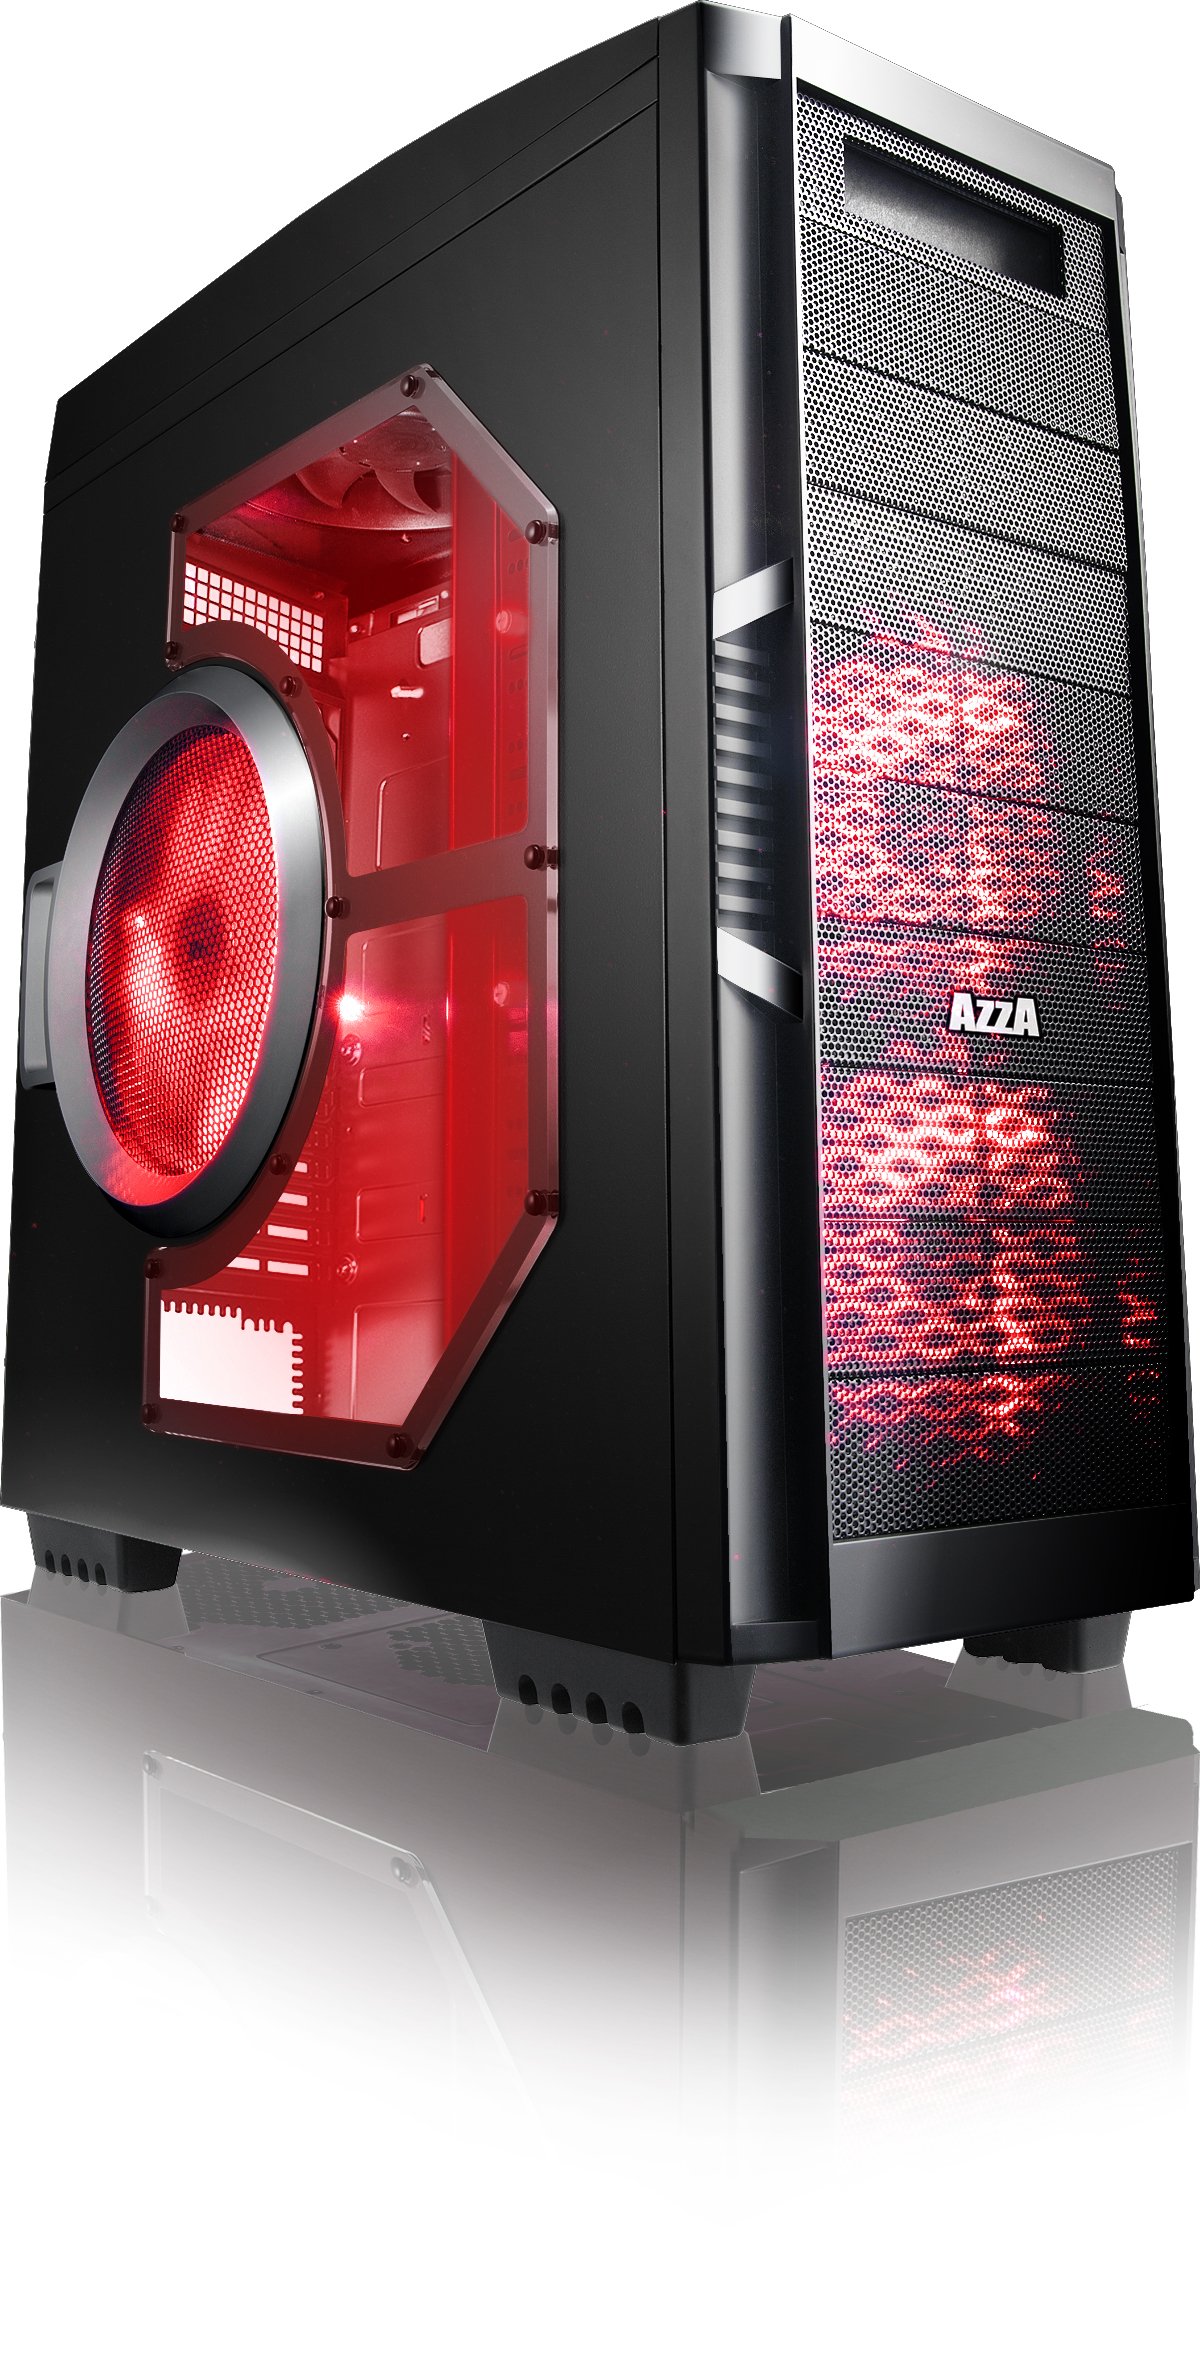
Figura 4.1: Naħa ta' quddiem view of the AZZA Solano 1000R case, showcasing the red LED fans on the front and side panel.

Figura 4.2: Quddiem view of the AZZA Solano 1000R case, highlighting the two 140mm red LED intake fans behind the mesh panel.

Figura 4.3: Ġenb view of the AZZA Solano 1000R case, showing the large 230mm red LED side panel fan and the transparent window.

Figura 4.4: Angolat minn fuq 'il quddiem view of the AZZA Solano 1000R case, showing the top ventilation grille, front I/O panel with USB and audio ports, and power button.
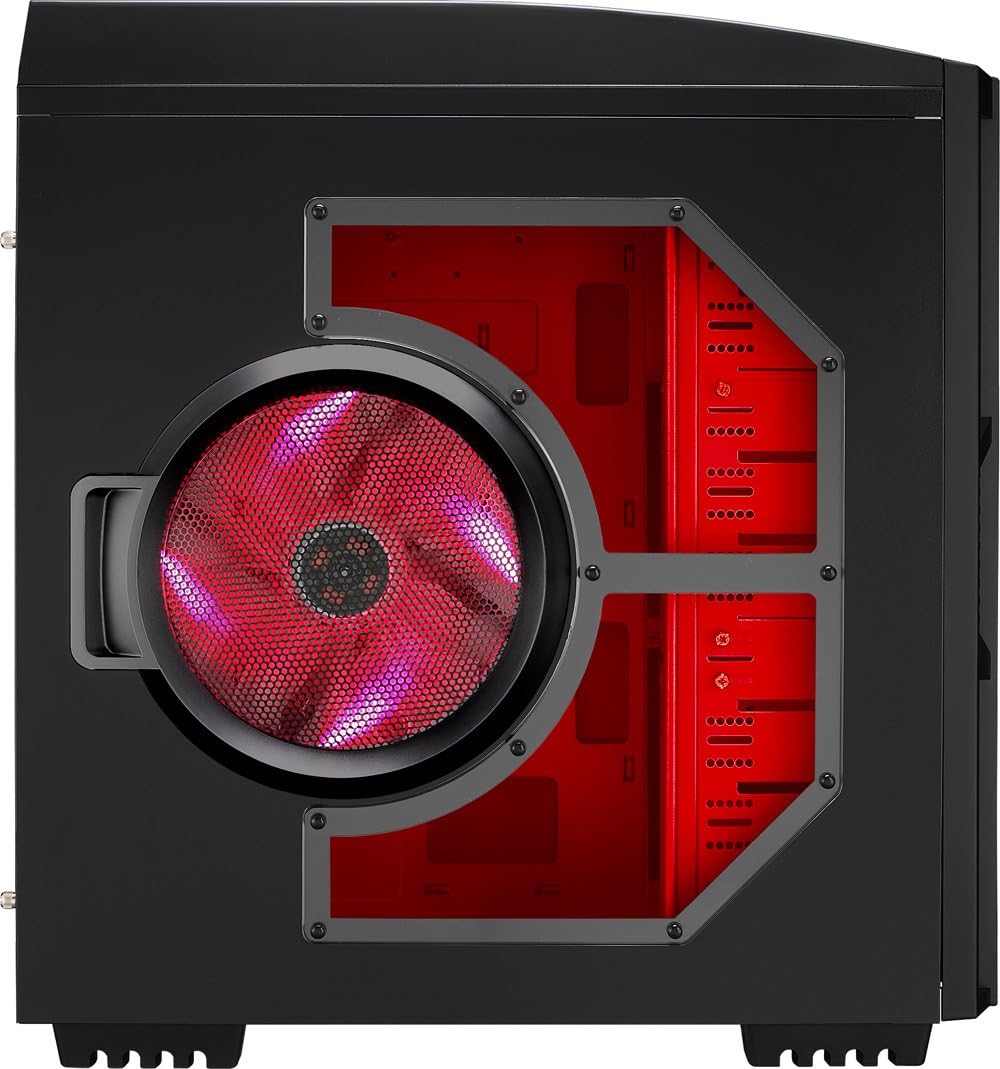
Figura 4.5: In-naħa ta' wara view of the AZZA Solano 1000R case, displaying the red interior, rear exhaust fan, and expansion slots.
4.2 Intern Views

Figura 4.6: Intern view of the AZZA Solano 1000R case with the left side panel removed, revealing the red painted motherboard tray, drive bays, and cable routing cutouts.

Figure 4.7: Angled interior view of the AZZA Solano 1000R case, focusing on the multiple 5.25" and 3.5" drive bays.

Figure 4.8: Angled interior view of the AZZA Solano 1000R case, showing the rear 120mm exhaust fan, expansion slots, and the extensive drive bay structure.

Figura 4.9: Intern view of the AZZA Solano 1000R case with the right side panel removed, showing the space behind the motherboard tray for cable management.
5. Gwida għall-Installazzjoni
Before beginning installation, ensure your workspace is clean and static-free. It is recommended to wear an anti-static wrist strap.
5.1 Tħejjija tal-Każ
- Poġġi l-kaxxa fuq wiċċ ċatt u stabbli.
- Neħħi l-pannelli tal-ġenb billi tneħħi l-viti tas-swaba' fuq wara tal-kaxxa u tiżżerżaq il-pannelli lura.
5.2 Installazzjoni tal-Motherboard
- Install the I/O shield provided with your motherboard into the opening at the rear of the case.
- Align the motherboard with the pre-installed standoffs. If necessary, install additional standoffs according to your motherboard's form factor.
- Carefully place the motherboard onto the standoffs, ensuring the I/O ports align with the shield.
- Waħħal il-motherboard bil-viti xierqa mill-kaxxa tal-aċċessorji.
5.3 Installazzjoni tal-Provvista tal-Enerġija
- Position the power supply unit (PSU) in the bottom-rear compartment of the case. You can orient it with the fan facing up or down, depending on your cooling preference and PSU design.
- Secure the PSU to the case using the screws provided with your power supply.
5.4 Installazzjoni ta' Drive tal-Ħażna (HDD/SSD)
- For 3.5" HDDs, slide the drive into an available drive bay until it clicks into place. Use the provided thumb screws for additional security if desired.
- For 2.5" SSDs, an adapter bracket (not included) may be required to fit into the 3.5" bays. Secure the SSD to the adapter, then install the adapter into a 3.5" bay.
- Connect the SATA data and power cables to your installed drives.
5.5 Optical Drive Installation
- Remove the desired 5.25" front bay cover from the case.
- Slide the optical drive into the bay from the front until it aligns with the screw holes.
- Secure the optical drive using the provided thumb screws.
- Connect the SATA data and power cables to the optical drive.
5.6 Installazzjoni tal-Karta tal-Espansjoni
- Neħħi l-għata tas-slott ta' espansjoni meħtieġa minn wara tal-kaxxa.
- Insert your graphics card or other expansion card into the appropriate PCIe/PCI slot on your motherboard.
- Secure the card with the provided screw or tool-less latch mechanism.
5.7 Ġestjoni tal-Cable
Utilize the cutouts and space behind the motherboard tray to route and organize your cables. This improves airflow and gives your build a cleaner appearance. Use cable ties from the accessory box to bundle cables.
5.8 Konnessjoni tal-I/O tal-Pannell ta' Quddiem
Connect the front panel cables (USB, Audio, Power Switch, Reset Switch, Power LED, HDD LED) to the corresponding headers on your motherboard. Refer to your motherboard manual for exact header locations.
6. Operazzjoni
6.1 Power On/Off
Press the power button located on the top panel to turn your system on or off. A power LED will illuminate when the system is active.
6.2 Kontroll tal-fann
The case features a fan speed control switch (L/M/H) at the rear, primarily for the top, side, and rear fans. Adjust this switch to balance cooling performance and noise levels according to your preference.
7. Manutenzjoni
7.1 Tindif
Regular cleaning helps maintain optimal airflow and component longevity.
- Barra: Imsaħ l-uċuħ ta 'barra b'artab, damp drapp. Evita cleaners li joborxu.
- Filtri tat-Trab: The case includes mesh filters at the bottom. Periodically remove and clean these filters to prevent dust buildup.
- Intern: Use compressed air to remove dust from inside the case, especially from fans and heatsinks. Ensure the system is powered off and unplugged before cleaning the interior.
8 Issolvi l-problemi
- Is-Sistema Mhux Tixgħel: Kun żgur li l-kejbils tal-enerġija kollha (24-pin ATX, 8-pin CPU, GPU power) huma konnessi sew. Ivverifika li s-swiċċ tal-PSU jinsab fil-pożizzjoni 'ON'. Iċċekkja l-konnessjoni tas-swiċċ tal-enerġija tal-pannell ta' quddiem mal-motherboard.
- Fannijiet Mhux Iduru: Check fan power connections to the motherboard or fan controller. Ensure the fan speed switch is not set to 'Off' or 'Low' if fans are not spinning at all.
- Side Panel Not Closing: If a large CPU cooler or tall components prevent the side panel from closing, especially due to the side fan, consider relocating the side fan to the exterior of the panel if possible, or ensure your cooler fits within the case's clearance specifications.
- Cable Management Difficulty: If the rear panel bulges due to thick cables, try rerouting cables more efficiently or using flatter cables where possible.
9. Speċifikazzjonijiet
| Karatteristika | Dettall |
|---|---|
| Numru tal-Mudell | CSAZ-1000R |
| Tip ta' Każ | Torri sħiħ |
| Kulur | Iswed/Aħmar |
| Dimensjonijiet tal-Prodott (L x W x H) | 19.7 x 8.1 x 21.5 pulzieri (500 x 206 x 546 mm) |
| Piż tal-oġġett | 24 liri (10.89 kg) |
| Metodu tat-tkessiħ | Arja |
| Tip ta' Immuntar tal-Provvista tal-Enerġija | Mount tal-qiegħ |
| Portijiet USB totali | 2 (USB 2.0) + 1 (eSATA) |
| Appoġġ għall-Fattur tal-Forma tal-Hard Disk | 3.5 Pulzier |
| Fannijiet Inklużi | 2x 230mm (Top, Side), 2x 140mm (Front), 1x 120mm (Rear) |
10. Garanzija u Appoġġ
Għal informazzjoni dwar il-garanzija u appoġġ tekniku, jekk jogħġbok irreferi għall-AZZA uffiċjali webis-sit jew ikkuntattja lill-bejjiegħ lokali tiegħek. Żomm il-prova tax-xiri tiegħek għal talbiet ta' garanzija.


