1. Introduzzjoni
1.1 Dwar Dan il-Manwal
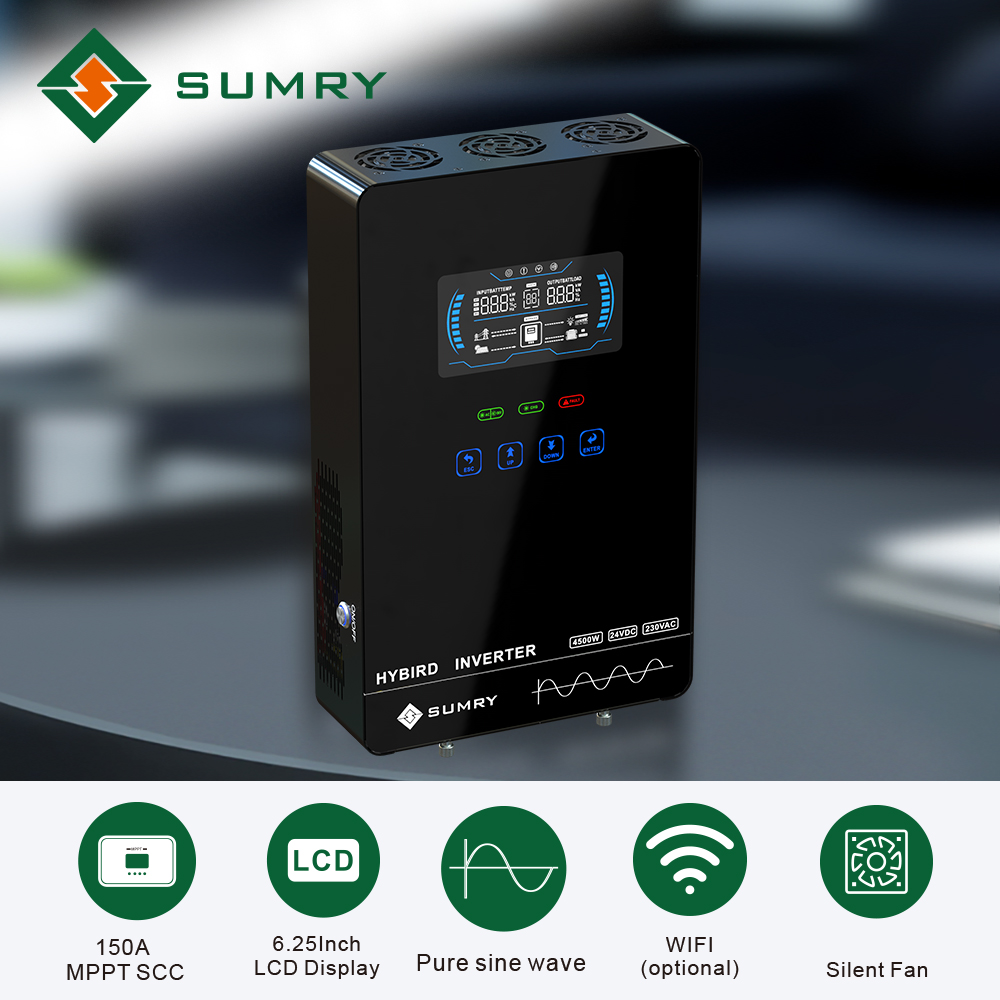
This manual describes the assembly, installation, operation, and troubleshooting of the Sumry HGX 4KW Hybrid Inverter. Please read this manual carefully before installation and operation, and keep it for future reference.
Dan il-manwal jipprovdi linji gwida dwar is-sigurtà u l-installazzjoni, kif ukoll informazzjoni dwar għodod u wajers.
1.2 Karatteristiċi
- Off-grid solar inverter
- No battery function available (can power loads directly from PV array without battery connected)
- Under Battery Mode, AC voltage can be adjusted to 100VAC, 110VAC, and 120VAC.
- Utility power, battery, and PV power complement each other
- Inverter solari tal-mewġ sine pur
- Unique glass top cover design with 6.25-inch LCD display and touchable buttons
- Built-in 140A MPPT (Max PV 5600W) solar charger
- Firxa għolja ta 'input PV minn 55V-450Vdc
- Disinn intelliġenti tal-ċarġer tal-batterija għal prestazzjoni ottimizzata tal-batterija
- Prijorità ta 'input AC/batterija konfigurabbli permezz ta' setting LCD
- Ristartja awtomatikament waqt li l-PV ikun qed jirkupra
- Over-load, over-temperature, and output short circuit protection
- Funzjoni ta 'startjar kiesaħ
- Attivazzjoni awtomatika tal-batterija tal-litju integrata
- Komunikazzjoni ma RS232/RS485
- Funzjoni ta 'monitoraġġ WiFi (mhux obbligatorju)
- Anti-dust kit for harsh environment (optional)
- Restore default settings with one click
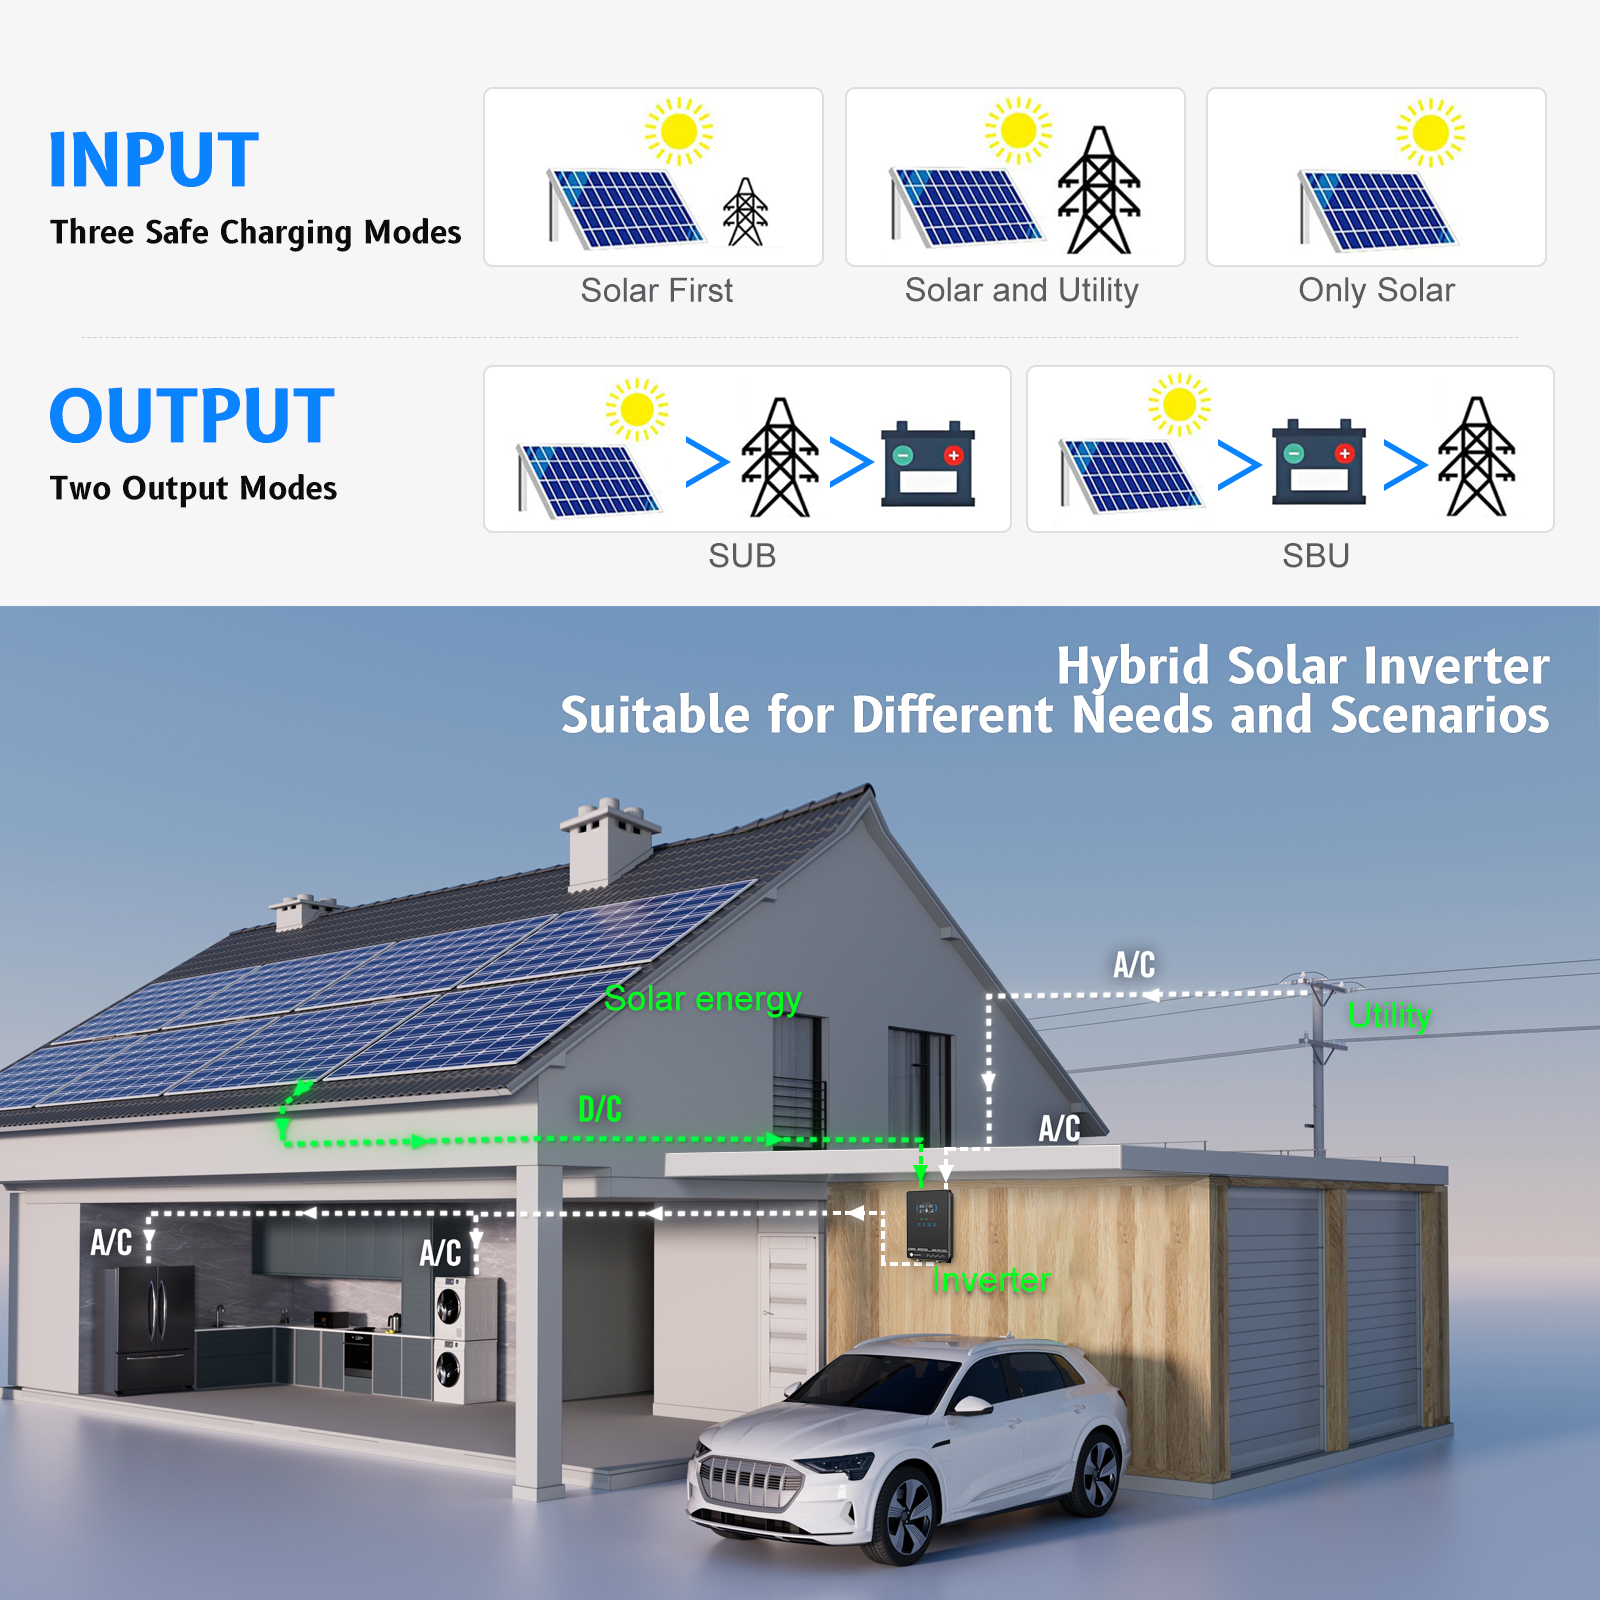
1.3 Arkitettura Bażika tas-Sistema
The following illustration shows a basic application for this inverter/charger. A complete running system includes:
- Ġeneratur jew Sors ta' enerġija ta' Utilità.
- PV modules (optional).
- Battery packs (optional).
This inverter can power various appliances in home or office environments, including motor-type appliances such as tube lights, fans, refrigerators, and air conditioners.


1.4 Prodott Fuqview


The inverter features a 6.25-inch LCD display, status indicators, function touch buttons, a power on/off switch, and various input/output ports including PV input, AC input, AC output, battery input, and an RS485/RS232 communication port.
2. Istruzzjonijiet tas-Sigurtà
⚠ WARNING: This chapter contains important safety and operating instructions. Read and keep this manual for future reference.
- Qabel tuża l-unità, aqra l-istruzzjonijiet kollha u l-marki ta’ kawtela fuq l-unità, il-batteriji, u t-taqsimiet kollha xierqa ta’ dan il-manwal.
- ATTENZJONI – To reduce risk of injury, charge only deep-cycle lead-acid type rechargeable batteries. Other types of batteries may burst, causing personal injury and damage.
- Żarmax l-unità. Ħudha f'ċentru ta' servizz kwalifikat meta jkun meħtieġ servizz jew tiswija. Assemblaġġ mill-ġdid mhux korrett jista 'jirriżulta f'riskju ta' xokk elettriku jew nar.
- Biex tnaqqas ir-riskju ta 'xokk elettriku, skonnettja l-wajers kollha qabel ma tipprova kwalunkwe manutenzjoni jew tindif. It-tifi tal-unità ma jnaqqasx dan ir-riskju.
- ATTENZJONI – Persunal kwalifikat biss jista’ jinstalla dan l-apparat bil-batterija.
- QATT iċċarġja batterija ffriżata.
- Għall-aħjar tħaddim ta' dan l-inverter/ċarġer, jekk jogħġbok segwi l-ispeċifikazzjonijiet meħtieġa biex tagħżel id-daqs xieraq tal-kejbil. Huwa importanti ħafna li tħaddem dan l-inverter/ċarġer b'mod korrett.
- Kun kawt ħafna meta taħdem b'għodda tal-metall fuq jew madwar il-batteriji. Jeżisti riskju potenzjali li twaqqa' għodda għal spark jew short circuit batteriji jew partijiet elettriċi oħra u jista 'jikkawża splużjoni.
- Please strictly follow installation procedure when you want to disconnect AC or DC terminals. Please refer to the INSTALLATION section of this manual for details.
- ISTRUZZJONIJIET TAT-TAT-TAT - This inverter/charger should be connected to a permanent grounded wiring system. Be sure to comply with local requirements and regulations to install this inverter.
- QATT jikkawża short circuit fl-output tal-AC u fl-input tad-DC. TIKKONNECTAX mal-mejns meta jkun hemm short circuit fl-input tad-DC.
- Twissija!! Persuni tas-servizz kwalifikati biss jistgħu jservu dan l-apparat. Jekk l-iżbalji għadhom jippersistu wara li ssegwi t-tabella tas-soluzzjoni tal-problemi, jekk jogħġbok ibgħat dan l-inverter/ċarġer lura lin-negozjant lokali jew iċ-ċentru tas-servizz għall-manutenzjoni.
3. Installazzjoni
3.1 Spakkjar u Spezzjoni
Qabel l-installazzjoni, jekk jogħġbok spezzjona l-unità. Kun żgur li xejn ġewwa l-pakkett mhu bil-ħsara. Għandek tkun irċevejt l-oġġetti li ġejjin:
- L-unità x 1
- Manwal għall-utent x 1
3.2 Preparazzjoni
Before connecting all wirings, please take off the bottom cover by removing two screws.
3.3 Immuntar tal-Unità
Ikkunsidra l-punti li ġejjin qabel ma tagħżel fejn tinstalla:
- Twaħħalx l-inverter fuq materjali tal-kostruzzjoni li jaqbdu.
- Immonta fuq wiċċ solidu.
- Installa dan l-inverter fil-livell tal-għajnejn sabiex tippermetti li l-wiri LCD jinqara f'kull ħin.
- It-temperatura ambjentali għandha tkun bejn 0°C u 55°C biex tiżgura l-aħjar tħaddim.
- Il-pożizzjoni ta' installazzjoni rakkomandata għandha tiġi mwaħħla mal-ħajt vertikalment.
- Kun żgur li żżomm oġġetti u uċuħ oħra kif muri fid-dijagramma biex tiggarantixxi dissipazzjoni tas-sħana suffiċjenti u biex ikollok spazju biżżejjed għat-tneħħija tal-wajers.
⚠ SUITABLE FOR MOUNTING ON CONCRETE OR OTHER NON-COMBUSTIBLE SURFACE ONLY.
Install the unit by screwing two screws into the wall.
3.4 Konnessjoni tal-batterija
⚠ CAUTION: For safety operation and regulation compliance, it's requested to install a separate DC over-current protector or disconnect device between battery and inverter. It may not be requested to have a disconnect device in some applications, however, it's still requested to have over-current protection installed. Please refer to the typical ampara t-tabella t'hawn taħt għad-daqs meħtieġ tal-fjus jew tas-circuit breaker.
⚠ WARNING! All wiring must be performed by qualified personnel.
⚠ WARNING! It's very important for system safety and efficient operation to use appropriate cable for battery connection. To reduce risk of injury, please use the proper recommended cable and terminal size as below.
Recommended Battery Cable and Terminal Size:
| Mudell | Tipiku Ampetà | Kapaċità tal-batterija | Daqs tal-Wajer | Kejbil mm² | Ring Terminal Dimensions D (mm) | Ring Terminal Dimensions L (mm) | Ring Terminal Dimensions M (mm) | Valur tat-torque |
|---|---|---|---|---|---|---|---|---|
| 3.0KW 24V | 110A | 100AH | 1 * 4AWG | 22 | 8 | 44 | 18.2 | 2 ~ 3 Nm |
| 200AH | 8 | 44 | 18.2 | |||||
| 4.0KW 24V | 150A | 200AH | 1 * 2AWG | 35 | 8 | 44 | 18.2 | 2 ~ 3 Nm |
Segwi dawn il-passi biex timplimenta l-konnessjoni tal-batterija:
- Arma terminali taċ-ċirku tal-batterija abbażi tal-kejbil tal-batterija rakkomandat u d-daqs tat-terminal.
- Connect all battery packs as units require.
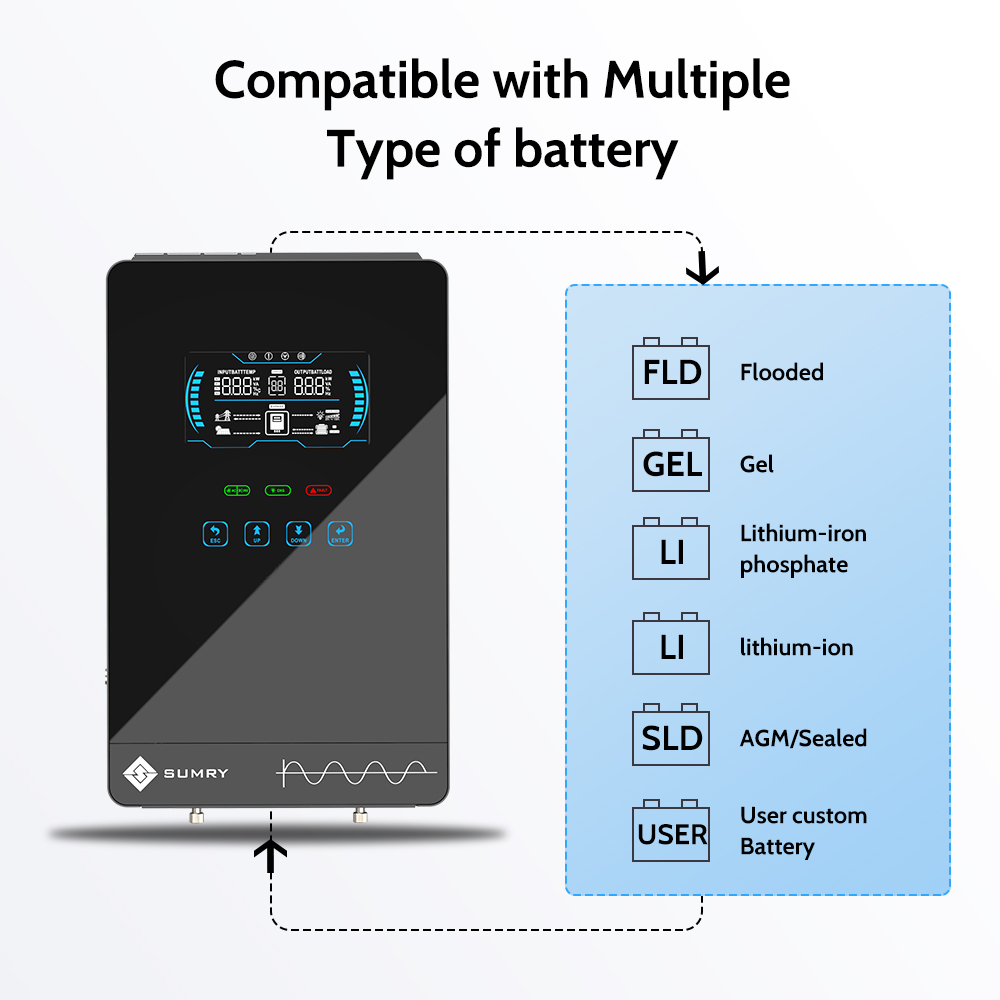
NOTE: Please only use sealed lead-acid battery or sealed GEL/AGM lead-acid battery or lithium battery.
- Insert the ring terminal of the battery cable flatly into the battery connector of the inverter and make sure the bolts are tightened with a torque of 2-3 Nm. Ensure polarity at both the battery and the inverter/charger is correctly connected and ring terminals are tightly screwed to the battery terminals.
⚠ WARNING: Shock Hazard! Installation must be performed with care due to high battery voltage f'serje.
⚠ CAUTION!! Do not place anything between the flat part of the inverter terminal and the ring terminal. Otherwise, overheating may occur.
⚠ CAUTION!! Do not apply anti-oxidant substance on the terminals before terminals are connected tightly.
⚠ CAUTION!! Before making the final DC connection or closing DC breaker/disconnector, be sure positive (+) must be connected to positive (+) and negative (-) must be connected to negative (-).
3.5 Konnessjoni ta 'Input/Output AC
⚠ CAUTION!! Before connecting to AC input power source, please install a separate AC breaker between the inverter and the AC input power source. This will ensure the inverter can be securely disconnected during maintenance and fully protected from overcurrent of AC input. The recommended spec of AC breaker is 32A for 3.0KW and 40A for 4.0KW.
⚠ CAUTION!! There are two terminal blocks with “INPUT” and “OUTPUT” markings. Please do NOT mis-connect input and output connectors.
⚠ WARNING! All wiring must be performed by qualified personnel.
⚠ WARNING! It's very important for system safety and efficient operation to use appropriate cable for AC input connection. To reduce risk of injury, please use the proper recommended cable size as below.
Suggested Cable Requirement for AC Wires:
| Mudell | Kejl | Valur tat-torque |
|---|---|---|
| 3.0KW | 10 AWG | 1.2 ~ 1.6 Nm |
| 4.0KW | 8 AWG | 1.4 ~ 1.6Nm |
Segwi dawn il-passi biex timplimenta l-konnessjoni tal-input/output tal-AC:
- Qabel ma tagħmel AC input/output konnessjoni, kun żgur li tiftaħ DC protettur jew skonnettur l-ewwel.
- Neħħi l-kmiem tal-insulazzjoni b'10mm għal sitt kondutturi. Qassar il-fażi L u l-konduttur newtrali N bi 3mm.
- Insert AC input wires according to polarities indicated on the terminal block and tighten the terminal screws.
- Then, insert AC output wires according to polarities indicated on the terminal block and tighten terminal screws. Be sure to connect the PE protective conductor (Ground) first.
- Ground (green/yellow)
- L – LINJA (kannella jew iswed)
- N – Neutral (blue or white)
- Kun żgur li l-wajers huma konnessi sew.
⚠ WARNING: Be sure that AC power source is disconnected before attempting to hardwire it to the unit.
⚠ CAUTION: Important! Be sure to connect AC wires with correct polarity. If L and N wires are connected reversely, it may cause utility short-circuited when these inverters are operated in parallel.
⚠ CAUTION: Appliances such as air conditioners require at least 2-3 minutes to restart to balance refrigerant gas. If a power shortage occurs and recovers quickly, it can damage connected appliances. Check if your air conditioner has a time-delay function before installation. Otherwise, the inverter/charger may trigger an overload fault and cut off output, potentially causing internal damage to the air conditioner.
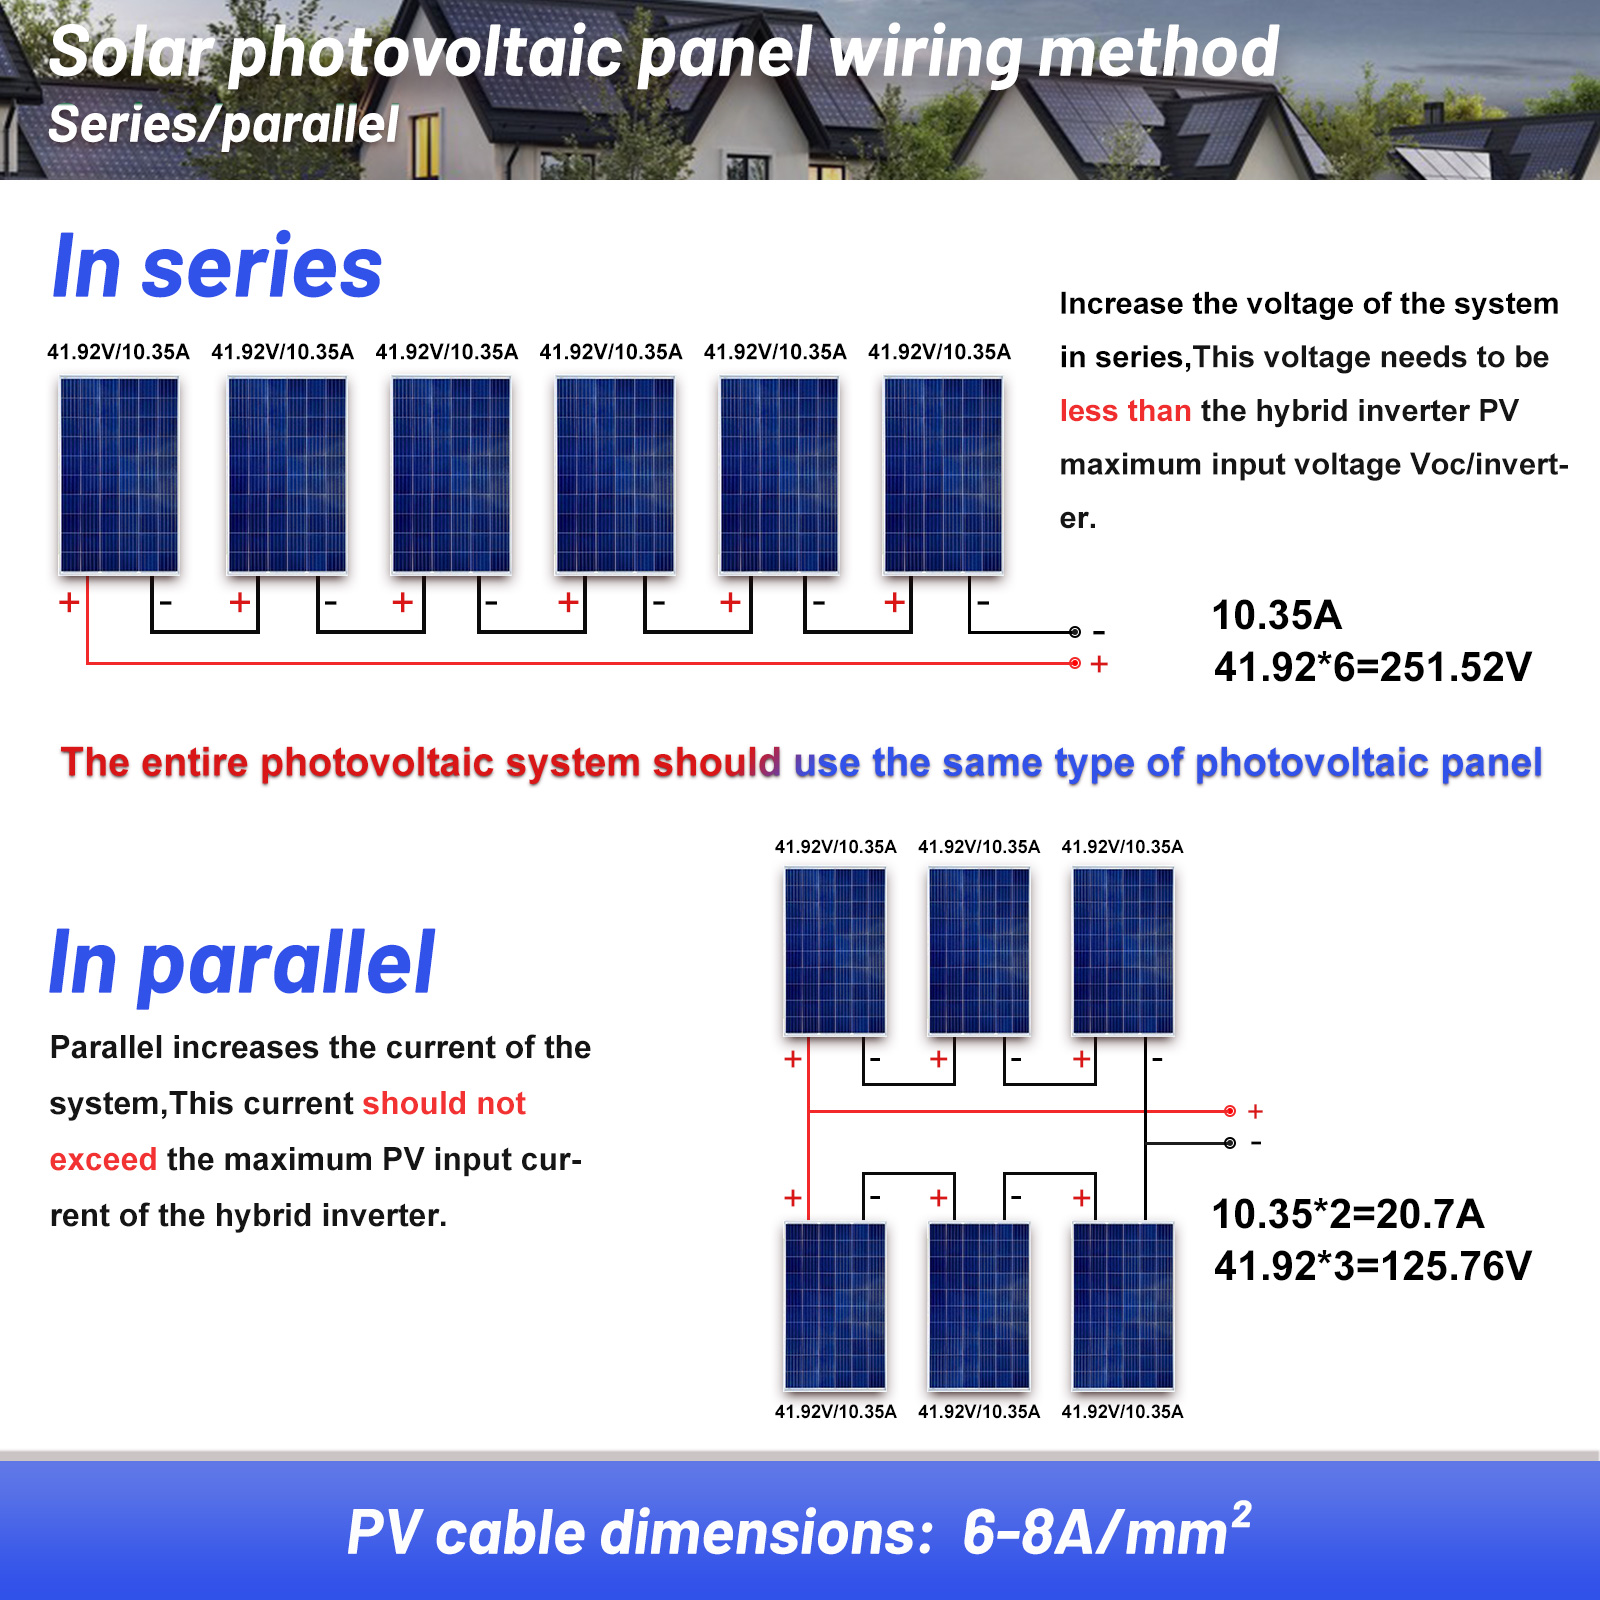
3.6 Konnessjoni PV
⚠ CAUTION: Before connecting to PV modules, please install separately a DC circuit breaker between the inverter and PV modules.
⚠ WARNING! All wiring must be performed by qualified personnel.
⚠ WARNING! It's very important for system safety and efficient operation to use appropriate cable for PV module connection. To reduce risk of injury, please use the proper recommended cable size as below.
Suggested Cable Requirement for PV Wires:
| Mudell | Daqs tal-Wajer | Kejbil (mm²) | Valur tat-Torque (massimu) |
|---|---|---|---|
| 3.0KW/4.0KW | 1 x 12AWG | 4 | 1.2 Nm |
Għażla tal-Modulu PV:
Meta tagħżel moduli PV xierqa, jekk jogħġbok kun żgur li tikkunsidra l-parametri li ġejjin:
- Ċirkwit miftuħ Voltage (Voc) of PV modules must not exceed the max. PV array open circuit voltage tal-inverter.
- Ċirkwit miftuħ Voltage (Voc) of PV modules should be higher than the min. PV Array MPPT Voltagfirxa e.
| MUDELL INVERTER | 3.0KW | 4.0KW |
|---|---|---|
| Max. PV Array Ċirkwit Miftuħ Voltage | 350Vdc | |
| PV Array MPPT Voltage Firxa | 55Vdc ~ 350Vdc | |
Segwi dawn il-passi biex timplimenta l-konnessjoni tal-modulu PV:
- Neħħi kmiem ta 'insulazzjoni 10 mm għal kondutturi pożittivi u negattivi.
- Check correct polarity of connection cable from PV modules and PV input connectors. Then, connect the positive pole (+) of the connection cable to the positive pole (+) of the PV input connector. Connect the negative pole (-) of the connection cable to the negative pole (-) of the PV input connector.
- Kun żgur li l-wajers huma konnessi sew.
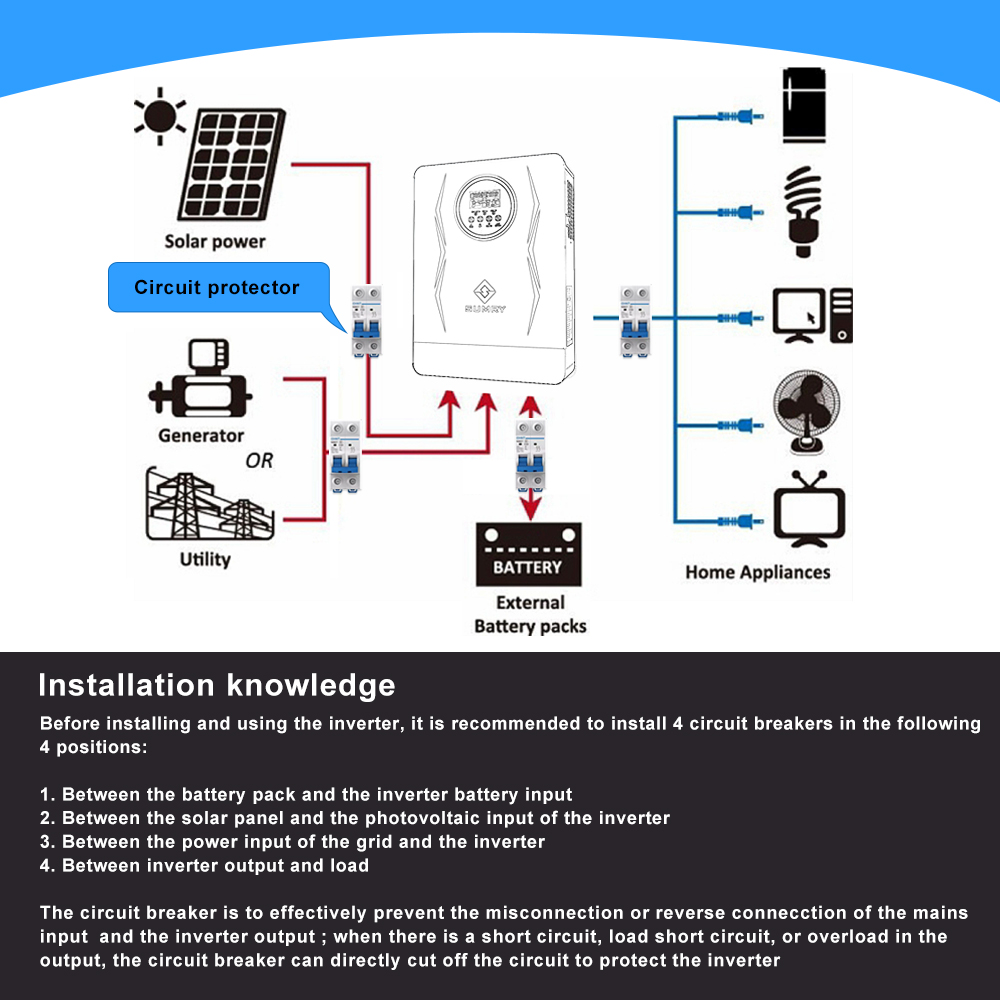
Installation Knowledge:
Before installing and using the inverter, it is recommended to install 4 circuit breakers in the following 4 positions:
- Between the battery pack and the inverter battery input.
- Between the solar panel and the photovoltaic input of the inverter.
- Between the power input of the grid and the inverter.
- Between inverter output and load.
The circuit breaker is to effectively prevent misconnection or reverse connection of the mains input and the inverter output. When there is a short circuit, load short circuit, or overload in the output, the circuit breaker can directly cut off the circuit to protect the inverter.
Circuit Breaker Specification:
For the Sumry HGX 4000W inverter, you need to install:
- A 2P200A specification circuit breaker between the battery and the inverter.
- A 2P20A specification circuit breaker between the photovoltaic input and the inverter.
- A 2P63A specification circuit breaker between the utility input and the inverter.
- A 2P40A specification circuit breaker on the output of the inverter.
3.7 Assemblea Finali
After connecting all wirings, please put the bottom cover back by screwing two screws.
4. Operazzjoni
4.1 Qawwa ON/OFF
Ladarba l-unità tkun ġiet installata kif suppost u l-batteriji jkunu konnessi, sempliċement agħfas is-swiċċ On/Off (li jinsab fil-qiegħ tal-kaxxa) biex tixgħel l-unità.
4.2 Operazzjoni u Panel tal-Wiri
The operation and display panel is on the front panel of the inverter. It includes three indicators, four function keys, and an LCD display, indicating the operating status and input/output power information.
Messaġġi tal-Indikatur LED:
| Indikatur LED | Kulur | Status | Messaġġi |
|---|---|---|---|
| AC-INV | Aħdar | Solidu Mixgħul | Output huwa mħaddem mill-utilità fil-modalità Linja. |
| Jteptep | L-output huwa mħaddem bil-batterija jew PV fil-modalità tal-batterija. | ||
| CHG | Aħdar | Solidu Mixgħul | Il-batterija hija kompletament iċċarġjata. |
| Jteptep | Il-batterija qed tiċċarġja. | ||
| ĦTIJIET | Aħmar | Solidu Mixgħul | Il-ħsara sseħħ fl-inverter. |
| Jteptep | Kundizzjoni ta' twissija sseħħ fl-inverter. |
Ċwievet tal-Funzjoni:
| Ċavetta tal-Funzjoni | Deskrizzjoni |
|---|---|
| ESC | Biex toħroġ mill-mod ta' l-issettjar |
| UP | Biex tmur għall-għażla preċedenti |
| 'L isfel | Biex tmur għall-għażla li jmiss |
| DĦUL | Biex tikkonferma l-għażla fil-mod ta 'l-issettjar jew tidħol fil-mod ta' l-issettjar |
4.3 Ikoni tal-Wiri LCD
The LCD display provides various information about the inverter's status and performance. Icons indicate input source, configuration, fault information, output information, and battery status.
Detailed descriptions of LCD display icons and their meanings can be found in the full PDF manual, available for download: Manwal għall-Utent (PDF).
4.4 L-issettjar tal-LCD
After pressing and holding the ENTER button for 3 seconds, the unit will enter setting mode. Use the “UP” or “DOWN” button to select setting programs, then press “ENTER” to confirm or “ESC” to exit.
Key settings include output source priority, maximum charging current, battery type, auto-restart functions, output voltage, and output frequency. Refer to the full manual for a complete list of settings and their options.
4.5 Konnessjoni u Settings tal-batterija tal-litju
If the inverter is matched with lithium batteries, only those with compatible BMS communication protocols are allowed. Follow these steps:
- Assemble battery ring terminal based on recommended battery cable and terminal specifications.
- Insert the ring terminal of battery cable flatly into the battery connector of the inverter and make sure the bolts are tightened with a torque of 2-3Nm. Ensure polarity is correct and terminals are tightly screwed.
- Connect the RJ45 connector to the COMM port on the inverter.
- Connect the other end of the RJ45 plug to the battery communication port (RS485). Ensure RS485-A and RS485-B connections are correct.
Note: If choosing a lithium battery, make sure to connect the BMS communication cable between the battery and the inverter. You need to choose battery type as “Lib-485” mode in Program 5.
When the battery type is set to "Lib-485", settings for programs 12, 13, and 29 are adjusted. The default charging current is 0.5C. If communication fails, the inverter will cut off output.
Long press the “ESC” button for 3 seconds to enter the lithium battery page, which displays total battery voltage, remaining capacity, charging/discharge current, battery capacity, BMS board temperature, and single cell voltages/temperatures.
Note: When communication fails (LCD display code 51), the inverter will cut off output. If the communication protocol does not match, you can select “LIB” mode.
4.6 Deskrizzjoni tal-Modalità Operattiva
The inverter supports various operating modes, including Standby/Power Saving Mode, Line Mode, and Battery Mode, each with specific charging and output behaviors.
- Modalità Standby: Inverter is not turned on, but can charge battery without AC output.
- Mod ta 'Iffrankar tal-Enerġija: Output is off when connected load is very low or not detected.
- Modalità tal-Linja: Unit provides output power from the mains and can charge the battery.
- Modalità tal-batterija: Unit provides output power from battery and PV power.
For detailed descriptions of each mode and their charging/output logic, refer to the full PDF manual.
5. Manutenzjoni
5.1 Ekwalizzazzjoni tal-Batterija
The equalization function helps reverse negative chemical effects like stratification and remove sulfate crystals that build up on battery plates, which can reduce battery capacity. It's recommended to equalize batteries periodically.
Biex tapplika l-ekwalizzazzjoni:
- Ippermetti l-funzjoni ta' ekwalizzazzjoni tal-batterija fil-programm tas-settings tal-monitoraġġ tal-LCD 33.
- Set equalization interval in program 37, or activate equalization immediately in program 39.
Il-kontrollur jidħol fil-Equalize stage when the set interval is reached or immediately activated. It supplies power to charge the battery until it reaches the equalization voltage, then maintains this voltage. Jekk il-batterija voltage doesn't reach the target within the timeout, the controller will stop equalization and return to float stage.
6 Issolvi l-problemi
6.1 Kodiċi ta' Referenza tal-Ħsara
The inverter's LCD display will show specific fault codes if an error occurs. These codes help identify the nature of the problem, whether it's an internal circuit error or an external issue like over-temperature or short circuit.
| Kodiċi tal-Ħtija | Avveniment ta' Ħtija | Ikona mixgħula |
|---|---|---|
| 01 | Il-fann ikun imsakkar meta l-inverter ikun mitfi. | ⚠ |
| 02 | Temperatura żejda | ⚠ |
| 03 | Batterija voltage huwa għoli wisq | ⚠ |
| 04 | Batterija voltage huwa baxx wisq | ⚠ |
| 05 | L-output short circuited jew it-temperatura żejda tiġi skoperta minn komponenti interni tal-konvertitur. | ⚠ |
| 06 | Vol. Tal-ħruġtage huwa għoli wisq. | ⚠ |
| 07 | Ħin ta' tagħbija żejda | ⚠ |
| 08 | Xarabank voltage huwa għoli wisq | ⚠ |
| 09 | Il-bidu artab tax-xarabank falla | ⚠ |
| 11 | Main relay falla | ⚠ |
| 51 | Kurrent żejjed jew żieda qawwija | ⚠ |
| 52 | Xarabank voltage huwa baxx wisq | ⚠ |
| 53 | Il-bidu artab tal-inverter falla | ⚠ |
| 55 | Fuq DC voltage fl-output AC | ⚠ |
| 56 | Il-konnessjoni tal-batterija hija miftuħa | ⚠ |
| 57 | Is-sensorju kurrenti falla | ⚠ |
| 58 | Vol. Tal-ħruġtage huwa baxx wisq | ⚠ |
6.2 Indikatur ta' Twissija
Warning codes indicate conditions that require attention but are not critical faults. These are often accompanied by audible alarms and flashing icons.
| Kodiċi ta' Twissija | Avveniment ta' Twissija | Allarm li jinstema' | Ikona li Tteptep |
|---|---|---|---|
| 01 | Il-fann ikun imsakkar meta l-inverter ikun mixgħul. | Beep darbtejn kull sekonda | ⚠ |
| 03 | Il-batterija hija ċċarġjata żżejjed | Beep darbtejn kull sekonda | ⚠ |
| 04 | Batterija baxxa | Beep darbtejn kull sekonda | ⚠ |
| 07 | Tagħbija żejda | Beep darbtejn kull sekonda | ⚠ |
| 10 | Derating tal-qawwa tal-ħruġ | Beep darbtejn kull sekonda | ⚠ |
| 12 | Il-ċarġer solari jieqaf minħabba batterija baxxa. | ⚠ | |
| 13 | Il-ċarġer solari jieqaf minħabba vol PV għolitage. | ⚠ | |
| 14 | Il-ċarġer solari jieqaf minħabba tagħbija żejda. | ⚠ | |
| 15 | PV huwa dgħajjef | ⚠ | |
| 61 | When the battery communication is abnormal, stop charging and discharging. | ⚠ |
6.3 Tabella għas-Soluzzjoni tal-Problemi
| Problema | LCD/LED/Buzzer | Spjegazzjoni / Kawża Possibbli | X'għandek tagħmel |
|---|---|---|---|
| L-unità tintefa awtomatikament waqt il-proċess tal-istartjar. | LCD/LEDs u buzzer se jkunu attivi għal 3 sekondi u mbagħad jitlesta. | Il-batterija voltage huwa baxx wisq (<1.91V/Ċellula) | 1. Iċċarġja mill-ġdid il-batterija. 2. Ibdel il-batterija. |
| Ebda rispons wara li jinxtegħel. | L-ebda indikazzjoni. | 1. Il-batterija voltage huwa baxx wisq. (<1.4V/Ċellula) 2. Il-polarità tal-batterija hija konnessa maqluba. | 1. Iċċekkja jekk il-batteriji u l-wajers humiex konnessi sew. 2. Iċċarġja mill-ġdid il-batterija. 3. Ibdel il-batterija. |
| Input voltage hija murija bħala 0 fuq l-LCD u l-LED aħdar qed jiteptep. | Il-protettur tal-input huwa tripped | Iċċekkja jekk l-interruttur tal-AC huwiex imqabbad u l-wajers tal-AC humiex konnessi sew. | |
| Il-mejns jeżistu iżda l-unità taħdem fil-modalità tal-batterija. | L-LED aħdar qed iteptep. | Kwalità insuffiċjenti ta 'enerġija AC. (Xatt jew Ġeneratur) | 1. Iċċekkja jekk il-wajers AC humiex irqaq wisq u/jew twal wisq. 2. Iċċekkja jekk il-ġeneratur (jekk applikat) huwiex qed jaħdem tajjeb jew jekk l-input voltagL-issettjar tal-firxa huwa korrett. (Appliance UPS) |
| L-LED aħdar qed iteptep. | Issettja "Solar First" bħala l-prijorità tas-sors tal-ħruġ. | Ibdel il-prijorità tas-sors tal-output għal Utilità l-ewwel. | |
| Meta l-unità tkun mixgħula, ir-relay intern jinxtegħel u jintefa ripetutament. | Il-wiri LCD u l-LEDs qed iteptep | Il-batterija hija skonnettjata. | Iċċekkja jekk il-wajers tal-batterija humiex konnessi sew. |
| Il-buzzer ħoss kontinwament u l-LED aħmar huwa mixgħul. | Kodiċi tal-ħsara 07 | Żball ta' tagħbija żejda. L-inverter huwa tagħbija żejda 110% u l-ħin huwa sa. | Naqqas it-tagħbija konnessa billi titfi xi tagħmir. |
| Kodiċi tal-ħsara 05 | Output short circuited. | Iċċekkja jekk il-wajers humiex konnessi sew u neħħi t-tagħbija anormali. | |
| Kodiċi tal-ħsara 02 | It-temperatura tal-komponent tal-konvertitur intern hija aktar minn 120 ° C. | Iċċekkja jekk il-fluss tal-arja tal-unità huwiex imblukkat jew jekk it-temperatura ambjentali hijiex għolja wisq. | |
| Kodiċi tal-ħsara 03 | Il-batterija hija ċċarġjata żżejjed. | Ritorn fiċ-ċentru tat-tiswija. | |
| Kodiċi tal-ħsara 01 | Il-batterija voltage huwa għoli wisq. | Iċċekkja jekk l-ispeċifikazzjonijiet u l-kwantità tal-batteriji jissodisfawx ir-rekwiżiti. | |
| Kodiċi tal-ħsara 06/58 | Ħtija tal-fann | Ibdel il-fann. | |
| Kodiċi tal-ħsara 08/09/53/57 | Output anormali (Inverter voltage taħt minn 190Vac jew ogħla minn 260Vac) | 1. Naqqas it-tagħbija konnessa. 2. Ritorn lejn iċ-ċentru tat-tiswija | |
| Kodiċi tal-ħsara 51 | Il-komponenti interni fallew. | Ritorn fiċ-ċentru tat-tiswija. | |
| Kodiċi tal-ħsara 52 | Kurrent żejjed jew żieda qawwija. | Ibda mill-ġdid l-unità, jekk l-iżball jerġa 'jiġri, jekk jogħġbok erġa' lura fiċ-ċentru tat-tiswija. | |
| Kodiċi tal-ħsara 55 | Xarabank voltage huwa baxx wisq. | ||
| Kodiċi tal-ħsara 56 | Vol. Tal-ħruġtage hija żbilanċjata. | Jekk il-batterija tkun imqabbda sew, jekk jogħġbok erġa lura fiċ-ċentru tat-tiswija. |
7. Speċifikazzjonijiet
7.1 Speċifikazzjonijiet tal-Modalità tal-Linja
| MUDELL INVERTER | 3.0KW/24V | 4.0KW/24V |
|---|---|---|
| Input Voltage Forma tal-mewġ | Sinusojdali (utilità jew ġeneratur) | |
| Vol Input Nominalitage | 120Vac | |
| Telf Baxx Voltage | 95Vac±5V(UPS); 65Vac±7V(Appliances) | |
| Ritorn ta' Telf Baxx Voltage | 100Vac±5V(UPS); 70Vac±5V(Appliances) | |
| Telf Għoli Voltage | 140Vac ± 5V | |
| Ritorn ta' Telf Għoli Voltage | 135Vac ± 5V | |
| Max AC Input Voltage | 150Vac | |
| Frekwenza Input Nominali | 50Hz/60Hz (It can be set in program 09) | |
| Frekwenza ta' Telf Baxxa | 45±1Hz/55±1Hz | |
| Frekwenza ta' Ritorn ta' Telf Baxx | 47±1Hz/57±1Hz | |
| Frekwenza ta' Telf Għoli | 55±1Hz/65±1Hz | |
| Frekwenza ta 'Ritorn ta' Telf Għoli | 53±1Hz/63±1Hz | |
| Protezzjoni Short Circuit Output | Modalità tal-linja: Circuit Breaker Modalità tal-batterija: Ċirkwiti Elettroniċi | |
| Effiċjenza (Modalità Linja) | >95% (Tagħbija R nominali, batterija ċċarġjata għalkollox) | |
| Ħin tat-Trasferiment | 10ms tipiku (UPS); 20ms tipiku (Appliances) | |
7.2 Speċifikazzjonijiet tal-Modalità Inverter
| MUDELL INVERTER | 3.0KW/24V | 4.0KW/24V |
|---|---|---|
| Qawwa tal-Ħruġ Rated | 3.0KW | 4.0KW |
| Ħruġ Voltage Forma tal-mewġ | Mewġa Sinjura Pura | |
| Ħruġ Voltage Regolament | 120Vac ± 5% | |
| Frekwenza tal-ħruġ | 60Hz jew 50Hz | |
| L-ogħla Effiċjenza | 94% | |
| Protezzjoni ta 'tagħbija żejda | 5s@≥150% tagħbija; 10s @ 110% ~ 150% tagħbija | |
| Kapaċità Żieda | 2 * qawwa nominali għal 5 sekondi | |
| Input nominali DC Voltage | 24Vdc | |
| Bidu kiesaħ Voltage | 23.0Vdc | |
| Vol. Twissija DC baxxtage | 22.0Vdc | |
| Ritorn ta' Twissija DC baxx Voltage | 23.0Vdc | |
| Baxx DC Cut-off Voltage | 21.0Vdc | |
| Vol ta' Rkupru DC Għolitage | 29Vdc | |
| Qtugħ DC Għoli Voltage | 31Vdc | |
| Ebda Konsum ta 'Enerġija Tagħbija | <35W | |
7.3 Speċifikazzjonijiet tal-Modalità ta' Ċarġ
Utility Charging Mode:
| MUDELL INVERTER | 3.0KW/24V | 4.0KW/24V |
|---|---|---|
| Kurrent tal-Iċċarġjar (UPS) @ Input Nominal Voltage | 80A | 110A |
| Iċċarġjar bl-ingrossa Voltage (Batterija mgħarrqa) | 29.2Vdc | |
| Iċċarġjar bl-ingrossa Voltage (Batterija AGM / tal-Ġell) | 28.2Vdc | |
| Iċċarġjar f'wiċċ l-ilma Voltage | 27Vdc | |
| Algoritmu tal-Iċċarġjar | 3-Pass | |
Modalità ta' Iċċarġjar Solari:
| MUDELL INVERTER | 3.0KW/24V | 4.0KW/24V |
|---|---|---|
| Qawwa Rated | 5600W | |
| PV Charge Kurrent | 100A | 140A |
| Effiċjenza | 98.0% max. | |
| Max. PV Array Ċirkwit Miftuħ Voltage | 350Vdc | |
| PV Array MPPT Voltage Firxa | 55-350Vdc | |
| Konsum ta' Enerġija Standby | 2W | |
| Batterija Voltage Preċiżjoni | +/-0.3% | |
| PV Voltage Preċiżjoni | +/- 2V | |
| Algoritmu tal-Iċċarġjar | 3-Pass | |
7.4 Speċifikazzjonijiet Ġenerali
| MUDELL INVERTER | 3.0KW/24V | 4.0KW/24V |
|---|---|---|
| Ċertifikazzjoni tas-Sigurtà | CE | |
| Firxa tat-Temperatura Operattiva | 0°C sa 55°C | |
| Temperatura tal-ħażna | -15°C ~ 60°C | |
| Dimensjoni (D * W * H), mm | 400 * 250 * 89mm | |
| Piż nett, kg | 7.5kg | 8.5kg |
* L-ispeċifikazzjonijiet tekniċi tal-prodott huma soġġetti għal tibdil mingħajr avviż.
7.5 Approximate Back-up Time Table
| Mudell | Tagħbija (W) | Ħin ta' backup @ 24Vdc 100Ah (min) | Ħin ta' backup @ 24Vdc 200Ah (min) |
|---|---|---|---|
| 4.0KW | 300 | 449 | 1100 |
| 600 | 222 | 525 | |
| 900 | 124 | 303 | |
| 1200 | 95 | 227 | |
| 1500 | 68 | 164 | |
| 1800 | 56 | 126 | |
| 2100 | 48 | 108 | |
| 2400 | 35 | 94 | |
| 2700 | 31 | 74 | |
| 3200 | 28 | 67 |
Note: Backup time depends on the quality of the battery, age of battery, and type of battery. Specifications of batteries may vary depending on different manufacturers.
8. Għajnuniet għall-Utenti
- For optimal performance, ensure all circuit breakers are correctly sized and installed as specified in the manual for battery, PV, AC input, and AC output connections.
- When connecting lithium batteries, always ensure the BMS communication cable is properly connected and the inverter is set to "Lib-485" mode in Program 5 for correct battery management. If communication issues arise, switch to "LIB" mode if your battery supports it.
- If you plan to use the WiFi monitoring function, remember that the inverter has only one communication port. You must choose between WiFi module communication or battery BMS communication, as only one can be active at a time.
- If the inverter is shutting down or not responding, first check battery voltage and all wiring connections, especially for correct polarity and secure terminals.
- If using a generator as an AC input source, ensure its output quality is stable and within the inverter's acceptable input voltage range to prevent issues.
9. Mistoqsijiet Frekwenti (FAQ)
- Q: Can this equipment be used in parallel, and if so, how many units?
- A: The provided information does not explicitly state parallel capability. Please consult the full user manual (PDF) or contact customer support for details on parallel operation.
- Q: Does it come with a built-in battery?
- A: No, the product description states "No battery function available" and refers to "External Battery packs" and "Compatible With Most Kinds Of 24V Batteries," indicating it does not have a built-in battery.
- Q: How can I get the digital user manual?
- A: A PDF version of the user manual is available. You can access it here: Manwal għall-Utent (PDF).
- Q: Does it work with LiFePO4 batteries?
- A: Yes, the inverter is compatible with LiFePO4 batteries, as well as other types like Lithium, GEL, Lead-acid, and AGM batteries. Ensure proper BMS communication settings are configured (Program 5, "Lib-485" mode).
- Q: Can it function without a battery?
- A: Yes, the inverter supports "No battery function available" mode, meaning it can power loads directly from the PV array without a battery connected.
- Q: Is a WiFi module or WiFi version available? Is there an app to control via WiFi?
- A: Yes, WiFi monitoring function is optional. There is an app ("smartess App") to monitor and control the inverter via WiFi. Note that the inverter has only one communication port, so you must choose between WiFi module communication or battery BMS communication.
- Q: The unit I received doesn't have a ground on the input AC. Can I tie the input and output ground together?
- A: The manual states that the inverter/charger should be connected to a permanent grounded wiring system and to connect the PE protective conductor (Ground) first for AC output. It is crucial to follow local requirements and regulations for grounding. If you are unsure, it is recommended to consult a qualified electrician.
10. Garanzija u Appoġġ
For warranty information, technical support, or service, please contact your local dealer or the service center. Only qualified service personnel should attempt repairs. If issues persist after following the troubleshooting guide, return the inverter/charger to the service center.
