
1. Introduzzjoni
The SilverStone RM4A is a 4U rackmount server chassis designed for professional users requiring high performance and reliability. This chassis offers extensive liquid cooling compatibility and flexible expansion options, making it suitable for diverse and demanding server applications. This manual provides essential information for the proper installation, operation, and maintenance of your RM4A chassis.
2. Informazzjoni dwar is-Sigurtà
- Always disconnect the power supply from the wall outlet before performing any installation, maintenance, or troubleshooting procedures.
- Wear an anti-static wrist strap when handling internal components to prevent electrostatic discharge (ESD) damage.
- Ensure proper grounding of the chassis and all connected components.
- Do not operate the chassis in environments with excessive dust, humidity, or extreme temperatures.
- Refer to the manuals of your motherboard, power supply, and other components for specific installation instructions and safety guidelines.
- Handle sharp edges and components with care to avoid injury.
3. Kontenut tal-Pakkett
Ivverifika li l-komponenti kollha huma preżenti fil-pakkett tiegħek:
- SilverStone RM4A 4U Rackmount Server Chassis
- Accessory kit (screws, standoffs, cable ties, etc.)
- Manwal għall-Utent (dan id-dokument)
4. Karatteristiċi ewlenin
- Supports up to SSI-EEB motherboards (12" x 13"), SSI-CEB (12" x 10.5"), and E-ATX (12" x 13").
- Accommodates 360mm liquid cooling radiators and two 80mm rear fans for enhanced heat dissipation.
- Features eight standard-size PCI/PCIe expansion slots.
- Includes a unique card retention bracket to secure graphics and expansion cards.
- Equipped with a convenient USB Type-C interface and two USB 3.0 ports on the front panel.
- Supports hard drive mounting on the expansion card retainer.
- Compatible with PS2 (ATX) and Mini Redundant power supplies.
5. Setup u Installazzjoni
5.1 Chassis Overview
Familiarize yourself with the external and internal layout of the RM4A chassis.

Figura 5.1: Quddiem view of the RM4A chassis, showing the perforated front panel and handles.

Figura 5.2: Wara view of the RM4A chassis, showing expansion slots, fan mounts, and PSU cutout.

Figure 5.3: Internal layout of the RM4A chassis, illustrating component placement such as motherboard, fans, and expansion cards.
5.2 Installazzjoni tal-Motherboard
The RM4A supports SSI-EEB, SSI-CEB, and E-ATX motherboards. Install the necessary standoffs for your motherboard form factor before securing the motherboard with screws.

Figure 5.4: Motherboard compatibility and layout within the chassis.
5.3 Installazzjoni tal-Karta tal-Espansjoni
The chassis provides eight full-height expansion slots. Remove the slot covers, insert your PCI/PCIe cards, and secure them using the provided screws and the expansion card retention bracket.
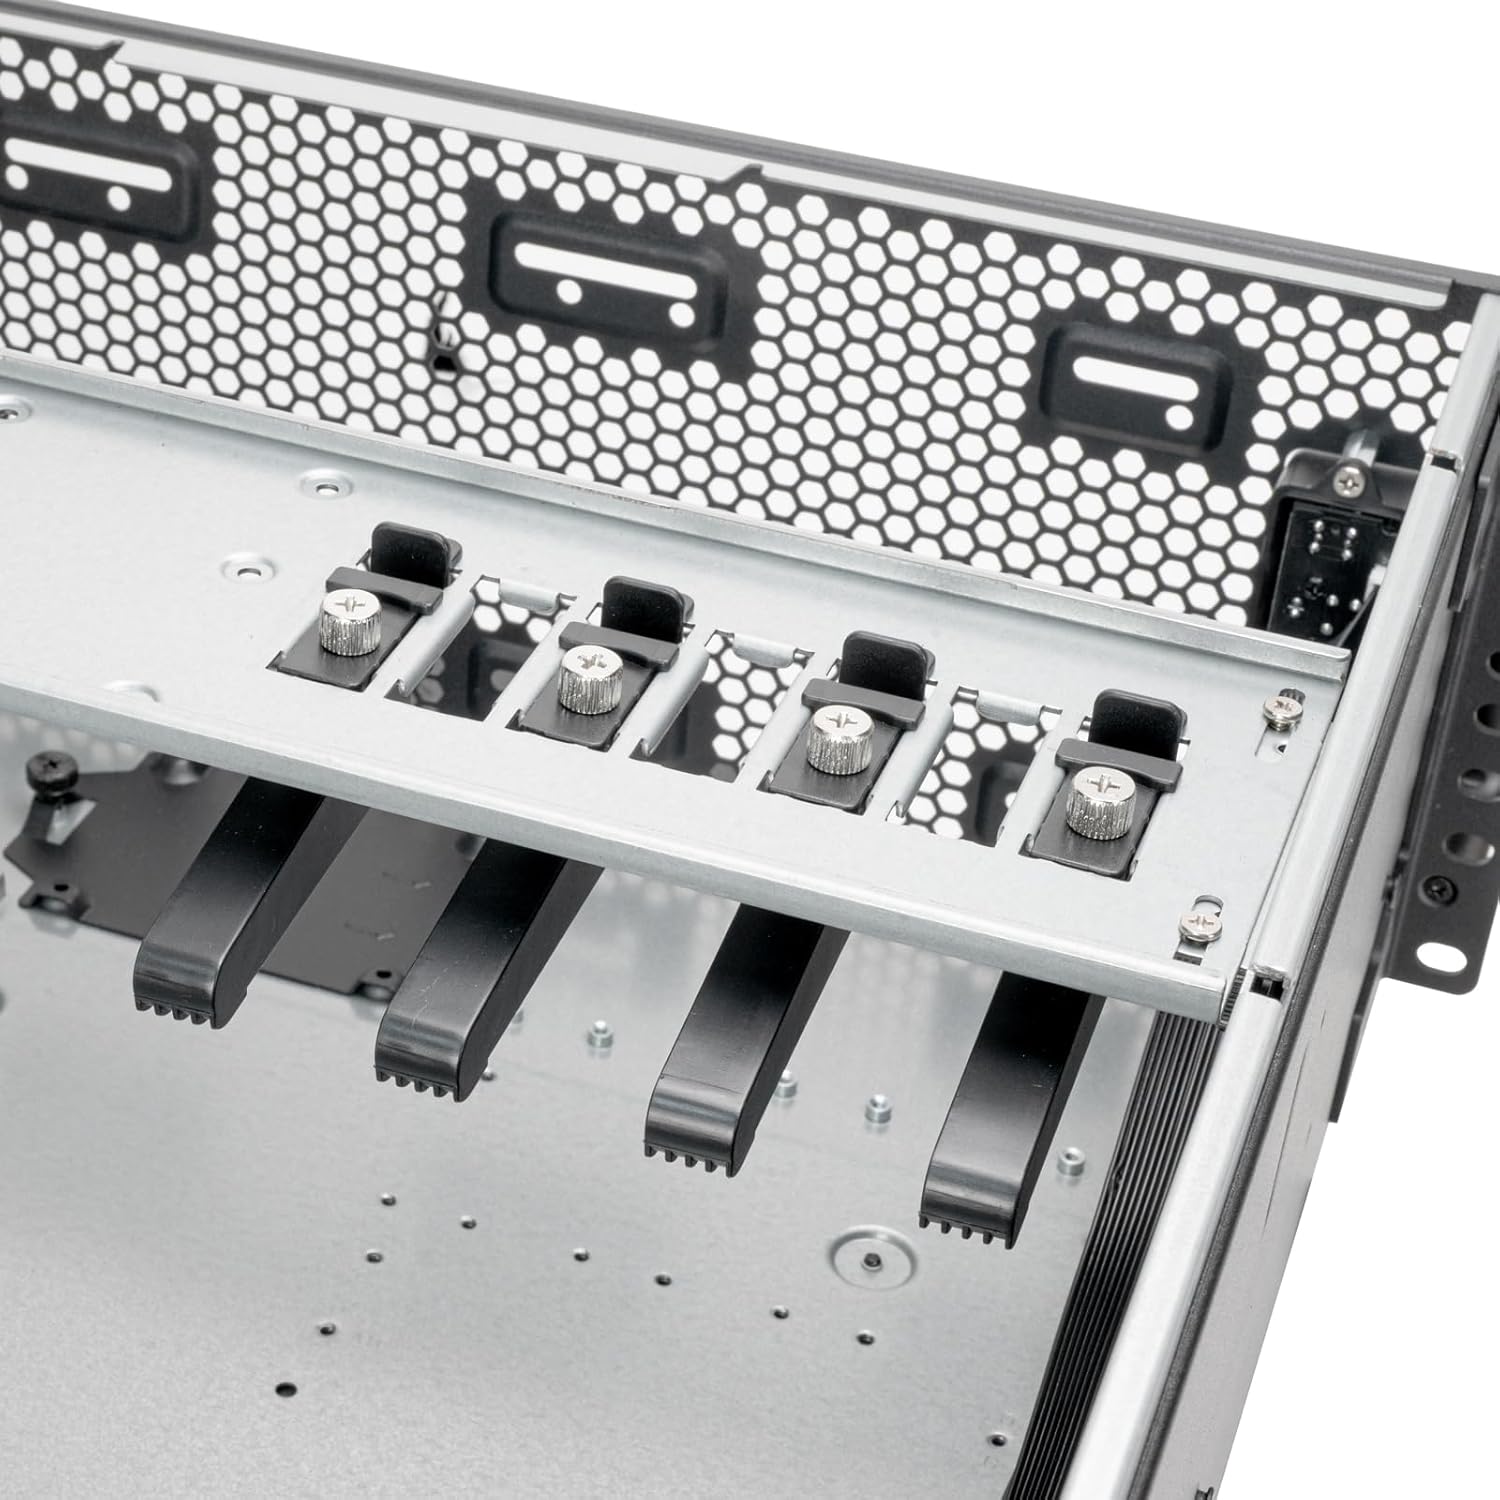
Figure 5.5: Expansion card retention bracket for securing PCI/PCIe cards.
5.4 Installazzjoni ta' Apparat ta' Ħażna
The RM4A supports 2.5" SSDs and 3.5" HDDs. Mount 2.5" SSDs in the designated trays and 3.5" HDDs on the expansion card retainer if applicable.

Figure 5.6: Storage mounting locations, including SSD trays and HDD mounting on the expansion card retainer.
5.5 Installazzjoni tas-Sistema tat-Tkessiħ
Install up to a 360mm liquid cooling radiator at the front and two 80mm fans at the rear for optimal airflow. Ensure fans are oriented correctly for intake and exhaust.

Figure 5.7: Cooling system support for 360mm radiators and 80mm rear fans.
5.6 Installazzjoni tal-Unità tal-Provvista tal-Enerġija (PSU).
Install your PS2 (ATX) or Mini Redundant power supply into the designated bay at the rear of the chassis. Secure it with screws.

Figure 5.8: Power supply mounting area.
5.7 Konnessjonijiet ta' Front Panel
Connect the front panel cables (USB Type-C, USB 3.0, Power, Reset, LED indicators) to the corresponding headers on your motherboard. Refer to your motherboard manual for header locations.

Figure 5.9: Front panel I/O, including USB Type-C, USB 3.0 ports, and power/reset buttons.
6. Istruzzjonijiet Operattivi
After completing all hardware installations and connections, connect the power cable to the PSU and a wall outlet. Press the power button on the front panel to turn on the system. The LED indicators will illuminate to show system status.
- Power On/Off: Press the power button to turn the system on or off. A short press typically initiates a soft shutdown, while a long press forces a power off.
- Irrisettja Sistema: Use the reset button for a system restart if needed.
- Portijiet USB: Utilize the front USB Type-C and USB 3.0 ports for connecting peripherals and external storage devices.
7. Manutenzjoni
Regular maintenance helps ensure the longevity and optimal performance of your RM4A chassis and its components.
- Tindif tat-Trab: Periodically clean dust from the chassis interior, fan filters, and cooling fins using compressed air or a soft brush. Dust accumulation can impede airflow and lead to overheating.
- Ġestjoni tal-Kejbil: Ensure internal cables are neatly routed and secured to prevent obstruction of airflow and potential damage.
- Spezzjoni tal-fann: Check fans for proper operation and clean any dust buildup on blades. Replace noisy or malfunctioning fans.
- Verifiki tal-Komponenti: Occasionally inspect all installed components for secure connections and proper seating.
8 Issolvi l-problemi
If you encounter issues with your RM4A chassis, consider the following basic troubleshooting steps:
- Ebda Qawwa:
- Ivverifika li l-kejbil tal-enerġija huwa konness sew kemm mal-PSU kif ukoll mas-sokit tal-ħajt.
- Kun żgur li s-swiċċ tal-PSU jkun fil-pożizzjoni 'ON'.
- Iċċekkja l-konnessjonijiet kollha tal-enerġija mill-PSU sal-motherboard u l-komponenti.
- Is-Sistema Mhux Tibbutja:
- Confirm that the CPU, RAM, and graphics card (if applicable) are properly seated.
- Check all motherboard power connectors (24-pin ATX, 8-pin EPS).
- Ensure front panel power switch cable is correctly connected to the motherboard.
- Is-sħana żejda:
- Ensure all fans are spinning and free of obstructions.
- Clean any dust buildup from fans and radiator fins.
- Verify proper thermal paste application on the CPU cooler.
- Portijiet USB Mhux Jaħdmu:
- Check the internal USB header connections from the front panel to the motherboard.
- Ensure motherboard USB drivers are installed.
9. Speċifikazzjonijiet
| Brand | SilverStone |
| Numru tal-Mudell | RM4A |
| Fattur tal-Formola | 4U Rackmount |
| Materjal | Metall |
| Kulur | Iswed |
| Dimensjonijiet (Daqs) | 4U x 17" x 24" |
| Appoġġ tal-Motherboard | SSI-EEB, SSI-CEB, E-ATX |
| Slots ta 'Espansjoni | 8 x PCI/PCIe |
| Appoġġ għat-Tkessiħ | Front: 360mm radiator; Rear: 2 x 80mm fans |
| Portijiet I / O ta 'quddiem | 1 x USB Type-C, 2 x USB 3.0, Power On/Off, System Reset, LED Status Indicators |
| Appoġġ għall-Provvista tal-Enerġija | PS2 (ATX) / Mini Redundant |
| UPC | 844761029500 |
10. Garanzija u Appoġġ
10.1 Informazzjoni dwar Garanzija
The SilverStone RM4A chassis comes with a 1 Sena Garanzija tal-Manifattur. Please retain your proof of purchase for warranty claims. The warranty covers defects in materials and workmanship under normal use. It does not cover damage caused by misuse, accident, modification, or unauthorized repair.
10.2 Appoġġ Tekniku
For technical assistance, troubleshooting, or further inquiries, please visit the official SilverStone webis-sit jew ikkuntattja l-appoġġ għall-klijenti tagħhom. Tista' ssib aktar informazzjoni u riżorsi fuq SilverStone Store on Amazon jew il-kumpanija uffiċjali tagħhom websit.


