
1. Introduzzjoni
This manual provides detailed instructions for the installation, operation, and maintenance of your STUDIOFINIX Bluetooth 5.4 4-Zone 8-Channel Audio Amplifier Receiver. This amplifier is designed to deliver high-fidelity audio across multiple rooms, offering independent zone control, various input options, and a professional karaoke function. Please read this manual thoroughly before use to ensure proper setup and optimal performance.
2. Istruzzjonijiet tas-Sigurtà
- Sors tal-Enerġija: Uża biss l-adapter tal-enerġija pprovdut. Kun żgur li l-volumtage jaqbel mar-rekwiżiti speċifikati fuq l-apparat.
- Ventilazzjoni: Do not block any ventilation openings. Install in a location with adequate airflow to prevent overheating.
- Ilma u Umdità: Tesponix l-unità għax-xita, umdità, jew likwidi li jqattru/jittajru. Żomm 'il bogħod minn sorsi tal-ilma.
- Sħana: Tpoġġix ħdejn sorsi tas-sħana bħal radjaturi, reġistri tas-sħana, stufi, jew apparat ieħor li jipproduċi sħana.
- Tindif: Unplug the unit from the power outlet before cleaning. Use a dry, soft cloth only.
- Servizzi: Tippruvax isservi dan il-prodott int stess. Irreferi l-manutenzjoni kollha lil persunal tas-servizz kwalifikat.
- Impedenza tal-Ispeaker: Ensure connected speakers have an impedance of 4-8 ohms. Connecting speakers with lower impedance may damage the ampaktar ħaj.
3. Kontenut tal-Pakkett
Iċċekkja li l-oġġetti kollha elenkati hawn taħt huma inklużi fil-pakkett tiegħek:
- STUDIOFINIX Amplifier x 1
- Adapter tal-Enerġija x 1
- Black Terminal Connectors x 4
- Manwal ta' Istruzzjoni x 1

Figure 3.1: Package Contents. The image displays the amplifier unit, its power adapter, four black terminal connectors, and the user manual.
4. Prodott Aktarview
4.1 Introduzzjoni tal-Panew ta' quddiem
The front panel provides access to primary controls and input ports for convenient operation.

Figure 4.1: Front Panel Layout. Key controls include the Volume/Power ON/OFF knob, MIC VOL knob, MIC input, AUX input, USB port, TF Card slot, and Bass/Treble adjustment knobs.
- VOLUME/PWR ON/OFF: Jikkontrolla l-volum ewlieni u jixgħel/jitfi l-unità.
- MIC VOL: Jaġġusta l-volum tal-mikrofonu konness.
- Input MIC: 3.5mm jack for microphone connection.
- Input AUX: 3.5mm jack for auxiliary audio devices.
- Port USB: Għad-daqq tal-awdjo files minn USB drive.
- Slott tal-Karta TF: Għad-daqq tal-awdjo files from a TF (MicroSD) card.
- BASS/TREBLE: Adjusts the low and high frequency response of the audio output.
4.2 Introduzzjoni tal-Panel ta' Fuq
The top panel features controls for mode selection, playback, and echo effects for karaoke.

Figure 4.2: Top Panel Layout. This view highlights the MODE button, playback controls (Fast Retreat/Previous Song, Play/Pause, Fast Forward/Next Song), and the ECHO button for microphone effects.
- MODALITÀ: Switches between input sources (Bluetooth, Optical, AUX, LINE IN, USB, TF Card).
- Kontrolli tal-daqq: Buttons for previous track, play/pause, and next track when using USB/TF card or Bluetooth.
- ECHO: Activates and adjusts the echo effect for the microphone input.
- Zone Control Buttons (1, 2, 3, 4): Independently turn on or off each of the four audio zones.
4.3 Back Panel Introduction
The back panel contains the main speaker outputs and additional wired input options.

Figure 4.3: Back Panel Layout. This image shows the DC IN port, speaker output terminals for Zones 1-4 (supporting 8 speakers), Optical input, and stereo RCA Line In (R/L) inputs.
- DC IN: Power input port for the provided power adapter.
- Speaker Outputs (ZONE 1-4): Connect up to 8 speakers (2 per zone) with 4-8 ohm impedance. Red terminals are positive (+), black terminals are negative (-).
- Input OTTIKU: Digital audio input for connecting devices like TVs or game consoles.
- LINE IN (R/L): Stereo RCA inputs for connecting analog audio sources.
5. Setup
5.1 Konnessjoni tal-Ispeaker
Il- amplifier supports up to 8 speakers, divided into 4 independent zones. Ensure your speakers have an impedance of 4-8 ohms.
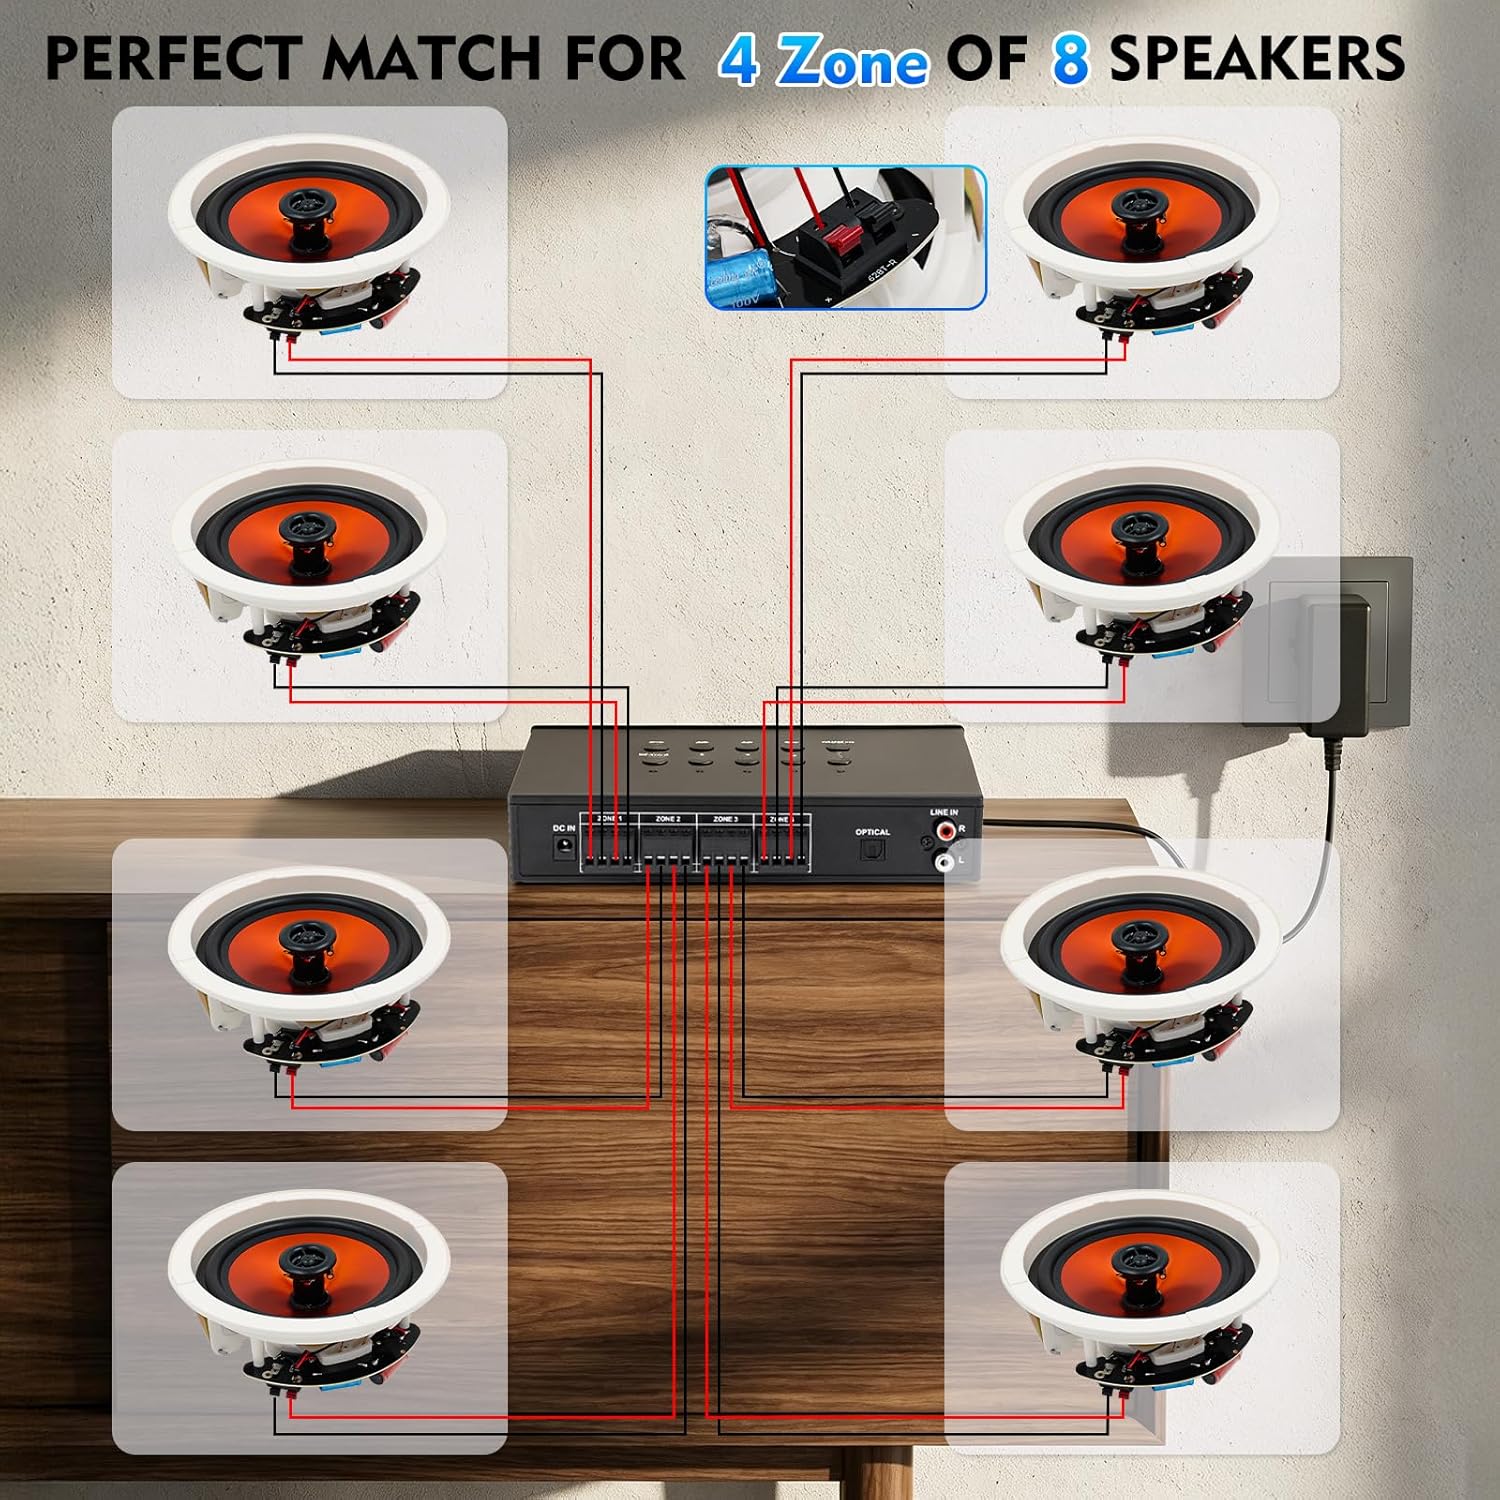
Figure 5.1: Speaker Wiring Diagram. This illustration demonstrates connecting two speakers per zone, with red wires to positive (+) terminals and black wires to negative (-) terminals on the amplifier's back panel.
- Identifika t-terminals pożittivi (+) u negattivi (-) fuq il-kelliema tiegħek.
- Connect the positive (+) wire from each speaker to the corresponding red (+) terminal on the amplifier for the desired zone.
- Connect the negative (-) wire from each speaker to the corresponding black (-) terminal on the amplifier for the desired zone.
- Repeat for all speakers across the 4 zones. Ensure all connections are secure.
5.2 Konnessjoni tal-Enerġija
After connecting all speakers and audio sources, connect the power adapter.
- Insert the DC plug of the power adapter into the 'DC IN' port on the back of the ampaktar ħaj.
- Ipplaggja l-adapter tal-enerġija f'sokit tal-ħajt adattat.
6. Istruzzjonijiet Operattivi
6.1 Mixgħul/Mitfi u Kontroll tal-Volum
- Biex titħaddem il- amplifier, rotate the VOLUME/PWR ON/OFF knob clockwise until the display illuminates.
- Biex titfi, dawwar il-pum kontra l-arloġġ sakemm tikklikkja biex tintefa.
- Adjust the master volume by rotating the VOLUME/PWR ON/OFF pum.
6.2 Għażla tas-Sors tal-Input
Agħfas il- MODALITÀ button on the top panel to cycle through available input sources: Bluetooth, Optical, AUX, LINE IN, USB, and TF Card.
6.3 Tqabbil tal-Bluetooth
Biex tikkonnettja apparat Bluetooth:

Figure 6.1: Bluetooth Connectivity. The image shows a smartphone successfully paired with the amplifier, indicating stable Bluetooth 5.4 connection for wireless audio streaming.
- Agħżel il-modalità Bluetooth billi tuża l- MODALITÀ button. The display will show "BT" or a similar indicator.
- Fuq l-ismartphone, it-tablet, jew apparat ieħor li jaħdem bil-Bluetooth tiegħek, attiva l-Bluetooth u fittex apparati disponibbli.
- Select "STUDIOFINIX" or a similar name from the list to pair.
- Ladarba tkun imqabbda, tista' tistrimja l-awdjo mingħajr fili lill- ampaktar ħaj.
6.4 Wired Input Operation
Il- amplifier supports various wired audio sources:

Figure 6.2: Multiple External Audio Sources. This graphic illustrates the diverse input options available, including Microphone, Bluetooth, USB, AUX, and TF Card, allowing connection of various external devices.
- Input ottiku: Connect a digital audio cable from your source (e.g., TV, game console) to the OPTICAL port on the back panel. Select Optical mode using the MODALITÀ buttuna.
- Input AUX: Connect a 3.5mm audio cable from your device to the AUX port on the front panel. Select AUX mode.
- LINJA FI: Connect RCA cables from your analog audio source (e.g., CD player) to the LINE IN (R/L) ports on the back panel. Select LINE IN mode.
- Karta USB/TF: Insert a USB drive or TF card into the respective slot on the front panel. The amplifier will automatically switch to USB or TF mode and begin playback. Use the playback controls on the top panel to manage tracks.
6.5 Funzjoni tal-Karaoke
Enjoy karaoke with the built-in microphone input and echo effect.

Figure 6.3: Karaoke Ready. This image depicts individuals enjoying a karaoke session, highlighting the amplifier's capability to connect a microphone for vocal performances.
- Ipplaggja l-mikrofonu tiegħek fil- Input MIC fuq il-pannell ta’ quddiem.
- Aġġusta l-volum tal-mikrofonu billi tuża l- MIC VOL pum.
- Agħfas il- ECHO button on the top panel to activate and adjust the echo effect for your vocals.
6.6 Independent Zone Control
Il- amplifier allows you to independently control the power for each of the four speaker zones.

Figure 6.4: 4-Zone Independent Control. This visual demonstrates how the amplifier can manage audio in four separate areas, allowing users to turn zones on or off as needed for multi-room audio customization.
- Uża d-dedikat ZONE 1, ZONE 2, ZONE 3, ZONE 4 buttons on the top panel to toggle each zone on or off.
- Note that while zones can be independently turned on/off, the overall volume, bass, and treble settings apply to all active zones simultaneously.
6.7 Aġġustament tal-Bass u t-Treble
Adjust the audio's tonal characteristics using the BASS u TREBLE knobs on the front panel to suit your preference.
7. Manutenzjoni
- Tindif: Disconnect the power before cleaning. Use a soft, dry cloth to wipe the exterior of the unit. Do not use liquid cleaners or aerosol sprays.
- Ħażna: If storing the unit for an extended period, disconnect it from power and store in a cool, dry place away from direct sunlight.
- Ventilazzjoni: Iċċekkja regolarment li l-fetħiet tal-ventilazzjoni jkunu nodfa mit-trab u l-fdalijiet.
8 Issolvi l-problemi
| Problema | Kawża Possibbli | Soluzzjoni |
|---|---|---|
| Ebda qawwa | Power adapter not connected; Power outlet not working; Unit is off. | Ensure power adapter is securely connected and plugged into a live outlet. Turn the VOLUME/PWR ON/OFF knob clockwise. |
| L-ebda ħoss mill-kelliema | Incorrect input source selected; Speaker wires loose or incorrectly connected; Volume too low; Specific zone turned off. | Press MODE to select the correct input. Check speaker wire connections (positive/negative). Increase master volume. Ensure the relevant zone button is ON. |
| Il-Bluetooth mhux qed jgħaqqad | Not in Bluetooth mode; Device too far; Device already connected to another ampaktar ħaj. | Select Bluetooth mode. Move device closer to the amplifier. Disconnect from other Bluetooth devices and try pairing again. |
| Mikrofonu mhux qed jaħdem | Microphone not plugged in; MIC VOL too low. | Ensure microphone is securely plugged into the MIC input. Increase the MIC VOL knob. |
| Il-karta USB/TF mhux qed tilgħab | Modalità mhux korretta; Inkompatibbli file format; Corrupted media. | Select USB or TF mode. Ensure audio files are in a supported format (e.g., MP3). Try a different USB drive or TF card. |
9. Speċifikazzjonijiet
| Karatteristika | Speċifikazzjoni |
|---|---|
| Brand | STUDIOFINIX |
| Numru tal-Mudell | ST-AMP-8PBT-BK-US |
| Numru ta 'Kanali | 8 |
| Output Wattage | 480 Watt (Total) |
| Verżjoni Bluetooth | 5.4 |
| Impedenza tal-Ispeaker | 4-8 ohms |
| Għażliet ta' Input | Optical, AUX, LINE IN, USB, TF Card, MIC, Bluetooth |
| Rispons ta' Frekwenza | ±2dB@20-20kHz |
| Sinjal-mal-ħoss Ratio | 85dB |
| Dimensjonijiet (L x W x H) | 195mm x 40mm x 140mm (Approx.) |
10. Informazzjoni dwar Garanzija
This STUDIOFINIX amplifier jiġi ma 'a Garanzija Limitata ta' 1 Snin from the date of purchase. This warranty covers manufacturing defects in materials and workmanship under normal use. It does not cover damage caused by misuse, accident, unauthorized modification, or improper installation. Please retain your proof of purchase for warranty claims.
11. Appoġġ għall-Klijent
For technical assistance, warranty claims, or general inquiries, please contact STUDIOFINIX customer support through the retailer's platform or visit the official STUDIOFINIX websit għal informazzjoni ta' kuntatt.
Appoġġ onlajn: www.studiofinix.com