Introduzzjoni
This manual provides comprehensive instructions for the installation, operation, maintenance, and troubleshooting of the ASUS Prime H810M-E-CSM Intel H810 mATX Commercial CSM Motherboard. This motherboard is engineered for Intel Core Ultra (Series 2) processors, offering robust performance and essential features for commercial and AI PC applications.
Informazzjoni dwar is-Sigurtà
Dejjem osserva l-prekawzjonijiet ta' sigurtà li ġejjin waqt l-installazzjoni u t-tħaddim:
- Skonnettja l-korda tal-enerġija mis-sokit tal-ħajt qabel ma tmiss xi komponenti.
- Ilbes ċinga tal-polz anti-statika biex tevita ħsara lill-komponenti minn skarika elettrostatika (ESD).
- Immaniġġja l-komponenti mit-truf tagħhom biex tevita li tmiss partijiet sensittivi.
- Żgura ventilazzjoni xierqa fil-kaxxa tal-PC tiegħek biex tevita li tissaħħan iżżejjed.
- Refer to the specific component manuals for additional safety guidelines.
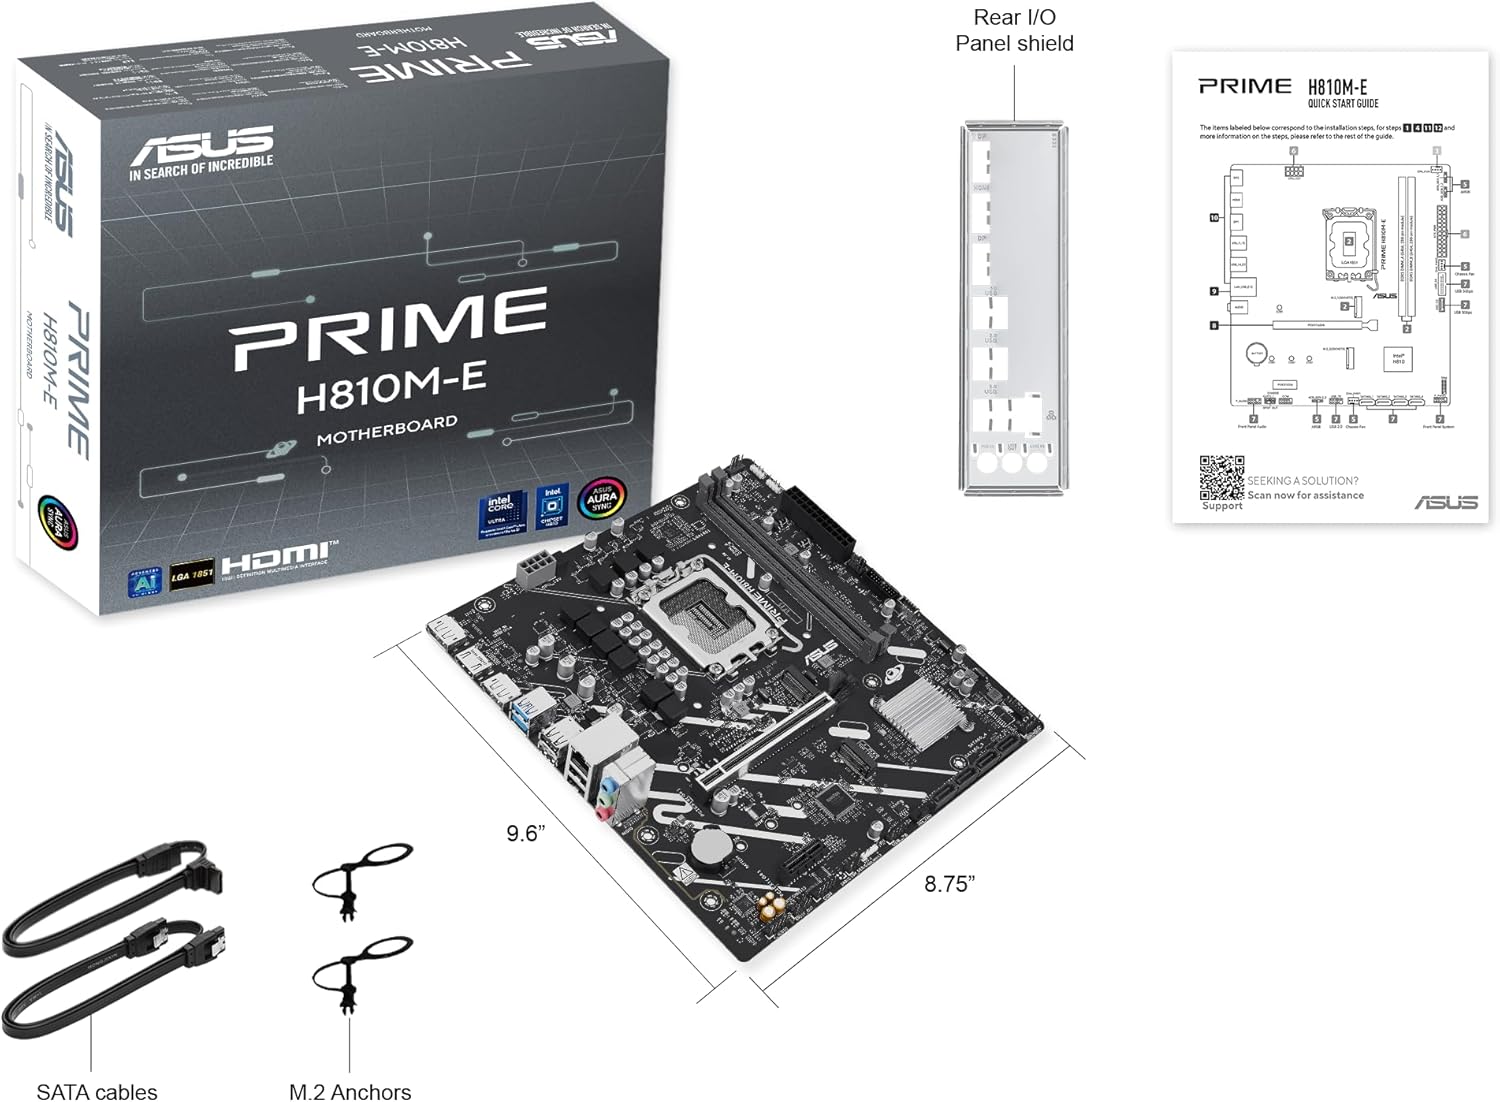
Kontenut tal-Pakkett
Ivverifika li l-oġġetti kollha huma preżenti fil-pakkett tal-motherboard tiegħek:
- ASUS Prime H810M-E-CSM Motherboard
- SATA 6Gb/s Data Cables (2x)
- M.2 SSD Anchors (2x)
- Rear I/O Shield
- Manwal għall-Utent / Gwida tal-Bidu Mgħaġġel
Tqassim tal-motherboard
Iffamiljarizza ruħek mal-komponenti u l-konnetturi ewlenin fuq il-motherboard.


Setup
1. Installazzjoni tas-CPU
This motherboard supports Intel Core Ultra (Series 2) processors with an LGA 1851 socket.
- Iftaħ il-lieva tas-sokit tas-CPU u neħħi l-għatu protettiv.
- Carefully align the CPU with the socket, ensuring the notches on the CPU match the keys on the socket.
- Poġġi s-CPU bil-mod fis-sokit mingħajr ma tapplika forza.
- Agħlaq il-lieva tas-sokit biex twaħħal is-CPU.
- Installa l-cooler tas-CPU skont l-istruzzjonijiet tal-manifattur tiegħu.
2. Installazzjoni tal-Memorja (RAM)
The motherboard features two DDR5 DIMM slots, supporting up to 128GB of RAM.
- Iftaħ il-klipps fiż-żewġt itruf tas-slott tad-DIMM.
- Allinja l-modulu tal-memorja mas-slott, filwaqt li tiżgura li l-islott fuq il-modulu taqbel maċ-ċavetta fis-slott.
- Agħfas sew 'l isfel fuq iż-żewġt itruf tal-modulu tal-memorja sakemm il-klipps jidħlu f'posthom.
3. Installazzjoni tal-Ħażna
The motherboard supports M.2 SSDs and SATA drives.
Installazzjoni SSD M.2:
- Sib l-islot M.2 fuq il-motherboard.
- Daħħal l-M.2 SSD fl-islott f'angolu ta' 30 grad.
- Gently push down the SSD and secure it with the provided M.2 anchor or screw.

Installazzjoni tad-Drajv SATA:
- Qabbad tarf wieħed ta' kejbil tad-dejta SATA ma' port SATA fuq il-motherboard.
- Connect the other end of the SATA data cable to your storage drive (HDD/SSD).
- Connect a SATA power cable from your power supply unit (PSU) to the storage drive.
4. Installazzjoni tal-Karta PCIe
Install graphics cards or other expansion cards into the PCIe 4.0 slots.
- Open the retention clip at the end of the PCIe slot.
- Align the expansion card with the slot and press down firmly until it is seated and the clip snaps shut.
- Waħħal il-kard mal-kaxxa tal-PC b'kamin.

5. Konnessjonijiet tal-Enerġija
Connect the power supply unit (PSU) cables to the motherboard.
- Konnettur tal-Enerġija ATX ta' 24-pin: Connect the main 24-pin power cable from your PSU to the corresponding connector on the motherboard.
- 8-pin CPU Power Connector (EATX12V): Connect the 8-pin CPU power cable from your PSU to the connector located near the CPU socket.
6. Konnessjonijiet tal-Panel ta' Quddiem
Connect your PC case's front panel cables (power button, reset button, USB ports, audio jacks, LED indicators) to the corresponding headers on the motherboard. Refer to the motherboard diagram for exact locations.
Operazzjoni
L-Ewwel Boot u s-Setup tal-BIOS/UEFI
Wara li tiġbor is-sistema tiegħek, qabbad monitor, tastiera, u maws. Ixgħel is-sistema.
- Agħfas il- Ħassar ċavetta waqt l-istartjar biex tidħol fl-utilità tas-setup tal-BIOS/UEFI.
- Ikkonfigura l-ordni tal-ibbutjar, il-ħin tas-sistema, u settings essenzjali oħra.
- Issejvja l-bidliet u oħroġ mill-BIOS.

Driver and Operating System Installation
Install your preferred operating system (e.g., Windows 10/11) from a bootable USB drive or DVD. After OS installation, install the latest drivers for the motherboard chipset, LAN, audio, and any other integrated components from the ASUS support websit biex tiġi żgurata prestazzjoni u stabbiltà ottimali.
Manutenzjoni
Tindif
Naddaf il-PC tiegħek regolarment biex tevita l-akkumulazzjoni tat-trab, li jista' jwassal għal sħana żejda u ħsara fil-komponenti. Uża arja kkompressata biex tneħħi t-trab mill-heatsinks, fannijiet, u komponenti oħra. Kun żgur li s-sistema tkun mitfija u skonnettjata qabel ma tnaddafha.
Aġġornamenti tal-BIOS
Iċċekkja l-appoġġ tal-ASUS perjodikament website for BIOS updates. BIOS updates can improve system stability, compatibility, and performance. Follow the instructions provided by ASUS carefully when performing a BIOS update to avoid system damage.
Issolvi l-problemi
Din it-taqsima tindirizza kwistjonijiet komuni li tista’ tiltaqa’ magħhom.
- No Display / No Post:
- Kun żgur li l-kejbils tal-enerġija kollha (24-pin ATX, 8-pin CPU) huma konnessi sew.
- Reseat the RAM modules. Try booting with only one RAM stick.
- Verify the CPU is correctly seated and the CPU cooler is properly installed.
- Check that the graphics card is fully seated in its PCIe slot and has adequate power.
- Jekk qed tuża grafika integrata, kun żgur li l-monitor tiegħek huwa konness mal-output tal-vidjo tal-motherboard (HDMI).
- Instabbiltà / Ħabtiet tas-Sistema:
- Kun żgur li s-sewwieqa kollha huma aġġornati.
- Iċċekkja t-temperaturi tas-CPU u l-GPU billi tuża softwer ta' monitoraġġ.
- Mexxi għodod dijanjostiċi tal-memorja biex tiċċekkja jekk hemmx RAM difettuża.
- Ivverifika l-PSU wattage hija biżżejjed għall-komponenti kollha.
- Periferali Mhux Rilevat:
- Ipprova qabbad il-periferali ma' port differenti.
- Installa jew aġġorna d-drajvers għall-periferali.
- Check BIOS settings to ensure the port is enabled.
Speċifikazzjonijiet
| Karatteristika | Speċifikazzjoni |
|---|---|
| Brand | ASUS |
| Isem tal-Mudell | PRIME H810M-E-CSM |
| Socket tas-CPU | LGA 1851 |
| Proċessuri Kompatibbli | Proċessuri Intel Core Ultra (Serje 2) |
| Tip ta' Ċipset | Intel H810 |
| Teknoloġija tal-Memorja RAM | DDR5 |
| Slots tal-Memorja Disponibbli | 2 |
| Ram Memory Maximum Size | 128 GB |
| Interface tal-Kard Grafika | PCI Express 4.0 |
| Total PCIe Ports | 2 |
| Portijiet SATA Totali | 4 |
| Total M.2 Slots | 1 |
| Portijiet USB totali | 11 (tipi varji) |
| Numru Totali ta' Portijiet HDMI | 1 |
| Numru ta' Portijiet Ethernet | 1 (1Gb LAN) |
| Tip ta 'Konnettur tal-Enerġija Prinċipali | 24-Pin |
| Pjattaforma | Windows 10, Windows 11 |
| Dimensjonijiet tal-oġġett L x W x H | 9.6"T x 8.7"W x 1.5"Għ |
| Piż tal-oġġett | 1.1 Liri |
Informazzjoni dwar Garanzija
The ASUS Prime H810M-E-CSM Motherboard comes with a Garanzija ta' 3 snin mill-manifattur. For detailed terms and conditions, please refer to the warranty card included in your package or visit the official ASUS support websit.
Appoġġ
For further assistance, technical support, driver downloads, or BIOS updates, please visit the official ASUS support websit:
You can also find additional resources and FAQs on the ASUS product page for the Prime H810M-E-CSM.