
1. Introduzzjoni
The Alxum Displayport KVM Switch (Model: SJW-KM202A) allows two computers to share two monitors, a keyboard, a mouse, and other USB 3.0 devices. This KVM switch supports DisplayPort input from computers and HDMI output to monitors, providing a streamlined workspace for users managing multiple systems.
Il-karatteristiċi ewlenin jinkludu:
- Appoġġ għall-Monitor Doppju: Connects two computers to two monitors using DisplayPort input and HDMI output.
- Riżoluzzjoni Għolja: Supports Ultra HD 4K@60Hz (3840x2160@60Hz) resolution, backward compatible with 4K@30Hz, 1920x1080P@60Hz, and lower resolutions.
- Konnettività USB 3.0: Equipped with 3 USB-A and 1 USB-C ports, offering Super Speed USB 3.0 data transfer at up to 5Gbps for sharing peripherals like keyboards, mice, printers, and USB drives.
- Multiple Switching Modes: Features one-touch button switching on the device and a wired desktop controller for convenient computer selection.
- Kompatibilità Wiesgħa: Kompatibbli mas-sistemi operattivi Windows, macOS, u Linux.
2. Kontenut tal-Pakkett
Jekk jogħġbok ivverifika li l-oġġetti kollha huma preżenti fil-pakkett tiegħek:
- 1 x Alxum Displayport KVM Switch
- 2 x USB-A to USB-A Cables
- 1 x Kontrollur tad-Desktop
- 1 x Adapter tal-Enerġija
- 1 x Kejbil tal-Enerġija
- 1 x Manwal għall-Utent

Image: Contents of the Alxum Displayport KVM Switch package, including the KVM unit, cables, desktop controller, power adapter, and user manual.
3. Prodott Aktarview
Familiarize yourself with the ports and buttons on your KVM switch:
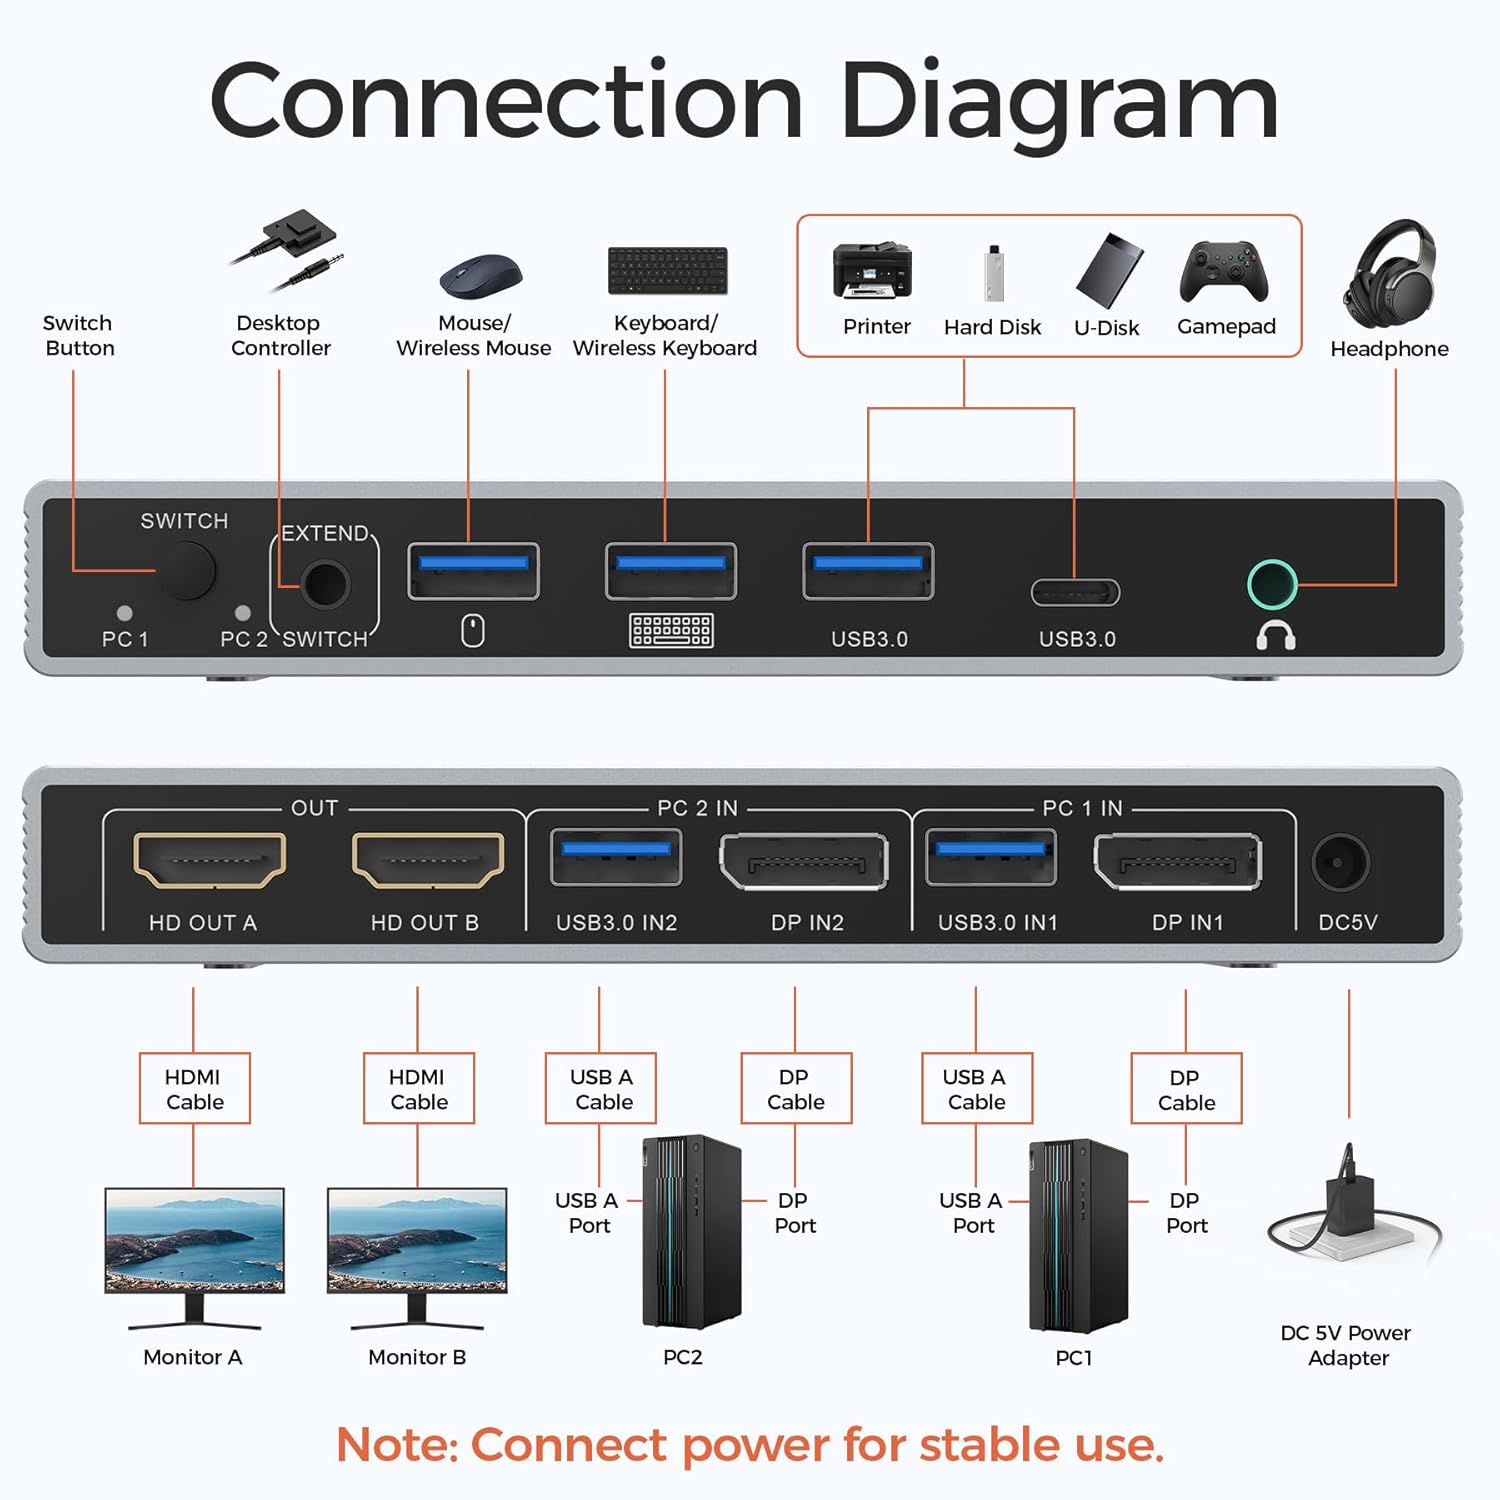
Image: Detailed connection diagram showing the front and rear panels of the Alxum Displayport KVM Switch, illustrating all input and output ports.
Front Panel
- SWITCH Button: Toggles between PC1 and PC2.
- EXTEND Port: Connects to the wired desktop controller for remote switching.
- Portijiet USB 3.0 (3x USB-A, 1x USB-C): For connecting USB peripherals such as keyboard, mouse, printer, U-disk, etc.
- Awdjo Out Port: Għall-konnessjoni ta' headphones jew speakers.
Panel ta' wara
- HD OUT A / HD OUT B: HDMI outputs for connecting to two monitors.
- PC 2 IN (USB3.0 IN2, DP IN2): Inputs for connecting to Computer 2 (one USB-A cable, one DisplayPort cable).
- PC 1 IN (USB3.0 IN1, DP IN1): Inputs for connecting to Computer 1 (one USB-A cable, one DisplayPort cable).
- DC 5V: Port tad-dħul tal-enerġija għall-adapter tal-enerġija inkluż.

Image: Close-up of the KVM switch showing the LED indicator light, which illuminates to show which PC (PC1 or PC2) is currently active.
4. Istruzzjonijiet ta' Setup
Follow these steps to connect your Alxum Displayport KVM Switch:
- Konnessjoni tal-Enerġija: Connect the included 5V power adapter to the DC 5V port on the KVM switch and plug it into a power outlet. This is essential for stable operation.
- Konnessjoni tal-monitor: Connect your two monitors to the HD OUT A and HD OUT B (HDMI) ports on the KVM switch using HDMI cables.
- Konnessjoni tal-Kompjuter 1:
- Connect one DisplayPort cable from your first computer's DisplayPort output to the DP IN1 port on the KVM switch.
- Connect one USB-A to USB-A cable from your first computer's USB-A port to the USB3.0 IN1 port on the KVM switch.
- Konnessjoni tal-Kompjuter 2:
- Connect one DisplayPort cable from your second computer's DisplayPort output to the DP IN2 port on the KVM switch.
- Connect one USB-A to USB-A cable from your second computer's USB-A port to the USB3.0 IN2 port on the KVM switch.
- Konnessjoni Periferali: Connect your keyboard, mouse, and other USB peripherals to the USB 3.0 ports on the front panel of the KVM switch. If using a wired desktop controller, connect it to the EXTEND port.
- Konnessjoni tal-awdjo (Mhux obbligatorju): Connect your headphones or speakers to the Audio Out port on the front panel.
Noti Importanti għas-Setup:
- Ensure each computer supports dual-monitor display. Test by connecting monitors directly to your computer before using the KVM switch.
- Each computer requires one DisplayPort cable and one USB-A cable connected to the KVM switch for full functionality (video, keyboard, mouse).
- Both your computer and monitors must support 4K@60Hz, and you must use appropriate cables, to achieve 4K@60Hz resolution.
- Do not press the switch button while connecting devices or cables to prevent potential issues.
- The two monitors will display the video source from only one computer at a time; simultaneous output from both PC1 and PC2 is not supported.

Image: Diagram illustrating the simplified cabling of the Alxum KVM switch, showing that each computer only requires one DisplayPort and one USB cable for connection.
5. Istruzzjonijiet Operattivi
Qlib Bejn Kompjuters
The Alxum KVM switch offers two methods for switching between connected computers:
- Swiċċ Buttuna: Press the 'SWITCH' button on the front panel of the KVM device to toggle between PC1 and PC2. The LED indicator will show which computer is active.
- Desktop Controller Switch: Use the wired desktop controller connected to the 'EXTEND' port. Press the button on the controller to switch between PC1 and PC2. This provides a convenient remote switching option.
Note: Hotkey switching via keyboard is not supported by this KVM switch.
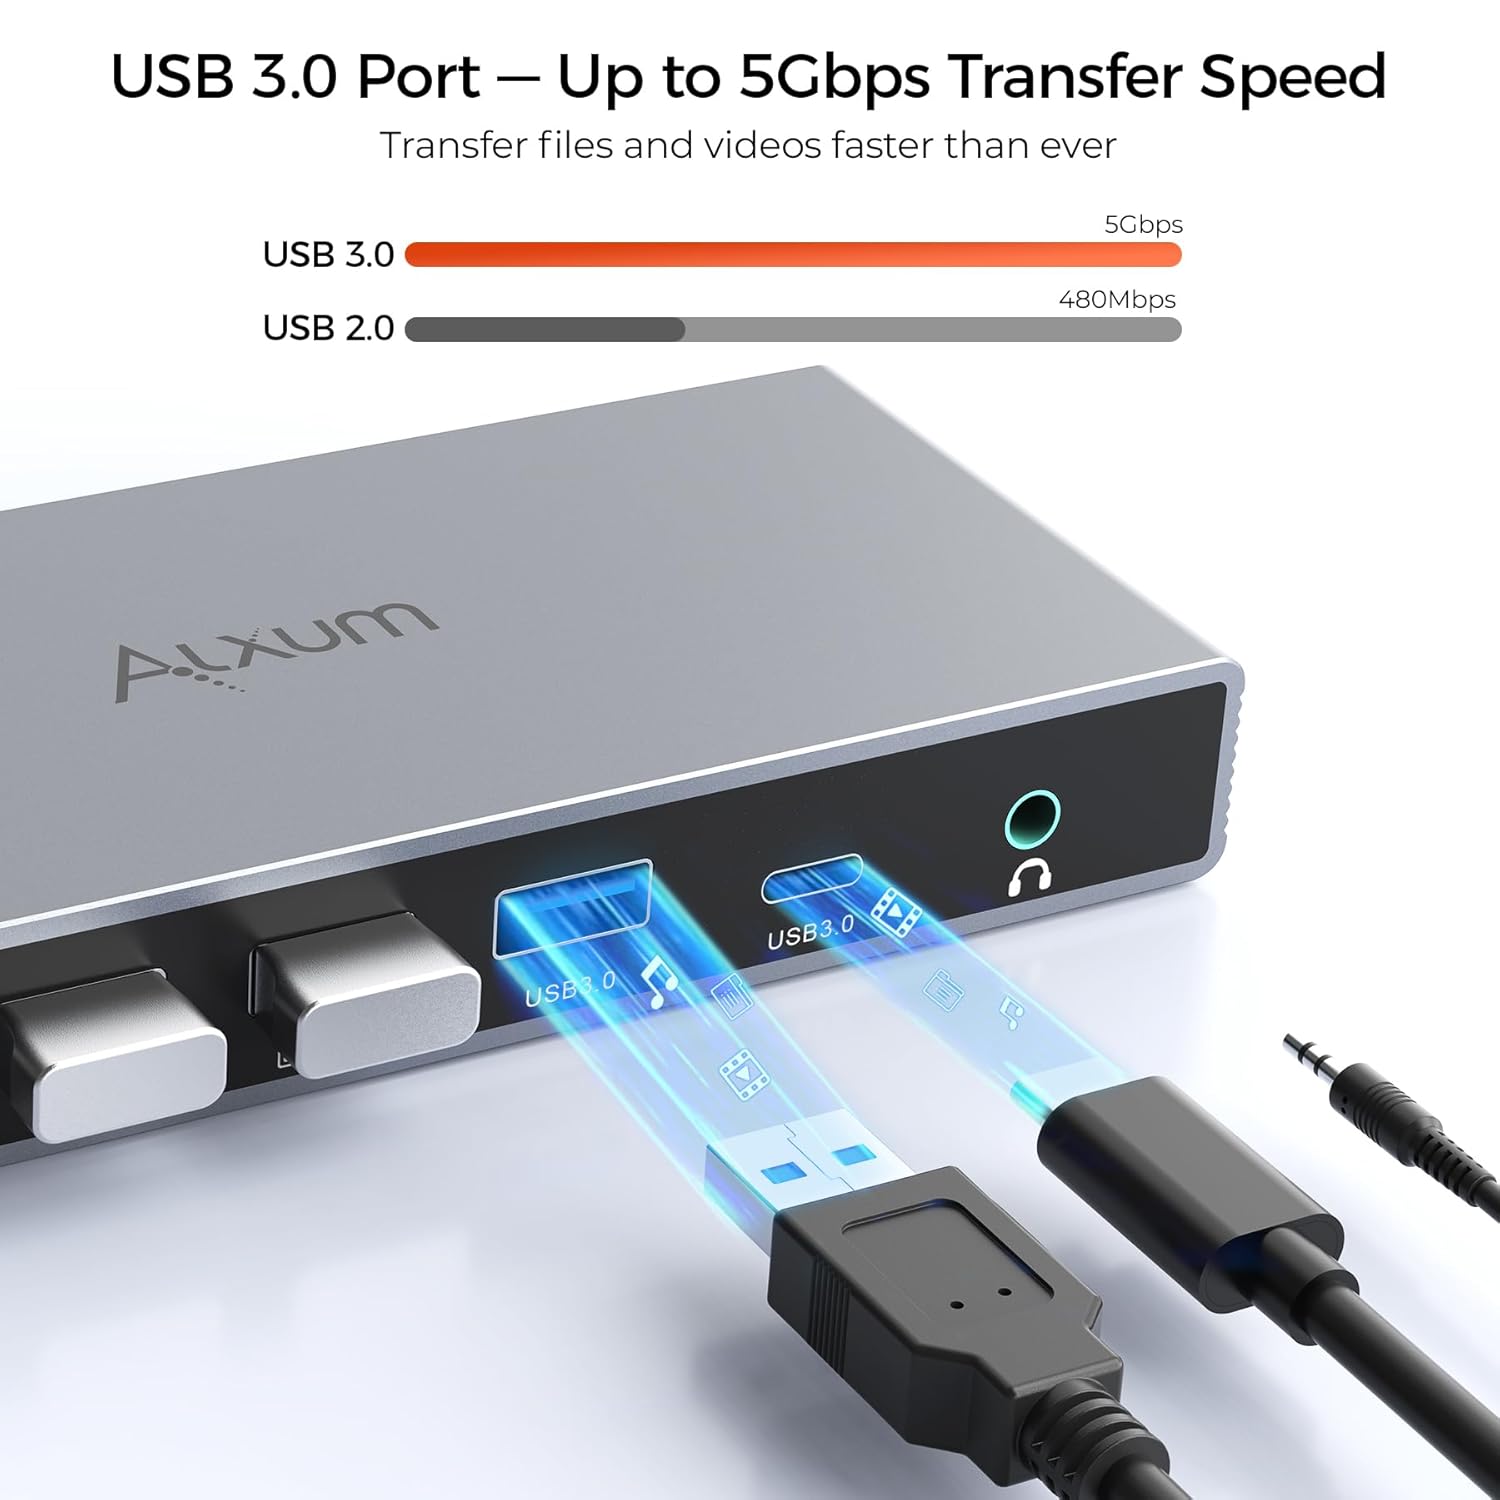
Image: Illustration showing the two methods for switching between computers: directly pressing the button on the KVM unit or using the wired desktop controller.
Display Working Modes
The KVM switch supports two primary display modes for your dual monitors:
- Modalità Estiża: Each monitor displays a different part of your desktop, extending your workspace.
- Modalità mera: Both monitors display the same content, mirroring your desktop.
To configure display modes on Windows, press Rebħa + P and select your desired mode (Duplicate or Extend). For macOS, please note that Multi-Stream Transport (MST) for extended mode may not be fully supported, depending on your Mac model and OS version.
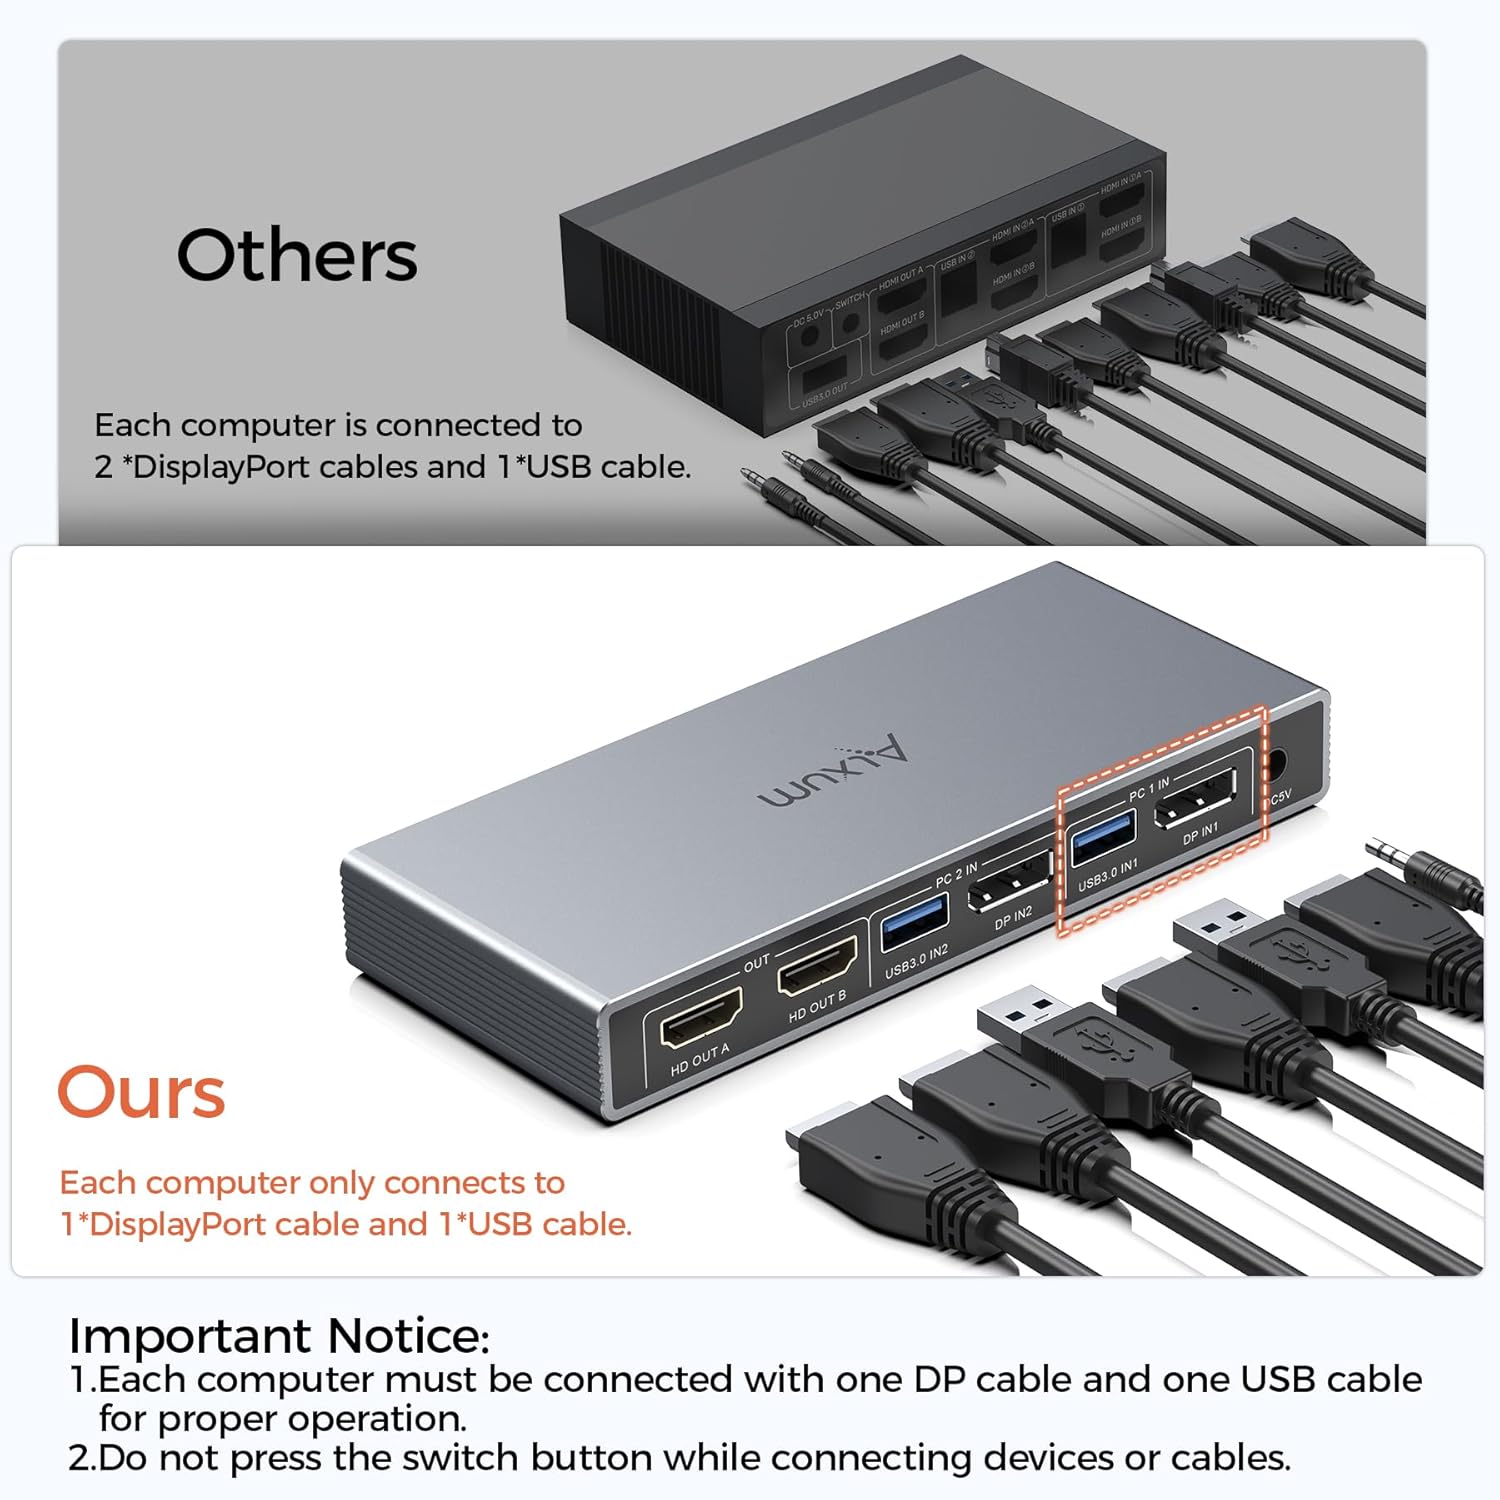
Image: Visual representation of Extended Mode, where two monitors show different content, and Mirror Mode, where both monitors display identical content.
6. Speċifikazzjonijiet
| Karatteristika | Speċifikazzjoni |
|---|---|
| Numru tal-Mudell | SJW-KM202A |
| Portijiet tad-dħul | 2 x DisplayPort (for PC video), 2 x USB 3.0 Type-A (for PC data) |
| Portijiet tal-ħruġ | 2 x HDMI (for monitors), 3 x USB 3.0 Type-A, 1 x USB 3.0 Type-C, 1 x 3.5mm Audio Out |
| Riżoluzzjoni tal-vidjo | Up to 4K@60Hz (3840x2160@60Hz), backward compatible |
| Trasferiment tad-Data USB | Sa 5Gbps (USB 3.0) |
| Metodi tal-Qlib | Button on device, Wired Desktop Controller |
| Sistemi Operattivi | Windows, macOS, Linux |
| Provvista tal-Enerġija | DC 5V (permezz tal-adapter tal-enerġija inkluż) |
| Dimensjonijiet (L x W x H) | 7.09 x 2.95 x 0.79 pulzieri (18 x 7.5 x 2 ċm) |
| Piż tal-oġġett | 1.01 liri (0.46 kg) |
7 Issolvi l-problemi
Jekk tiltaqa' ma' problemi bis-swiċċ KVM tiegħek, jekk jogħġbok irreferi għas-soluzzjonijiet komuni li ġejjin:
- No Display / Flickering Screen:
- Ensure the 5V power adapter is securely connected to the KVM switch and a power outlet.
- Verify all DisplayPort and HDMI cables are correctly and firmly connected to both the KVM switch, computers, and monitors.
- Check if your computers and monitors support the desired resolution (e.g., 4K@60Hz). Ensure all cables used are rated for that resolution.
- Try connecting the monitors directly to the computer to confirm they function correctly without the KVM switch.
- Restart the KVM switch by unplugging and re-plugging the power adapter.
- It-Tastiera/Maws Mhux Jirrispondi:
- Ensure the USB-A to USB-A cables are securely connected from both computers to the KVM switch (USB3.0 IN1 and USB3.0 IN2).
- Verify your keyboard and mouse are connected to the USB 3.0 ports on the front of the KVM switch.
- Try connecting the keyboard and mouse to different USB ports on the KVM switch.
- Ensure the correct computer input (PC1 or PC2) is selected on the KVM switch.
- Note that hotkey switching is not supported; use the physical button on the KVM or the wired desktop controller.
- Apparati USB Mhux Skoperti:
- Confirm the USB-A to USB-A cables are properly connected from both computers to the KVM switch.
- Kun żgur li s-swiċċ tal-KVM huwa mixgħul.
- Try connecting the USB device to a different USB 3.0 port on the KVM switch.
- Kwistjonijiet tal-Awdjo:
- Check the audio cable connection from your speakers/headphones to the KVM's Audio Out port.
- Verify audio output settings on your computer are configured to use the KVM switch as the audio device.
8. Manutenzjoni
To ensure the longevity and optimal performance of your Alxum Displayport KVM Switch, follow these maintenance guidelines:
- Tindif: Uża drapp artab u niexef biex tnaddaf il-barra tal-apparat. Evita li tuża prodotti tat-tindif likwidi jew aerosols, li jistgħu jagħmlu ħsara lill-unità.
- Ħażna: Aħżen is-swiċċ KVM f'post frisk u niexef 'il bogħod mix-xemx diretta u minn temperaturi estremi.
- Immaniġġjar: Immaniġġja l-apparat b'attenzjoni. Evita li twaqqgħu jew li tissottomettih għal impatti qawwija.
- Ġestjoni tal-Kejbil: Kun żgur li l-kejbils mhumiex mgħawġa jew imġebbda żżejjed, għax dan jista' jwassal għal ħsara maż-żmien.
- Itfi: If the device will not be used for an extended period, it is recommended to disconnect the power adapter.
9. Garanzija u Appoġġ
Alxum products are designed for reliability and performance. For specific warranty information, please refer to the warranty card included with your product or visit the official Alxum websit.
If you require technical assistance or have questions not covered in this manual, please contact Alxum customer support through their official channels. When contacting support, please have your product model number (SJW-KM202A) and purchase details readily available.