1. Introduzzjoni
Thank you for choosing the Bloomy Luminology IPL Epilator. This device utilizes advanced Intense Pulsed Light (IPL) technology for effective, gentle, and painless hair removal. Designed for home use, it helps inhibit hair regrowth over time, providing a smooth skin experience. Please read this manual thoroughly before first use to ensure safe and optimal operation.
2. Kontenut tal-Kitt
Your Bloomy Luminology IPL Epilator package includes the following items:
- 1 x IPL Epilation Device
- 1 x Pair of Protective Glasses
- 1 x Razor
- 1 x Adapter tal-Enerġija
- 1 x Pinzell tat-Tindif
- 1 x Pair of Black Sunglasses
- 3 x Makeup Remover Pads
3. Twissijiet tas-Sigurtà
Important: Always read and follow all safety instructions before using the device.
- Wear the provided protective glasses during operation to shield your eyes from the intense pulsed light.
- Do not use the device on or near the eye area.
- Żomm l-apparat 'il bogħod mill-ilma u l-umdità.
- Do not use on irritated, damaged, or sunburned skin.
- Consult a doctor before use if you have any skin conditions, medical implants, or are pregnant/breastfeeding.
- Żomm fejn ma jintlaħaqx mit-tfal.
- Aqla 'l-apparat meta ma jkunx qed jintuża u qabel it-tindif.
4. Setup
- Ipprepara l-ġilda: Clean and shave any surface hair in the area you intend to treat. Ensure the skin is dry and free of lotions, oils, or deodorants.
- Qabbad l-Enerġija: Connect the power adapter to the device and then plug it into an electrical outlet. The device will power on.
- Ilbes Protezzjoni tal-Għajnejn: Put on the provided protective glasses to shield your eyes from the IPL flashes.
5. Istruzzjonijiet Operattivi
5.1. Understanding Energy Levels and Modes
The Bloomy Luminology IPL Epilator features 5 adjustable energy levels and 2 operating modes to suit different skin types and treatment areas.
- Livelli ta' Enerġija: The device supports five energy adjustment levels. Start with a lower level (e.g., Level 1) and gradually increase as your skin tolerates it. Higher levels provide greater energy for more effective results.
- Modalità Awtomatika: Suitable for large areas like legs, arms, and back. This mode allows for continuous flashing when the device is in contact with the skin.
- Modalità Manwali: Ideal for sensitive or smaller, precise areas such as the face, bikini line, and armpits. In this mode, you manually press the flash button for each pulse.
5.2. Step-by-Step Usage
- Adjust Energy Level: Once powered on, use the appropriate buttons (refer to device interface) to select your desired energy level. Start with a low level and increase gradually.
- Agħżel il-Modalità: Long press the flash button to switch between Automatic and Manual modes.
- Applika fuq il-ġilda: Place the device's treatment window vertically and firmly against your skin in the area to be treated. Ensure full contact.
- Ibda l-Flash:
- In Modalità Manwali, press the flash button gently to emit a single pulse of light.
- In Modalità Awtomatika, the device will automatically flash when in full contact with the skin. Glide the device slowly over the treatment area.
- Mexxi lejn iż-Żona li Jmiss: After each flash (manual mode) or continuous flashes (automatic mode), move the device to an adjacent skin area. Avoid overlapping flashes too much or treating the same spot multiple times in one session.
- Wara t-Trattament: After completing your session, you may apply a soothing lotion or skincare product to the treated area if desired.
5.3. Skeda ta' Trattament
For optimal results, follow a consistent treatment schedule. Visible hair reduction is typically observed after 8 weeks of regular use. Hair will gradually become thinner and regrowth will be inhibited.
- Ġimgħat 1-3: Visible hair reduction and slower hair regrowth.
- Ġimgħat 4-6: Hair gradually becomes thinner.
- Ġimgħat 7-8: Achieve smoother skin.
- After Week 8: Use 1-2 times per month for maintenance.

Immaġni: IPL Technology and Hair Growth Cycle. This diagram illustrates how IPL technology penetrates deep into the hair follicle root to interrupt the hair growth cycle, showing the progression of hair reduction over 8 weeks.

Immaġni: Precise and Effective Hair Removal in 8 Weeks. This image shows examples of treatment progression on the leg and bikini line, with visible hair reduction from week 0 to week 8.

Immaġni: 5th Light Intensity. This graphic illustrates the five-speed free adjustment of light intensity, indicating that higher gears provide greater energy and better effects, suitable even for soft and sensitive parts.

Immaġni: Multifunctional and Efficient Treatment Times. This chart provides estimated treatment times for various body parts, such as 1 minute for armpits, 2 minutes for face, 3 minutes for arms, 5 minutes for shanks and thighs, 1 minute for neck and shoulder, and 12 minutes for back, with a total of 30 minutes for painless hair removal.
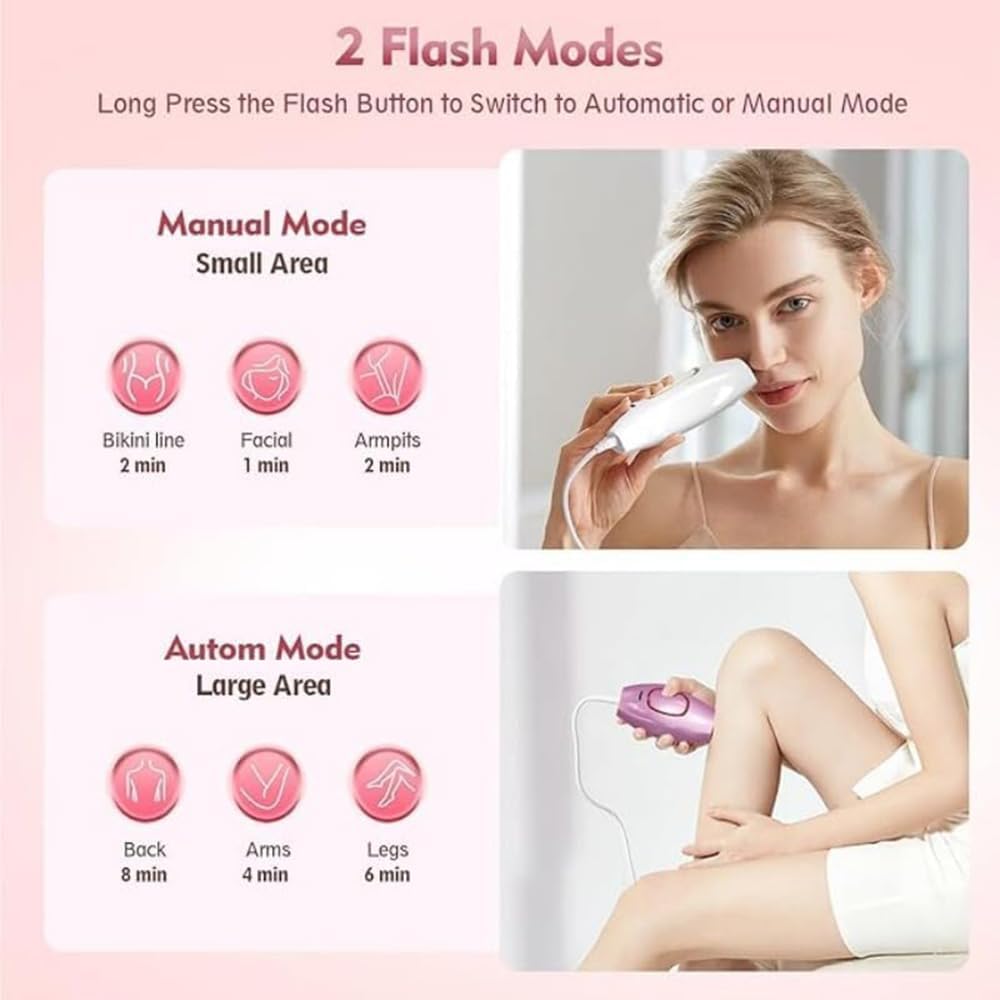
Immaġni: 2 Flash Modes. This image demonstrates the two flash modes: Manual Mode for small areas like bikini line, facial, and armpits, and Automatic Mode for large areas such as back, arms, and legs, along with estimated treatment durations for each.

Immaġni: Using Steps. A visual guide showing the six steps for using the IPL epilator: 1. Remove and clean surface hair, 2. Connect power cord, 3. Wear goggles, 4. Press power button and adjust energy, 5. Place flash window vertically and press flash key, 6. Use skincare product to protect the skin.
6. Manutenzjoni
Proper maintenance ensures the longevity and performance of your Bloomy Luminology IPL Epilator:
- Wara Kull Użu: Itfi l-apparat u aqlah mill-iżbokk tad-dawl.
- Tindif: Keep the treatment window clean by gently wiping it with a soft, dry cloth. Do not use abrasive cleaners or immerse the device in water.
- Ħażna: Store the device in a dry environment, away from direct sunlight, to prolong its lifespan.
7 Issolvi l-problemi
Hawn huma soluzzjonijiet għal kwistjonijiet komuni li tista' tiltaqa' magħhom:
- Apparat mhux qed jixgħel: Kun żgur li l-adapter tal-enerġija huwa konness sew kemm mal-apparat kif ukoll ma' sokit elettriku li jaħdem.
- Ebda flash: Make sure the treatment window is in full and firm contact with your skin. The device has a skin contact sensor for safety. Check if the energy level is set.
- Skumdità waqt l-użu: Some users may experience a slight tingling or warmth, which is normal. If discomfort is too high, reduce the energy level. Ensure your skin is clean and dry.
- Uneven results: Ensure you are moving the device consistently and avoiding significant overlaps or missed spots.
Jekk tesperjenza problemi persistenti li mhumiex koperti hawn, jekk jogħġbok ikkuntattja l-appoġġ għall-klijenti.
8. Speċifikazzjonijiet
| Isem tal-Prodott | Photon Hair Removal Device |
| Materjal | ABS |
| Tip ta' Sors tad-Dawl | Dawl Pulsed Intens (IPL) |
| Medda tal-Enerġija | 1.5 – 3.9 J/cm² |
| Flash Window Dimensions | 33 x 10 mm² |
| Medda ta' Wavelength | 470-1100 nm |
| Ħajja tal-Flash | ≥ 500,000 flashes |
| Adapter | AC 100-240 V, DC 12 V/3 A |
| Piż tal-Prodott | 570 g |
| Dimensjonijiet tal-Prodott | 124 × 83 × 48.5 mm |
| Temperatura operattiva | 5 °C – 30 °C |
| Umdità Operattiva | 30 sa 60% umdità relattiva |
| Kuluri Disponibbli | White, Pink, Black |
9. Garanzija u Appoġġ
Specific warranty information was not provided in the product details. Please refer to the product packaging or the retailer's website for warranty terms and conditions.
For customer support, technical assistance, or any inquiries regarding your Bloomy Luminology IPL Epilator, please contact the manufacturer or your point of purchase.